


 – Easy Recipe for Summer")

Let’s be real—who doesn’t lose their mind over BBQ? Juicy ribs, charred chicken thighs… but let’s talk about the unsung hero of the grill: roasted eggplant. That creamy, garlicky, slightly smoky bite from the BBQ stall? Yeah, I used to think it was magic—until I nailed this home recipe. Now my friends beg me to make it every time we hang out, and my family? They hover by the oven like little food gremlins waiting for it to finish. Trust me, this isn’t your basic roasted veggie—it’s a flavor bomb. Let’s dive in!
Why This Garlic Roasted Eggplant Works (And Why You’ll Obsess Over It)
First off, the secret’s in the sauce. No sad, dry eggplant here—we’re layering garlic, peppers, and a umami-packed glaze that seeps into every crevice. And that “grid cut” trick? Game. Changer. It lets all the good stuff soak in, so every bite is creamy inside with a tiny charred edge outside. Plus, we steam it first to lock in moisture—no more rubbery eggplant disasters. Let’s get to the goods!
Ingredients You’ll Need (No Fancy Stuff, Promise)
Keep it simple—all these are at your local grocery store:
- 2 long eggplants (the skinny ones work best—they roast evenly!)
- 1 red bell pepper (for color and a little sweetness)
- 1 green bell pepper (adds a fresh crunch)
- 2 heads of garlic (yes, two—garlic lovers, rejoice!)
- ½ onion (yellow or white, whatever you have)
- 2 tbsp oyster sauce (umami king—don’t skip this)
- 3 tbsp light soy sauce (saltiness with depth)
- 2 tsp dark soy sauce (for that rich, caramel color)
- Pinch of salt (taste as you go!)
- 1 bunch cilantro (freshness overload)
- 1 bunch scallions (green parts for garnish, white parts if you want extra flavor)
- 4 bird’s eye chilies (optional, but adds a fiery kick—skip if you hate spice)
- Enough cooking oil (for sautéing the garlic and veggies)
Step-by-Step Instructions (Let’s Make This Magic)
1. Prep Your Ingredients (The “Don’t Skip Washing” Step)

First things first: wash everything. Eggplants can have weird dirt in their crevices, peppers get pesticide residue—just give ’em a good rinse under cold water. Pat ’em dry with a paper towel so they don’t get slippery when you cut ’em.
2. Chop Chop Chop (Crank Up the Music—This Is Fun)

Time to channel your inner chef:
- Dice the red and green bell peppers into tiny bits (think pea-sized—they’ll cook faster).
- Dice the onion too (smaller = more flavor in every bite).
- Slice the bird’s eye chilies (remove the seeds if you want less heat!).
- Mince the garlic until it’s super fine (pro tip: use a garlic press if you hate chopping).
- Chop the cilantro and scallions into ½-inch pieces—save these for the end!
3. Make the Garlicky Sauce (Your Kitchen Will Smell Amazing)

Heat a pan over medium heat, pour in a splash of cooking oil. Toss in the minced garlic and sauté for 30 seconds—don’t burn it! Burnt garlic tastes bitter, and we don’t want that.

Add the diced onion next and cook for 1 minute until it’s soft and translucent. Now turn off the heat (important—we don’t want the sauce to get too thick!). Stir in the oyster sauce, light soy sauce, and dark soy sauce. Add a pinch of salt, then mix everything until it’s smooth.

Toss in the bell peppers and chilies (if using) and stir again. Taste it—should be saltier than your usual dish. Why? Because the eggplant will soak up the flavor, so if it’s not salty enough now, the final dish will be bland. Trust me on this!
4. Prep the Eggplant (Grid Cut = Max Flavor)

Cut the eggplants in half lengthwise. Now, here’s the trick: make diagonal cuts across the flesh, but don’t cut all the way through the skin. It’s like making squid flowers—this lets the sauce seep in and the eggplant cook evenly.

Steam the eggplants for 10 minutes. Wait, steam? Yes! This softens the inside so it’s creamy, not dry. No more chewing on rubbery eggplant—promise.
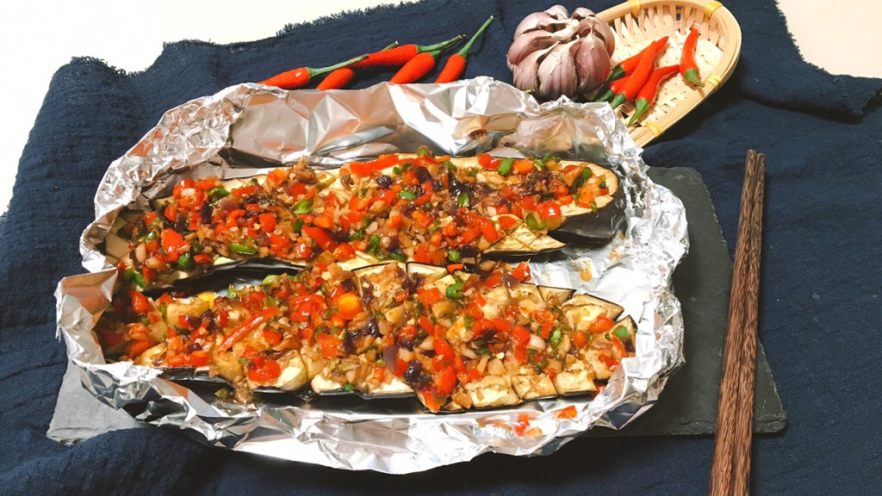
5. Assemble and Roast (Oven Time = Countdown to Deliciousness)

Preheat your oven to 375°F (190°C) while the eggplants steam. Line a baking sheet with foil (less cleanup = more time eating!). Place the steamed eggplants on the sheet, then spoon that garlicky sauce all over them. Make sure to stuff some sauce into the grid cuts—every nook needs love. Pour any leftover sauce on top too.

Pop it in the oven for 20 minutes. The edges will get a little charred, and the sauce will bubble—your kitchen will smell like a BBQ joint, I swear.
6. Garnish and Serve (Hot = Best)

Take the eggplant out of the oven, sprinkle the chopped cilantro and scallions on top. That fresh green pop? It cuts through the richness of the garlic and makes every bite brighter.

And… done! Grab a fork (or your hands—no judgment) and dig in while it’s hot. The inside is creamy, the outside has a tiny crunch, and every bite is loaded with garlic, peppers, and umami. Yum.
Pro Tips to Make This Even Better
- Long eggplants are key: they’re less bitter and have thinner skin than round ones.
- Adjust the sauce to your taste: if you love garlic, add an extra head. Hate spice? Skip the chilies. No oyster sauce? Use hoisin instead (it’s sweeter, but still delicious).
- Don’t skip the steam step: it’s the secret to creamy eggplant. Dry eggplant = sad eggplant.
- Serve it with rice: trust me, you’ll want to sop up every last drop of sauce with something.
Final Thoughts
This garlic roasted eggplant isn’t just a side—it’s a star. It’s easy, cheap, and tastes better than any BBQ stall version I’ve had. Next time you’re craving BBQ but don’t want to fire up the grill, whip this up. Your friends and family will be begging for seconds (and thirds). Enjoy!


")
 at Home – Easy Recipe with Step-by-Step Photos")
")
")
")
