

 & Red Dates Pork Bone Soup Recipe | Nourishing Chinese Wellness Dish")


Introduction: Why This Broccoli & Chicken Stir-Fry Deserves a Spot in Your Weekly Rotation
Let me just start by saying: if you’re tired of sad, flavorless “diet meals” that taste like cardboard, this broccoli and chicken stir-fry is about to change your life. Picture this: tender, juicy chicken that’s not dry or rubbery, bright green broccoli florets with just the right crunch, and a glossy sauce that’s packed with umami goodness. And get this – it’s actually good for you! No more “I’ll start eating healthy tomorrow” vibes here. We’re making this tonight, and you’re gonna love every bite.
Trust me, I’ve tried my fair share of “low-fat, low-cal” recipes that left me hangry and disappointed. But this one? It’s the kind of meal that makes you want to do a happy dance after the first forkful. It’s quick (15 minutes max!), satisfying, and – the best part – it won’t leave you feeling guilty. Whether you’re trying to shed a few pounds, just want a nutritious weeknight dinner, or need a fast meal for busy days, this stir-fry is your new BFF.
No, seriously. Imagine coming home from work, hungry and stressed, and within minutes having a plate of food that’s both delicious and good for you. That’s this recipe in a nutshell. Let’s dive in!
Ingredients: What You’ll Need (No Fancy Stuff Required!)
First, let’s list out the stars of the show. Don’t worry, these are all pantry staples or easy-to-find veggies:
- Chicken Breast: 150g (that’s about 5.3 ounces – perfect for a single serving. You can also use pre-marinated chicken if you’re short on time, but fresh is better for flavor!)
- Broccoli: 1/2 head (about 2 cups of florets). Fresh is key here – avoid wilted broccoli, it’ll make your dish soggy.
- Carrot: 1/2 medium carrot (peeled and cut into small chunks. The orange color adds a nice pop and sweetness.)
- Garlic: 2 cloves (minced – don’t skip this! It’s the flavor backbone.)
- Seasonings: Light soy sauce (1.5 tbsp), oyster sauce (1 tbsp), salt (to taste), black pepper (pinch), cornstarch (1 tsp), and cooking oil (as needed). Optional extras: a pinch of sugar or a squeeze of lemon for extra brightness, but we’ll keep it simple for now.
Pro tip: Measure everything out first! Nothing kills the vibe like realizing you’re out of garlic mid-stir-fry. Trust me, I’ve been there.
Step-by-Step: How to Make This Stir-Fry (No Failures, I Promise!)
Okay, let’s get cooking! This process is easier than you think, and the result is 10/10. Let’s break it down step by step.

Step 1: Prep All Your Ingredients (This Saves So Much Time!)
Before you start cooking, lay out all your ingredients. Wash the broccoli thoroughly and break it into small florets. Peel the carrot and cut it into chunks (about 1/2 inch). Mince the garlic – you want it fine, but not so fine it’s a paste. Pat the chicken breast dry with a paper towel (this helps it brown better) and cut it into 1-inch cubes. This is the “zen moment” of cooking – prepping makes everything flow later!

Step 2: Marinate the Chicken for Tender Juiciness
Here’s a secret to keeping chicken breast from drying out: a quick marinade! In a bowl, mix the chicken cubes with a pinch of salt, a grind of black pepper, 1/2 tbsp light soy sauce, and 1 tsp cornstarch. Rub it all together and let it sit for 15 minutes. The cornstarch acts like a tiny moisture trap, so your chicken stays tender instead of turning into a rubber band. While the chicken marinates, you can prep the veggies – multitasking at its finest!

Step 3: Prep the Veggies (Garlic, Carrot, and Broccoli)
Now, mince those garlic cloves (trust me, you’ll smell the garlicky goodness from the street!). If you’re not a garlic fan, maybe use 1 clove instead, but why would you? Cut the carrot into small chunks – they’ll cook faster and add a sweet contrast. For the broccoli, break it into florets and rinse them under cold water to get rid of any dirt. Pat the broccoli dry with a paper towel (we’ll use this moisture-free state later – wet veggies make the pan steam, not sizzle!).

Step 4: Blanch the Carrot (Quick Heat for Even Cooking)
Bring a small pot of water to a boil. Add the carrot chunks and let them boil for 2 minutes. Why blanch? Because it softens the carrot just enough so it cooks evenly with the chicken without turning mushy. If you’re short on time, you can skip this, but the carrot might be a bit crunchy. For extra texture, leave it in for 2 minutes max. Set a timer – you don’t want soggy veggies!

Step 5: Blanch the Broccoli (Critical for That Crisp Texture!)
After the carrot has cooked for 2 minutes, drop in the broccoli florets. Boil for just 1 minute – that’s all! Overcooking broccoli is a crime against nature. It’ll turn from vibrant green to a sad olive color and lose all that satisfying crunch. I speak from experience: I once left broccoli in for 3 minutes and had a mushy mess. Not worth it. After 1 minute, drain the broccoli too.

Step 6: Drain and Prep the Veggies for the Pan
Now, drain both the carrot and broccoli in a colander. Gently shake them to remove excess water – the drier they are, the better they’ll brown and crisp up in the pan. Set them aside and pat yourself on the back: you’re halfway there!

Step 7: Sizzle the Garlic in Oil (Aromatic Magic!)
Heat a tablespoon of cooking oil in a large pan or wok over medium-high heat. Once the oil is shimmering (but not smoking!), add the minced garlic. Listen for that “pop” – that’s the garlic waking up and releasing its magic. Stir it for 10-15 seconds until fragrant. If it starts to turn golden, remove it – garlic burns fast, and burnt garlic is bitter. Trust me, you’ll smell it if it’s burning! (I’ve done this… twice.)

Step 8: Cook the Marinated Chicken (First, Let’s Brown It!
Now, add the marinated chicken breast to the pan. Push it around so it’s spread out – you want even browning. Stir-fry it for 3-4 minutes, turning occasionally, until it’s white and opaque throughout. The chicken is done when it’s no longer pink inside – no more raw juices! If you cut a piece open, it should be white all the way through. This step is crucial for that “seared” flavor – not cooking it long enough leaves it bland, cooking too long makes it dry.

Step 9: Add the Veggies Back in (The Color Explosion!)
Once the chicken is cooked, add the drained carrot and broccoli to the pan. Stir everything together so they’re coated in the chicken juices. The veggies will start to sizzle – that’s your cue to go “YES, this is working!” Now, toss them around for 2-3 minutes until everything is heated through. The broccoli should still be bright green and slightly crisp – you can tell by poking a floret with a fork. If it’s soft, you overcooked it. Adjust time as needed!

Step 10: Pour on the Sauce (The Umami Secret!)
Now, it’s time for the magic sauce. Add the light soy sauce (1.5 tbsp) and oyster sauce (1 tbsp) to the pan. Stir everything together – the sauce should coat all the ingredients nicely. Taste it now! You might need a pinch more salt, so add a tiny bit at a time. Remember, soy sauce is salty, so start with less than you think. Once it tastes good to you, you’re golden.

Step 11: Finish with a Little Extra Flair (Optional, But Nice!)
For that final pop, you can add black pepper (a good grind!), a dash of sugar (to balance the salt), or a squeeze of lemon juice. I usually just stick with salt and pepper, but feel free to get creative! Stir everything one more time, and you’re ready to serve.

Step 12: Serve & Enjoy (You Did It!)
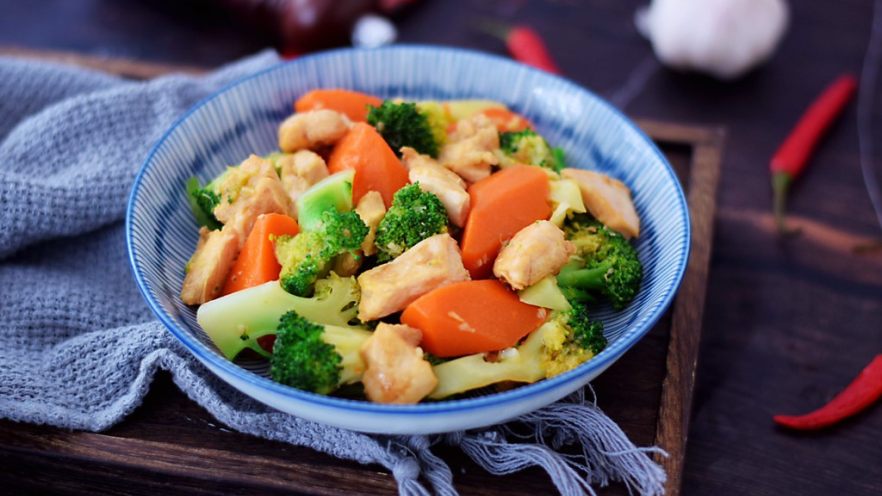
Look at that! A beautiful, golden stir-fry with tender chicken, bright green broccoli, and sweet carrots. Serve it hot over rice, with noodles, or just by itself – it’s that versatile. Trust me, you’ll want to take a photo for Instagram before eating it (pro tip: take a close-up of the sauce glistening on the chicken). I’ve had this for lunch the next day too – it’s just as good cold!

Pro Tips: Make This Stir-Fry Even Better (From My Kitchen Experiments)
Let’s be real – even the best recipes have room for tweaks. Here are my personal hacks to take this dish to the next level:
- Chicken Tenderizing Hack: For extra juiciness, add a splash of yogurt to the marinade (instead of cornstarch). It keeps the chicken super tender, but cornstarch works too. Both are game-changers for not dry chicken!
- Broccoli Survival Guide: If you don’t blanch the broccoli, stir-fry it directly with the chicken. It’ll take 5-6 minutes total, but you need to stir it constantly. This method keeps it more “al dente” but requires more attention. Either way, it’s delicious!
- Batch Cooking: Double the recipe and store it in a container for lunch. Reheat it in the microwave for 2 minutes – it still tastes fresh! Perfect for meal prepping lazy people like me.
- Spice It Up: Add red pepper flakes, a dash of chili oil, or even a pinch of cumin for a spicy kick. I once added a handful of cashews – that’s a sweet-savory combo I’ll never go back from! (Optional, but highly recommended.)
Why This Dish Is a Healthy Win (For Your Body & Mind)
Let’s not ignore the “healthy” part! This broccoli and chicken stir-fry is basically a nutrient-packed hug. Here’s why you should feel good about eating it:
- High Protein: Chicken breast is lean protein, which keeps you full for hours and helps build muscle. 150g gives you about 30g of protein – that’s a good chunk of your daily needs!
- Low Calorie: This entire stir-fry is around 250-300 calories – way less than takeout! You can enjoy seconds without guilt (I’ve done that… maybe once or twice.)
- Vitamin-Rich Veggies: Broccoli is loaded with vitamin C, K, and fiber. Carrots give beta-carotene (hello, eye health!). Your body will thank you for this green goodness.
- Quick & Easy: 15 minutes from start to finish! Perfect for busy weeknights when you don’t want to spend hours cooking. No sad instant noodles here!
Final Verdict: You Need This Recipe in Your Life
Okay, let’s wrap this up. This broccoli and chicken stir-fry isn’t just a meal – it’s a lifestyle upgrade. It’s healthy, fast, and tastes like a million bucks. Whether you’re trying to eat better, need a quick dinner, or just want something delicious that won’t derail your goals, this is it.
So, what are you waiting for? Grab your ingredients, turn on some music, and make this tonight. Trust me, you’ll be making it weekly. And if you do, tag me – I’d love to see your version! Happy cooking, and remember: eating healthy doesn’t have to be boring. In fact, it can be super exciting!


")


 Recipe: A Light Twist on a Classic Dish")

