
Introduction
Mid-Autumn Festival is just around the corner, and let’s be real—mooncakes can be a mixed bag. But these custard snow skin mooncakes? They’re the game-changer! I’ve been baking mooncakes for years, and even my pickiest family member is obsessed now. Why? Because they’re soft, chewy, and the milky custard filling is so creamy. Plus, the “snow white” ice skin looks like it belongs in a fairy tale—hello, Jade Rabbit vibes from the Moon Palace! And the best part? They’re way easier to make than you think. Let’s dive into how to make these at home!
Ingredients You’ll Need
Let’s split this into two parts: the dreamy snow skin dough and the silky custard filling. No exotic ingredients needed—just pantry staples!
Snow Skin Dough Ingredients
- 50g glutinous rice flour (sticky rice flour)
- 50g rice flour (regular rice flour)
- 30g cornstarch (cornflour)
- 50g powdered sugar (icing sugar)
- 230ml whole milk (or your favorite milk)
- 30ml corn oil (or vegetable oil)
- 30g condensed milk (sweetened condensed milk)
Custard Filling Ingredients
- 100g unsalted butter (softened at room temp)
- 65g granulated sugar
- 4 large eggs
- 80g milk powder
- 40g cornstarch (cornflour)
- Water (for steaming the filling)
Dusting Powder (Gao Fen)
- 50g glutinous rice flour (to coat the mooncakes)
Step-by-Step Guide: Make the Magic Happen
Let’s break this down into easy, bite-sized steps. Follow along, and you’ll have mooncakes worth bragging about!
Step 1: Prep the Snow Skin Dough

First, grab all the snow skin dry ingredients: glutinous rice flour, rice flour, cornstarch, and powdered sugar. Dump them into a big bowl and stir like you’re mixing a cake batter—until everything’s evenly combined. No lumps allowed here, okay? Smooth base = perfect texture later!

Next, add the milk, condensed milk, and corn oil. Whisk everything together until the dry ingredients dissolve completely. It should look a bit runny, but that’s normal—this is the “dough” before steaming!

Cover the bowl with a lid (poke a few holes for steam) and steam over boiling water for 25 minutes. While that’s cooking, let’s make the dusting powder—we don’t want to waste time!
Step 2: Make the Dusting Powder (Gao Fen)

Take the 50g glutinous rice flour and toss it into a dry, non-stick pan over low heat. Stir constantly for 5–7 minutes until it turns slightly yellow (like golden sand). Transfer it to a plate to cool. This powder keeps the mooncakes from sticking to your hands and mold—so crucial!
Step 3: Cool and Knead the Snow Skin

When the 25 minutes are up, use a spatula to scoop the steamed dough onto a clean surface. Let it cool until it’s warm but not hot—about 10 minutes. Then, knead the dough gently with your hands for 2–3 minutes until it’s smooth and all the oil is absorbed. It should feel soft, not dry or sticky—like a well-loved cloud!

Wrap the dough tightly in plastic wrap and let it rest at room temp for 30 minutes. Patience, grasshopper—this relaxes the dough and makes shaping easier!
Step 4: Whip Up the Creamy Custard Filling

Now, the filling! Start by melting butter and sugar in a pot over low heat. Beat with an electric mixer (or a whisk if you’re strong!) until pale and fluffy—about 3 minutes. It’ll go from solid to airy, like magic dust!

Add the eggs one at a time, beating after each. The 4th egg might make it look a little separated—don’t panic! That’s normal. Keep mixing until it’s smooth again.

Stir in the milk powder and cornstarch. Now, we’re ready to steam this goodness!

Pour a splash of water into a small pot (just enough to steam, not boil). Place a heatproof bowl on top, add the batter, and stir constantly while steaming for 2 minutes. Then cover and steam another 5 minutes.

After 5 minutes, stir again to prevent clumping, then steam uncovered for 5 more minutes. Keep stirring until the filling thickens and looks glossy—it’ll firm up into a creamy, not-too-sweet treat!

Transfer the filling to a plate, cool to room temp, then fridge for 30 minutes to firm up. Now it’s ready to roll into balls!
Step 5: Assemble Your Mooncakes

Divide the cooled snow skin dough into 17 equal pieces (25g each). Roll each into a smooth ball—no cracks allowed! (Pro tip: Use a scale for precision.)

Do the same with the custard filling: 17 equal balls (25g each). Roll them smooth—this ensures even filling distribution!

Take a dough ball, flatten it into a circle (thicker in the center, thinner on the edges), and place a custard ball in the middle. Pinch the edges closed, then roll between your palms to make a perfect sphere.

Dip the ball into the cooled Gao Fen powder, roll to coat, then press into a mooncake mold (any design works!). Tap gently to release—you’re done!

Place the mooncakes on a plate and chill in the fridge for at least 4 hours (or overnight). The longer they chill, the softer the skin gets—so worth the wait!
Pro Tips for Success
Here’s what I learned the hard way—save yourself the mess with these hacks!
- Steaming the dough: Keep the lid on during the 25-minute steam to avoid cracking! Open only at the end.
- Butter softness: Let butter sit out for 1–2 hours (or microwave for 10 seconds) to avoid grainy filling.
- Don’t over-knead: A gentle knead = soft skin. Overworking = tough texture.
- Stir the filling: Constant stirring while steaming = no burnt bottom, no lumps!
Final Bite: Why These Mooncakes Are a Must-Try
These homemade custard snow skin mooncakes are next-level. The chewy, “snow white” exterior with the silky custard filling is pure joy—especially after chilling. They’re perfect for Mid-Autumn Festival, or even as a sweet surprise for loved ones. I made these for my family, and now they’re my biggest cheerleaders! If you’re new to mooncakes, start here—you’ll never go back to store-bought.

Look at those beautiful, glossy mooncakes! They’re too pretty to eat… almost!

See that soft, pillowy skin? It’s like biting into a cloud—with custard inside!

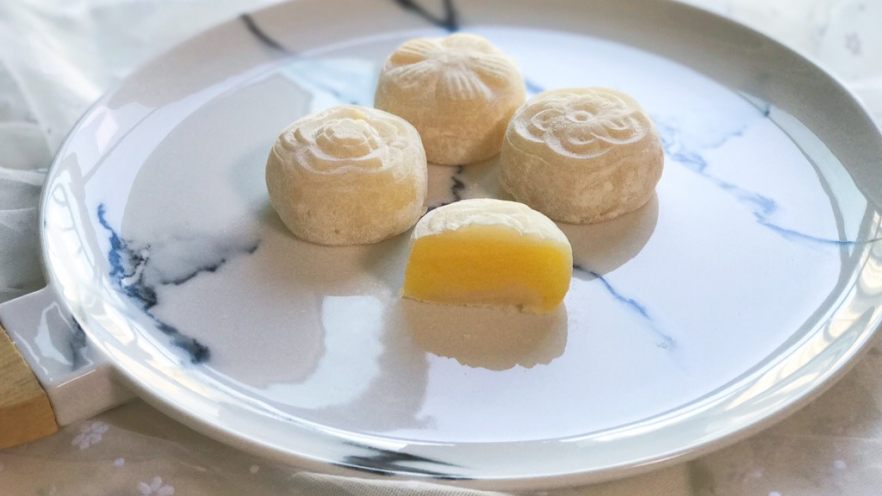
Cut one open—creamy custard oozing out! Chef’s kiss.

A platter of these beauties—ideal for sharing with friends, family, or even just you. Enjoy!
snow skin mooncakes, custard snow skin mooncakes, homemade mooncakes, mid-autumn festival dessert, easy mooncake recipe, traditional Chinese dessert, steamed mooncakes, glutinous rice flour mooncakes, creamy custard filling, best mooncake recipe