
Why You Need This Creamy Pumpkin Pie in Your Life
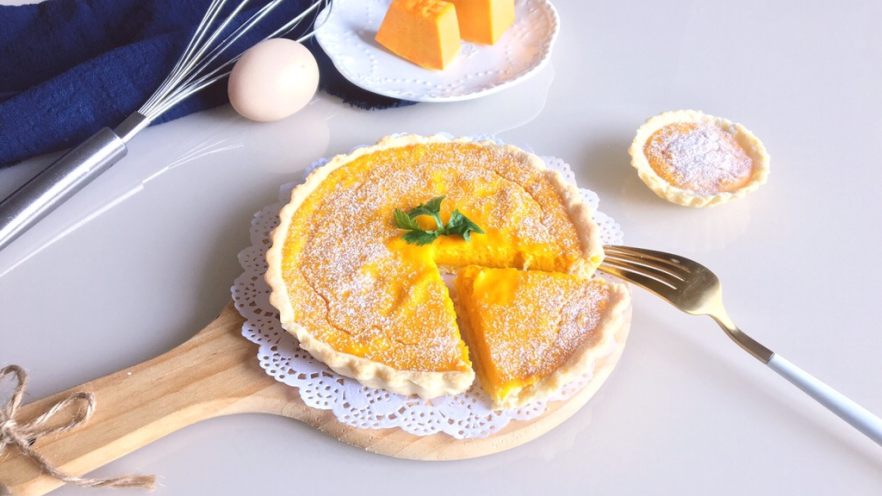
Let’s be real—pumpkin pie gets a bad rap sometimes for being too dense or lacking flavor. But this creamy pumpkin pie? It’s a game-changer. Imagine a flaky, buttery crust holding a smooth, velvety filling that tastes like a hug in a pie dish. The best part? It’s not just for Thanksgiving! This recipe is perfect for lazy weekend afternoons, coffee dates with friends, or even a sweet post-dinner treat. Trust me, once you try it, you’ll be making it on repeat.
Ingredients You’ll Need
First things first: let’s gather your ingredients. I’ve broken them down into crust and filling so you don’t get overwhelmed. No fancy gadgets required—just basic kitchen stuff!
For the Pie Crust
- 100g all-purpose flour (yes, all-purpose works here—no need for fancy pastry flour!)
- 40g unsalted butter (softened, but not melted—important for that flaky texture)
- 20g granulated sugar (just a touch to sweeten the crust)
- 25g milk (any type works, but whole milk adds extra richness)
For the Creamy Filling
- 200g pumpkin puree (homemade is best, but canned works too—just make sure it’s plain pumpkin, not pumpkin pie mix!)
- 40g heavy cream (the secret to that creamy texture—don’t skip this!)
- 20g plain yogurt (Greek or regular, it adds a nice tang)
- 1 large egg (room temperature is ideal for mixing)
- 15g granulated sugar (adjust if you like it sweeter—no judgment)
- 10g all-purpose flour (to thicken the filling)
- A pinch of salt (brings out the flavors—trust me)
- Optional: a sprinkle of cinnamon or nutmeg for extra warmth
Step-by-Step Instructions
Okay, let’s dive into the fun part—making the pie! I’ll walk you through each step with tips to make it foolproof. Let’s start with the filling because it needs a minute to cool.
1. Make the Creamy Pumpkin Filling
First, get that pumpkin puree ready. If you’re using fresh pumpkin, peel it, slice it into chunks, and steam for 20 minutes until it’s fork-tender. If you’re using canned, skip this step—lucky you!

Once your pumpkin is soft, transfer it to a blender or food processor. Add the heavy cream, yogurt, and sugar. Blend until it’s super smooth—no lumps allowed! This is where the creaminess starts.

Pour the blended mixture into a bowl. Crack in the egg and whisk it in until everything is combined. Don’t overmix—just until the egg is fully incorporated.

Now, add the flour. Sift it first if you want extra smoothness (I usually do, but if you’re in a hurry, skip it—just whisk well!). Whisk until there are no dry spots left. The filling should be thick enough to hold a line when you drag a spoon through it.


2. Prepare the Pie Crust
Now for the crust—my favorite part (shhh, don’t tell the filling!). Start by sifting the flour into a bowl. Sifting helps make the crust lighter, but if you don’t have a sifter, just whisk it a few times.
Cut the softened butter into small cubes and add it to the flour. Use your fingers to rub the butter into the flour until it looks like coarse crumbs. This is called “cutting in” the butter—don’t overdo it! You want some small butter pieces left because they’ll melt in the oven and make the crust flaky.


Add the milk and sugar to the crumb mixture. Gently knead it into a dough. Don’t over-knead—just until it comes together. If it’s too dry, add a tiny bit more milk. If it’s too sticky, add a sprinkle of flour.
Wrap the dough in plastic wrap and refrigerate for 20 minutes. This helps the gluten relax and makes rolling easier.

3. Assemble and Bake the Pie
Preheat your oven to 180°C (350°F). Take the dough out of the fridge and roll it out on a floured surface to about 1/8 inch thick. Carefully transfer it to a 6-inch pie dish (or any size you have—adjust baking time if needed).

Trim the excess dough from the edges and crimp them with your fingers or a fork for a pretty look. Prick the bottom of the crust with a fork (this prevents it from puffing up).

Blind bake the crust first: line it with parchment paper, fill with pie weights or dried beans, and bake for 10 minutes. This stops the crust from getting soggy.

Take the crust out of the oven, remove the weights and parchment. Pour the pumpkin filling into the crust. Smooth the top with a spatula.
Bake for 20-25 minutes at 170°C (340°F). The edges should be set, but the center might still be a little jiggly—that’s okay, it will set as it cools.

Let the pie cool completely on a wire rack. If you can wait, refrigerate it for an hour or two for extra firmness. Then, slice and enjoy!
Pro Tips for Perfect Pumpkin Pie
- Use cold butter for the crust: Cold butter creates flaky layers because it melts in the oven, leaving small air pockets.
- Don’t overmix the filling: Overmixing can make the filling tough. Mix just until everything is combined.
- Blind bake the crust: This is non-negotiable if you want a crispy bottom. No one likes a soggy crust!
- Let it cool: I know it’s hard, but cutting the pie while it’s hot will make it fall apart. Be patient—your taste buds will thank you.
Final Thoughts
This creamy pumpkin pie is so easy to make, even if you’re a beginner baker. The combination of the flaky crust and smooth filling is unbeatable. It’s perfect for any occasion, and it’s sure to impress your friends and family. So grab your ingredients, preheat that oven, and let’s make some pie! You won’t regret it.