


Hey there, cookie lovers! 🍪 If you’re a fan of matcha (hello, green tea magic!) and crave that perfect buttery, slightly sweet treat that’s totally homemade, you’re in the right place. Today, I’m sharing a super easy matcha cookie recipe that’s basically foolproof—no fancy tools, no weird additives, just good old-fashioned butter, sugar, and that vibrant green matcha powder we all adore.
Let’s Talk About Why These Homemade Matcha Cookies Are a Must-Try
First off, let’s get real: store-bought cookies can sometimes feel… mehh, right? But these? They’re next-level. The matcha brings a subtle, earthy flavor that’s not overpowering—just enough to make you go, “Oh, this is so much better than I expected!” And since we’re making them from scratch, we skip those artificial preservatives and weird fillers. It’s just pure, simple ingredients that taste like love. Plus, once you bite into that first warm cookie, you’ll be hooked. Trust me, I’ve tested this recipe a dozen times, and my friends/family never believe they’re “homemade” until I tell them.
Let’s Gather the Ingredients (No Fancy Stuff Needed!)
No need to hunt down rare ingredients here—everything you need is probably in your pantry or local grocery store. Let’s list them out with a little pro tip for each (because I’ve made the mistakes, so you don’t have to!):
- 100g All-Purpose Flour (or Low Gluten Flour): This is the base that holds the cookies together. Low gluten flour works best for that tender, melt-in-your-mouth texture, but all-purpose will do if that’s what you have.
- 65g Unsalted Butter: This is key! Softened butter is what makes the cookies fluffy and buttery. If it’s too hard, the dough will be lumpy; if it’s melted, they’ll spread too much. Aim for room temperature where it’s soft but not runny—about 65°F (18°C) is ideal.
- 20g Granulated Sugar + 30g Powdered Sugar: Why two sugars? The granulated sugar adds a little crunch and caramel sweetness, while powdered sugar helps with smoothness and melting into the batter. Together, they balance the matcha’s bitterness perfectly.
- 25g Egg Liquid: Just a little egg! It binds everything together and adds richness. Use a large egg, crack it into a small bowl, and whisk lightly before adding.
- 5g High-Quality Matcha Powder: Ah, the star of the show! Look for ceremonial grade or culinary grade matcha—avoid the cheap stuff with a grassy aftertaste. Make sure it’s fresh (check the expiration date!) and store it in an airtight container away from heat.
Step-by-Step: Baking Matcha Cookies Like a Pro
Okay, let’s get our hands dirty (but not literally—we’ll keep it clean!). Here’s how to turn these ingredients into cookies you’ll want to eat for breakfast, lunch, and dinner… er, maybe just save a few for later. 😉
1. Prep All Your Ingredients First
Before you start mixing, make sure everything’s ready to go. That way, you don’t end up scrambling halfway through.
- Soften the butter: Take it out of the fridge 30–45 minutes before starting. If you’re in a hurry, let it sit on the counter, or pop it in a bowl with warm water for 5 minutes (but don’t let it melt!).
- Measure the other ingredients: Weigh them if you can (for precision!), but if not, just use standard measuring cups/spoons.
- Line your baking sheets: Parchment paper is a must to prevent sticking. If you don’t have parchment, use a silicone mat or grease the sheet with butter (but parchment is easier for cleanup!).

2. Soften the Butter Until Its “Finger-Tested” Ready
Your butter should be soft enough that when you press your finger into it, it leaves a clear indent. If it’s still hard, give it another 10 minutes on the counter. If it’s too soft (like melted butter), put it back in the fridge for 5 minutes to firm up a bit. This step is crucial—soft butter mixes evenly with sugar and creates that light, airy texture we love.

3. Mix the Sugars into the Butter (This Prevents Splattering!)
Add both sugars (20g granulated + 30g powdered) to the softened butter. Use a hand mixer (or a wooden spoon if you’re old-school) to mix them together. Pro tip: Start with low speed to avoid sugar flying everywhere! Once they’re combined, the butter will look lighter and slightly fluffy—like a pale yellow cloud.

4. Beat the Butter Until It’s Fluffy and Pale
Now, turn up the mixer speed to medium and beat the butter-sugar mixture for 2–3 minutes. It should go from that “yellowish” color to a pale, creamy white, and triple in volume. If it’s not fluffy enough, beat a bit longer—this is where the air gets trapped, making the cookies rise and stay tender.

5. Add Egg Liquid Gradually (One Spoonful at a Time!)
Pour the 25g egg liquid into a small bowl and whisk gently. Then, add it to the butter-sugar mixture one tablespoon at a time. After each addition, mix on low speed for 30 seconds until fully incorporated. If you add all the egg at once, the batter might curdle (no one wants lumpy cookies!). Trust me, patience here = better results.

6. Scrape Down the Sides (No Lumps Allowed!)
After adding all the egg, stop the mixer and use a spatula to scrape down the sides of the bowl. This ensures every bit of batter gets mixed evenly. You don’t want to miss any egg pockets—they’ll cause uneven cookies!

7. Sift the Flour and Matcha (This Keeps It Smooth!)
Now, take the 100g flour and 5g matcha powder and mix them in a separate bowl. Sift them together (this removes lumps and aerates the dry ingredients). Sifting is super important—no one likes gritty cookies! If you don’t have a sieve, just whisk them really well with a fork.

8. Fold the Dry Ingredients Into the Batter
Pour the sifted flour and matcha into the wet batter. Use a spatula to fold them in gently—don’t overmix! Overmixing makes the cookies tough. Just keep folding until there are no more white streaks. The batter should be thick, smooth, and slightly sticky (like playdough, but green!).

9. Transfer the Batter to a Piping Bag (Or Use a Spoon!)
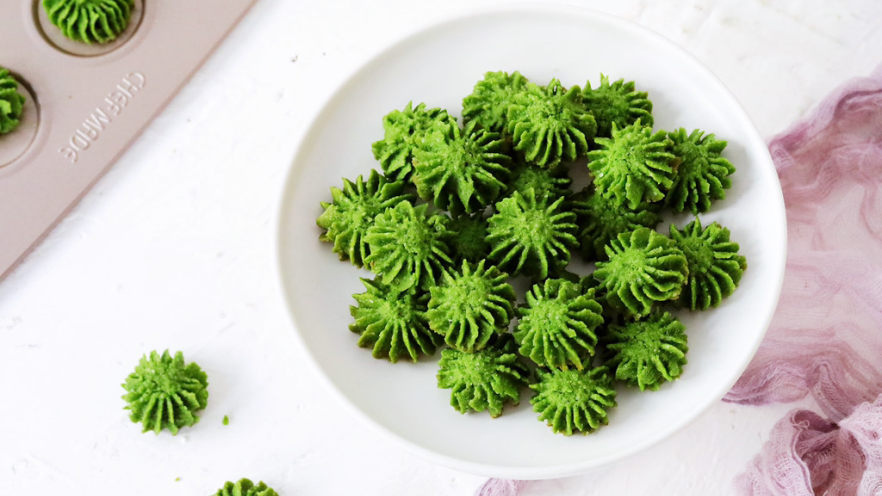
If you have a piping bag, this is where the magic happens for perfect, uniform cookies. If not, you can just spoon the batter onto the baking sheet. Let’s use the piping bag method for that Instagram-worthy look!
- Attach a cookie tip (I used a 18-tooth star tip, size 6, from my kitchen set) to the piping bag.
- Fill the bag with the batter, twisting the top to close.
- Pipe the batter onto the prepared baking sheets, leaving 2 inches between each cookie (they’ll spread a bit!).

10. Bake at 150°C (300°F) for 15–20 Minutes
Preheat your oven to 150°C (300°F) about 10 minutes before baking. Place the sheets in the middle rack (not too high, not too low). The cookies will take 15–20 minutes—watch them carefully in the last 5 minutes to prevent burning. They should look slightly golden on top, with a matte finish (not shiny—shiny means they’re underdone!).

11. Let Them Cool Completely
Take the cookies out of the oven and let them sit on the baking sheet for 5 minutes—they’ll continue cooking and firm up. Then transfer them to a wire rack to cool completely. Do not eat them warm! Wait, actually… okay, maybe a tiny bite is fine. But let them cool fully for the best texture—they’ll hold their shape better and taste even sweeter.

12. Final Shots: Admire Your Matcha Cookies!
Once they’re cool, take a bite (I won’t judge if you eat the whole batch in one sitting…). They should be buttery, slightly crisp on the edges, and chewy in the center with that lovely green matcha flavor. The color is vibrant, the texture is perfect, and you’ll feel like a baking hero!

Pro Tips to Avoid Common Mistakes
- Butter temperature: As we said, soft but not melted! If it’s too cold, the sugar won’t mix evenly. If too hot, the cookies spread too much.
- Matcha quality: Use high-quality matcha for that bright green color and authentic flavor. Cheaper matcha can taste bitter.
- Oven temperature: Every oven is different! If yours runs hot, lower it by 10°C (18°F). If it runs cold, check with an oven thermometer.
- Storing: Keep cookies in an airtight container at room temperature for up to 5 days. They’ll stay fresh and chewy longer if stored in the fridge, but let them come to room temp before eating.

Why You’ll Fall in Love With This Recipe
These matcha cookies aren’t just “good”—they’re special. Whether you’re sharing them with friends, dipping them in tea, or packing them for lunch, they’re the ultimate feel-good treat. Plus, making them at home means you control every ingredient—no weird stuff, just pure, simple joy.
I’ve tested this recipe with kids, beginners, and even my skeptical brother, and they all agree: homemade matcha cookies are the best. So what are you waiting for? Grab your ingredients, follow these steps, and let me know how they turn out in the comments!

[Final cookie close-up: golden edges, vibrant green, with a bite taken out—yummy!]

[Another angle: cookies arranged in a cute line, ready to serve!]


")
")
![French Savory Tart [Magic Cake] – Sugar-Free, Layered Delight (Forced My Friend’s Recipe to Obsession!)](https://hearthsiderecipes.com/images/5214/5mit2exneu1.jpg "French Savory Tart [Magic Cake] – Sugar-Free, Layered Delight (Forced My Friend’s Recipe to Obsession!)")


 | Easy, Nutritious Recipe")
