
")


Why Decorative Butter Cookies Are My Go-To Baking Project
Let’s be real—nothing beats the smell of butter cookies baking in the oven. They’re the ultimate comfort treat: buttery, crumbly, and just sweet enough. But here’s the thing: basic butter cookies are great, but why stop there? With a few simple tricks—like switching up your piping tip or adding a dash of cocoa or matcha—you can turn those plain rounds into showstopping decorative butter cookies that look like they came from a fancy bakery. Trust me, I’ve spent way too many weekends testing this recipe (and eating the “failed” batches), so I’ve got all the hacks to make yours perfect.
Ingredients You’ll Need for Decorative Butter Cookies
First things first: let’s gather your ingredients. No weird fancy stuff here—just pantry staples you probably already have. I’ve measured these out exactly so don’t skip the scale (eyeing it might lead to flat cookies… ask me how I know).
- 85g unsalted butter (the real stuff—no margarine, please!)
- 1g fine salt (it balances the sweetness, I promise)
- 50g powdered sugar (not granulated—this keeps the texture smooth)
- 1 drop vanilla extract (or more if you’re a vanilla fanatic)
- 45g egg liquid (just one egg, beaten—save the yolk if you want, but whole works too)
- 115g all-purpose flour (sifted! Sifted! Sifted!)
- 15g milk powder (adds that extra creamy flavor)
Step-by-Step Guide to Making Decorative Butter Cookies
1. Prep Your Butter (The Most Important Step!)

First, get your butter to room temperature. I’m talking soft enough to poke with your finger and leave a dent, but not melted into a puddle. If you’re impatient (guilty!), don’t microwave it—you’ll end up with oily mess. Instead, cut it into small cubes and let it sit on the counter for 30-60 minutes. Pro tip: In winter, pop it in the oven on the lowest “warm” setting for 5 minutes (set a timer—you’ll forget).
2. Beat the Butter (Low and Slow)
Grab your electric mixer (handheld works fine—no need for a stand mixer unless you’re making a ton). Pop the butter in a bowl and beat it on low speed just until it’s smooth and creamy. Don’t overbeat here—we’re not trying to make it fluffy yet.
3. Add Flavor Boosts (Salt, Vanilla, and Sugar)
Now toss in the salt (trust me, it makes the sweetness pop), a drop of vanilla extract (or two—no judgment), and the powdered sugar. Keep mixing on low until everything is combined. You don’t want any sugar lumps left—those will mess up your piping later.
4. Mix in the Egg (Slowly!)
Here’s where people go wrong: adding the egg all at once. If you do that, your mixture will curdle (gross). Instead, pour in half the egg liquid, beat on medium speed until it’s fully incorporated (no streaks!), then add the other half. Keep beating until the butter turns pale yellow and fluffy—this is the “light and airy” stage that makes your cookies crumbly.
5. Add Dry Ingredients (No Overmixing!)
Sift your flour and milk powder into the bowl (sifting prevents lumps—seriously, do it). Now use a spatula to fold everything together. Stop as soon as there are no more dry spots. If you mix too much, your cookies will be tough instead of tender. Oh, and now’s the time to preheat your oven to 170°C (340°F) on both top and bottom heat.
6. Prep Your Piping Bag (The Fun Part!)
For decorative butter cookies, you need a piping tip. I love the Wilton 2D tip—it makes those classic rosette shapes. Grab a disposable piping bag and slide the 2D tip into the end. If you don’t have a tip converter, just snip a small hole in the bag (big enough for the tip to fit through but not so big it falls out).
7. Fill the Piping Bag (No Mess Hack!)

Here’s a life-saver: stand the piping bag in a tall glass and fold the top over the rim. This way, you can scoop the cookie dough into the bag without getting it all over your hands. Once it’s full, squeeze out any air bubbles (hold the bag at the top and push the dough down gently). Air bubbles = messy piping and uneven cookies.
8. Pipe Your Cookie Shapes (Practice Makes Perfect!)
Line a baking sheet with parchment paper (no greasing needed). Now hold the piping bag at a 90-degree angle to the sheet, about 1cm above it. Squeeze the bag gently and move in a clockwise circle, then release and lift up. The tail should end in the middle—if it sticks out, just press it down with your finger (dip it in flour first so it doesn’t stick). Leave 2cm between each cookie—they’ll spread a little.
9. Try a Different Tip for Fun Shapes

Want to mix it up? Grab a Wilton 4B tip (it’s bigger and makes fluffy cloud shapes). Use a new piping bag (reusing the same one with a different tip is a pain—save yourself the hassle). Pipe the dough in small, tight circles while lifting the bag slightly—this makes those cute, puffy cookies. Just remember: thicker cookies take longer to bake!
10. Bake Until Golden (Don’t Burn Them!)
Pop the baking sheet into the middle rack of your preheated oven. The Wilton 2D cookies take about 12 minutes—keep an eye on them! They’re done when the edges are slightly golden. The 4B cookies are thicker, so they’ll need 14-16 minutes. Let them cool on the sheet for 5 minutes before moving them to a wire rack—they’re fragile when hot!
11. Add Extra Flavors (Cocoa, Matcha, or Cranberries!)
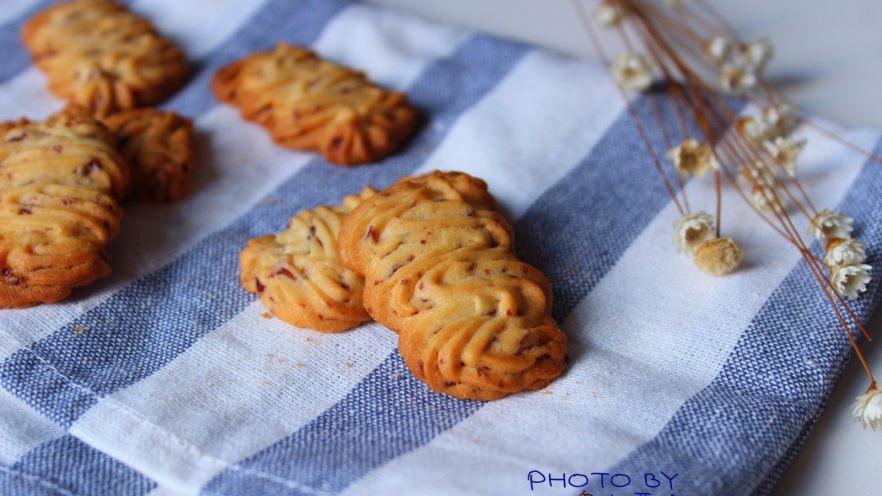
Want to switch up the flavor? Replace 10-15g of flour with cocoa powder for chocolate butter cookies, or matcha powder for green tea ones. You can also stir in a handful of dried cranberry bits (chopped small!) into the dough before piping—they add a tart kick that pairs perfectly with the buttery sweetness.
Pro Tips for Perfect Decorative Butter Cookies Every Time
I’ve made so many mistakes with these cookies (burnt edges, flat shapes, curdled batter—you name it). So here are my top tips to save you from frustration:
- Butter is key: It must be soft, not melted. If it’s too hard, your piping bag will burst (yes, this happened to me).
- Don’t skip sifting: Lumpy flour = lumpy cookies. Sift once for good measure.
- Piping bag hacks: Use a tall glass to fill the bag, and squeeze out all air bubbles. If the bag gets too hard to hold, pop it in the fridge for 10 minutes.
- Oven temperature: Every oven is different! Use an oven thermometer to check—mine runs 10°C hot, so I lower it to 160°C.
- Storage: Keep cooled cookies in an airtight container at room temperature for up to 1 week. They stay crumbly and delicious!
- Salt matters: Don’t skip the salt—it balances the sweetness and makes the flavor more complex.
- Vanilla options: If you don’t have vanilla extract, use vanilla bean paste (it’s fancier!) or even a pinch of vanilla powder.
- Egg temperature: Room temperature egg mixes better than cold egg. If you forget to take it out, soak it in warm water for 5 minutes.
- Piping practice: If you’re new to piping, test a little dough on a plate first. Get the hang of the pressure before you start on the baking sheet.
- Reusing tips: If you want to reuse a tip, wash it immediately after use—dough dries hard and is hard to scrub off.
Common Mistakes to Avoid (I’ve Done All These!)
Let’s be real—baking is trial and error. Here are the mistakes I’ve made so you don’t have to:
- Overmixing the dough: This makes cookies tough. Stop as soon as there are no dry spots.
- Adding egg too fast: Curdled batter = dense cookies. Take your time!
- Baking too long: Burnt edges are the worst. Set a timer and check 1 minute early.
- Using granulated sugar instead of powdered: Granulated sugar makes the dough grainy and hard to pipe.
- Not preheating the oven: Cold oven = flat cookies. Preheat for at least 10 minutes.
Final Thoughts: Why You’ll Love These Decorative Butter Cookies
These cookies are so versatile—you can change the shape, color, and flavor to fit any occasion. They’re perfect for Christmas (use red and green sprinkles!), birthdays (pipe them into stars!), or just a Sunday afternoon snack. And the best part? They’re easy enough for beginners but impressive enough to serve to friends. So grab your ingredients, preheat that oven, and let’s bake some delicious, decorative butter cookies. You’ve got this!


