


Let’s be real—who has time to stand over a stove stirring a pot for hours when you’ve got a rice cooker sitting on your counter? I used to think rice cookers were only for, well, rice. But guess what? They’re secret weapons for lazy (but delicious) meals. Today, I’m spilling the tea on how to make fall-off-the-bone braised beef using nothing but your trusty rice cooker. It’s so easy, even my roommate—who burns toast—nailed it on her first try.
Why Use a Rice Cooker for Braised Beef?
First off, let’s talk about the perks. Rice cookers are set-it-and-forget-it magic. No need to adjust heat or check on it every 10 minutes. They cook evenly, lock in moisture, and turn tough beef into something so tender you can cut it with a fork. Plus, cleanup is a breeze—just one pot to wash. Win-win.
Ingredients You’ll Need
Before we dive in, let’s round up the stuff. You don’t need fancy ingredients—most of these are probably already in your pantry. Here’s what you’ll grab:
- 200g beef shank (it’s got just the right amount of fat to keep it juicy)
- 2 green onion stalks (cut into sections)
- 2 slices of ginger (fresh is way better than dried—trust me)
- 3 dried chili peppers (skip if you don’t like heat, but a little kick is nice)
- 2 bay leaves (adds that warm, earthy flavor)
- 20 Sichuan peppercorns (they give a subtle numbing kick—so good)
- 1 small cinnamon stick (not too big, or it’ll overpower everything)
- 1 star anise (that classic five-spice vibe)
- 2 tbsp cooking wine (Shaoxing wine is best, but any will work)
- 3 tbsp dark soy sauce (for that rich, dark color)
- 2 tbsp light soy sauce (for saltiness and umami)
- 500ml hot water (not cold—cold water can make the beef tough)
- 2 rock sugar cubes (adds a hint of sweetness to balance the salt)
Step-by-Step Guide to Rice Cooker Braised Beef
Okay, let’s get cooking. I’ve broken this down into 15 super simple steps—no fancy skills required. Let’s go!
Step 1: Prep the Beef

First, rinse your beef shank under cold water to get rid of any blood. Then cut it into big chunks—like 3-4cm pieces. Don’t make them too small, or they’ll fall apart while cooking. Pro tip: Pat the beef dry with a paper towel first if you want a better sear, but since we’re using a rice cooker, it’s not totally necessary.
Step 2: Blanch the Beef

Pop the beef chunks into a pot of cold water. Turn the heat to high and let it boil. Blanching removes the yucky foam and impurities, so your braised beef will taste cleaner. Trust me, this step is non-negotiable—skip it and your beef might taste gamey.
Step 3: Rinse the Beef

Once the water boils, you’ll see a gross white foam floating on top. Skim that off with a spoon, then turn off the heat. Use a slotted spoon to take the beef out and rinse it under cold water. This stops the cooking process and gets rid of any leftover foam. Set the beef aside for now.
Step 4: Gather Your Spices

Now’s the time to get your spice game on. Grab your dried chili peppers, bay leaves, Sichuan peppercorns, cinnamon stick, and star anise. You can toss them into a spice bag if you have one (makes cleanup easier), but if not, just throw them right in the rice cooker—we’ll pick them out later.
Step 5: Add Beef and Aromatics to the Rice Cooker

Take your clean rice cooker inner pot and put the blanched beef inside. Then add the green onion sections and ginger slices. These aromatics will infuse the beef with a fresh, savory flavor—so don’t skip them!
Step 6: Toss in the Spices

Now add all those spices you gathered earlier. Just dump them right on top of the beef. If you’re using whole spices (like we are), they’ll release their flavors slowly as they cook—perfect for braising.
Step 7: Pour in Hot Water

Here’s a key tip: Use hot water, not cold. Cold water can shock the beef and make it tough. Pour in 500ml of hot water—enough to cover the beef completely. If it’s not covering, add a little more, but don’t overdo it (we don’t want soup).
Step 8: Add Cooking Wine

Measure out 2 tbsp of cooking wine and pour it in. This helps to deodorize the beef and adds a nice depth of flavor. If you don’t have cooking wine, you can use dry white wine, but cooking wine is better for that authentic braised taste.
Step 9: Add Dark Soy Sauce

Next up: 3 tbsp of dark soy sauce. This is what gives the beef that rich, dark brown color. Don’t add too much, or it’ll be too salty. Just a few tablespoons will do the trick.
Step 10: Add Light Soy Sauce

Now add 2 tbsp of light soy sauce. This adds saltiness and umami (that savory, meaty flavor we all love). The combination of dark and light soy sauce is perfect—dark for color, light for taste.
Step 11: Cook on Stew Mode

Put the inner pot back into the rice cooker and close the lid. Find the “stew” or “slow cook” function (every rice cooker is a little different—check your manual if you’re not sure). Set it for about 1 hour. Then… walk away! Go watch a show, fold laundry, or scroll TikTok. The rice cooker has got this.
Step 12: Let It Cool Slightly

Once the timer goes off, don’t open the lid right away. Let it sit for 10-15 minutes—this allows the beef to absorb more flavor. Plus, it’ll be easier to handle when it’s not scalding hot.
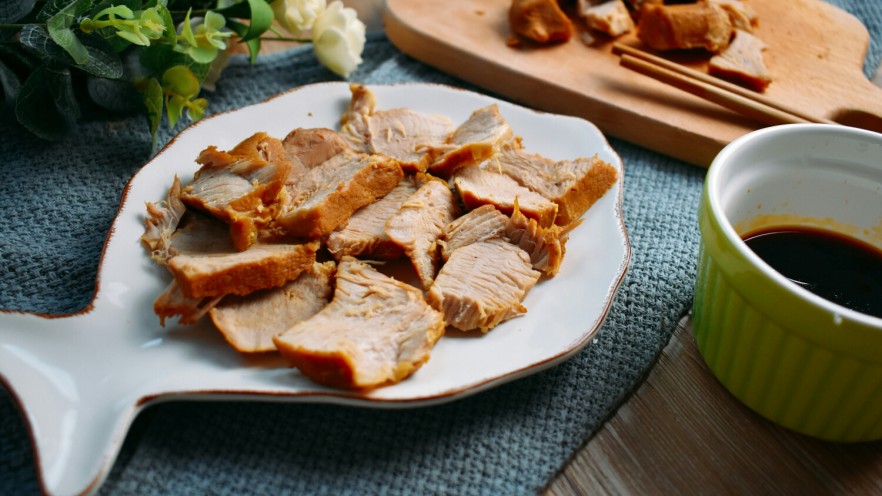
Step 13: Slice the Beef

Take the beef out of the rice cooker and let it cool a little more (you don’t want to burn your fingers!). Then slice it into thin pieces. The beef should be so tender that it slices easily—if it’s still tough, pop it back in the rice cooker for another 15 minutes.
Step 14: Make a Dipping Sauce (Optional but Delicious)

Want to take your braised beef to the next level? Make a quick dipping sauce. Mix together 1 tbsp light soy sauce, 1 tsp vinegar, a pinch of sugar, and a dash of chili oil. It adds a tangy, spicy kick that pairs perfectly with the rich beef.
Step 15: Serve and Enjoy!

Plate up the sliced beef, drizzle some of the braising sauce over it, and dip it in your sauce if you made it. It’s perfect with rice, noodles, or even just on its own as a snack. Trust me, one bite and you’ll be hooked.

See that? That’s the perfect braised beef—glossy, tender, and packed with flavor. And you made it in a rice cooker! Who knew?
Pro Tips for Perfect Rice Cooker Braised Beef
Before I wrap up, here are a few extra tips to make your braised beef even better:
- Use beef shank or chuck—they have marbling that keeps the meat juicy during long cooking.
- Don’t skip blanching— it’s key for a clean flavor.
- Let the beef rest after cooking—this makes it more tender and flavorful.
- If your rice cooker doesn’t have a stew mode, use the “keep warm” function for 2-3 hours (it works too!).
- Leftovers taste even better the next day— the flavors have time to meld together.
Final Thoughts
Making braised beef in a rice cooker is so easy, it’s almost silly. You don’t need any fancy equipment or cooking skills—just a rice cooker and a few ingredients. Whether you’re a busy student, a working parent, or just someone who hates doing dishes, this recipe is for you. Give it a try this week—your taste buds will thank you.

 Recipe: A Classic Chinese Takeout Favorite You Can Make At Home")
")


