




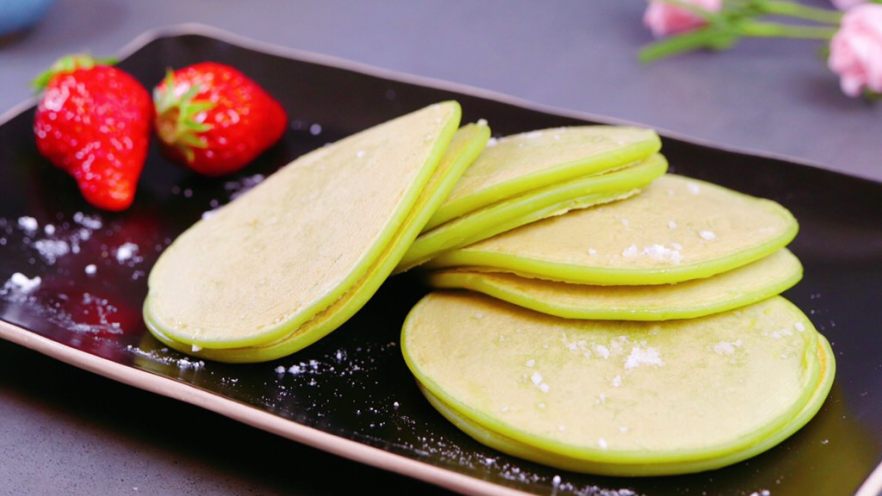

Let’s be real—mornings are chaos. Between hitting snooze three times, chasing the cat off the counter, and remembering you forgot to pack lunch… who has time for a fancy breakfast? But what if I told you there’s a way to make something that’s both delicious and feels like a treat, without spending an hour in the kitchen? Enter: matcha yogurt pancakes. Soft, slightly earthy from the matcha, tangy from the yogurt, and so fluffy you’ll want to do a happy dance. Trust me, I’ve made these so many times my roommate now begs for “the green pancake days.” Let’s dive in!
Why Matcha Yogurt Pancakes Are a Morning Game-Changer
First off, let’s talk about the star combo: matcha + yogurt. Matcha isn’t just a pretty green powder—it’s packed with antioxidants (hello, catechins!) and gives you a gentle energy boost (no jitters like coffee!). Then there’s the yogurt: it adds moisture, a subtle tang that cuts through the sweetness, and even a bit of protein to keep you full until lunch. Plus, these pancakes are way easier than regular fluffy ones—no buttermilk, no fancy mixing techniques. Just throw everything together and cook. Perfect for busy weekdays or lazy weekend brunches.
Ingredients You’ll Need (No Fancy Stuff, Promise)
Let’s keep it simple. You probably have most of these in your pantry already:
- 150g all-purpose flour (yes, the basic kind works!)
- 20g matcha powder (use a good quality one—cheap matcha tastes bitter, and we don’t want that)
- 1 large egg (room temp is better, but if you forget, cold is fine too)
- 100g plain yogurt (Greek or regular—Greek adds more protein, but regular is creamier)
- 100ml milk (dairy or plant-based—oat milk works great here)
- 6 strawberries (for topping—fresh is best, but frozen works in a pinch)
- 12g light cream (or whipped cream if you’re feeling indulgent)
- 3g powdered sugar (for that fancy dusting at the end)
Pro tip: If you don’t have matcha, you could skip it… but why would you? The green color is half the fun, and the flavor is chef’s kiss. Just don’t substitute with cocoa—we’re making green pancakes, not brown ones.
Step-by-Step Guide to Fluffy Matcha Yogurt Pancakes
Okay, let’s get cooking. I’ve broken this down into super easy steps so even if you’re a beginner, you can nail it.
Step 1: Prep the Flour Base

First, grab a big bowl and dump in the all-purpose flour. No need to sift unless you’re a perfectionist—this is a casual recipe, folks.
Step 2: Add the Matcha Magic

Now, add the matcha powder to the flour. Give it a good stir with a whisk or fork to mix them evenly. If you skip this, you’ll end up with clumps of green powder in your pancakes, and nobody wants that. Trust me—I’ve made that mistake.
Step 3: Crack in the Egg

Next, crack the egg right into the dry mix. No need to beat it first—we’ll mix everything together in a sec. Just make sure there are no shell bits (pro tip: crack the egg into a small bowl first if you’re nervous about shells).
Step 4: Mix in Yogurt and Milk (Don’t Overmix!)

Now, add the yogurt and milk. Stir everything together with a spatula until it’s just combined. Important: Don’t mix it until it’s smooth! A few lumps are okay—overmixing makes tough pancakes. I repeat: NO OVERMIXING.
Step 5: Cook on Low Heat (Patience Is Key)

Heat a non-stick pan over low heat. No oil needed if your pan is good, but a tiny bit of butter or oil won’t hurt (it adds flavor!). Scoop about ¼ cup of batter onto the pan—don’t make them too big, or they’ll be hard to flip. Let them cook for 2-3 minutes until you see bubbles forming on the surface. This is when you know it’s time to flip.
Step 6: Flip and Cook the Other Side

Use a spatula to gently flip the pancake. Cook for another 1-2 minutes until it’s golden brown on the bottom and cooked through. If the pan is too hot, the outside will burn before the inside is done—so keep that heat low!
Step 7: Stack ’Em Up

Once the pancake is done, transfer it to a plate. Keep going until all the batter is used up. You should get about 6-8 small pancakes—perfect for stacking.
Step 8: Add the Creamy Layer

Now for the fun part: assembling! Take one pancake and spread a thin layer of light cream on top. Don’t go overboard—we don’t want it to be too messy.
Step 9: Top with Strawberries

Chop up the strawberries into small pieces (or big chunks—no judgment) and sprinkle them over the cream. The sweet, juicy strawberries pair so well with the earthy matcha. Yum.
Step 10: Stack Another Pancake

Put another pancake on top of the strawberry layer. Repeat steps 8-10 until you have a tall stack (or as tall as you want—mine usually falls over if I do more than 3, but that’s part of the charm).
Step 11: Make More Stacks (For Friends… or Just Yourself)

If you have leftover batter, make more stacks! These are great for sharing, but let’s be honest—you might eat two stacks by yourself. No shame.
Step 12: Dust with Powdered Sugar (The Fancy Finish)

Finally, sprinkle a little powdered sugar on top. It adds a touch of sweetness and makes the pancakes look like you bought them from a café. Ta-da! Your masterpiece is done.
My Top Tips for Perfect Matcha Yogurt Pancakes
I’ve made these enough times to know what works (and what doesn’t). Here are my pro tips:
- Low heat is non-negotiable: I can’t stress this enough. High heat = burnt outside, raw inside. Keep it low and slow.
- Don’t overmix the batter: Lumps are your friends here. Overmixing makes the pancakes dense and chewy.
- Use good matcha: Cheap matcha tastes like grass. Spend a little extra on a quality one—you’ll taste the difference.
- Customize the toppings: Strawberries are great, but try blueberries, raspberries, or even a drizzle of honey. Get creative!
Final Thoughts: Why You Should Make These This Week
Matcha yogurt pancakes are the perfect balance of easy, healthy, and delicious. They’re great for busy mornings, lazy weekends, or even as a snack (no judgment if you eat them for dinner). Plus, the green color makes them fun—my niece calls them “magic pancakes.” So grab your ingredients, turn on some music, and make a batch. You won’t regret it.


![French Savory Tart [Magic Cake] – Sugar-Free, Layered Delight (Forced My Friend’s Recipe to Obsession!)](https://hearthsiderecipes.com/images/5214/5mit2exneu1.jpg "French Savory Tart [Magic Cake] – Sugar-Free, Layered Delight (Forced My Friend’s Recipe to Obsession!)")
