




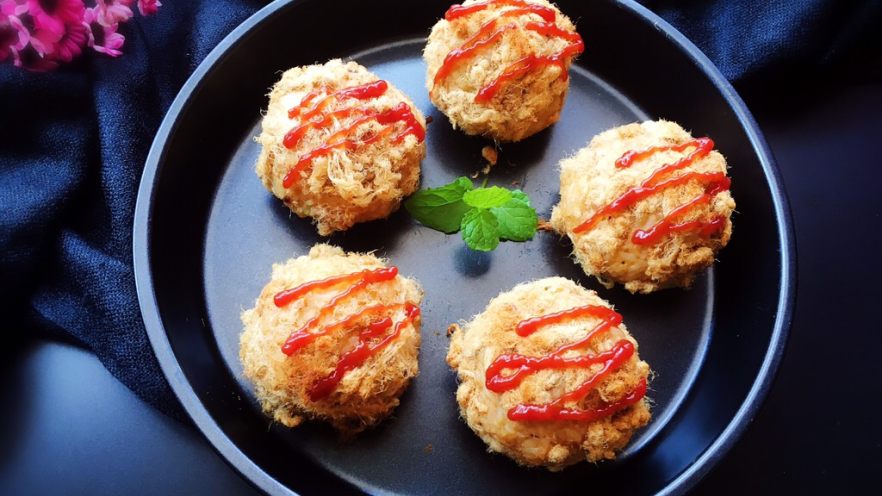

Hey guys! Let me tell you about my latest kitchen win: these cheese and pork floss rice balls. My husband’s been canceling plans left and right lately, so we’ve got leftover rice stacking up like crazy. I was over fried rice, so I thought, “Why not turn those leftovers into something fun and cheesy?” Spoiler: they’re so good, even my pickiest kid cleaned his plate! Plus, they’re crispy on the outside, gooey with melted cheese inside, and packed with that savory pork floss flavor. Let’s dive in—this recipe is easier than you think!
Ingredients You’ll Need
- 1 bowl of leftover cooked rice (cold works best, but room temp is fine too!)
- 1 large egg (beaten, optional but adds moisture)
- 1 small napa cabbage slice, shredded (or any veggies you love!)
- 1 small carrot, diced into tiny cubes
- 2 slices of cheese (I use mozzarella for that melty goodness)
- 1 tablespoon of soy sauce (adjust to taste)
- ½ teaspoon of salt (or less if you’re using low-sodium soy sauce)
- 50g of pork floss (preferably the finely shredded kind for smooth coating)
Step-by-Step Instructions
These rice balls are surprisingly simple to make, even if you’re not a pro cook! Whip them up in under 30 minutes for a quick snack or lunch box treat. Let’s get started!

1. Gather All Your Ingredients
First, make sure you have everything prepped and ready to go. Line a baking sheet with parchment paper (or just use a regular sheet if you’re lazy like me—no judgment!). Set out the rice, egg, veggies, cheese, and pork floss. Oh, and don’t forget gloves—they’re a game-changer for handling sticky rice!

2. Shred the Cabbage
Take that cabbage slice and cut it into thin strips. I like to use scissors for this—no fancy knife skills needed! If you’re short on time, just tear it into small pieces. The goal is a fine shred so it mixes easily into the rice without being too chunky.

3. Dice the Carrot
Chop the carrot into tiny cubes—about the size of a small marble. This way, it cooks quickly and adds a nice crunch without being overwhelming. If you’re making these for little kids, you can even grate the carrot for a smoother texture!

4. Sauté the Veggies
Heat a tiny bit of oil in a pan over medium heat. Add the shredded cabbage and diced carrot. Stir-fry for 2-3 minutes until they’re just tender—don’t overcook, or they’ll turn mushy! This step adds a fresh, slightly sweet flavor that balances the savory pork floss.

5. Season the Veggies
Sprinkle in the salt (½ teaspoon is perfect) and stir again. Taste-test here—if you want more flavor, add a pinch more salt or a drizzle of soy sauce. Let the veggies cool while you prep the rice; we don’t want them to melt the cheese later!

6. Cool the Veggies
Transfer the cooked veggies to a plate and let them cool completely. If you’re in a hurry, pop them in the fridge for 5 minutes! This step is crucial—hot veggies will make the cheese inside the rice ball turn into a soggy mess instead of oozing cheese. Trust me, patience here = happy rice balls later.

7. Mix Rice with Egg and Soy Sauce
Now, take your bowl of leftover rice. Crack the egg into it and add the tablespoon of soy sauce. Mix everything together with your hands (but wear gloves!). The egg helps bind the rice, so it sticks together when you shape it into balls. Keep mixing until the rice is evenly coated—no dry spots left!

8. Perfect the Rice Texture
Gloves are your best friend here! Rice can be slippery, but gloves give you better grip. Use your hands to knead the rice, egg, and soy sauce until it’s sticky and holds together. If it’s too dry, add a splash more soy sauce; if it’s too wet, spread it out to dry for a few minutes. Aim for a “soft but firm” texture.

9. Prepare the Cheese
Take the two cheese slices and cut them into small pieces or thin squares. I love using mozzarella because it melts into a creamy, stretchy mess, but cheddar works too! If you’re using a lot of cheese, you might want to cut them into smaller chunks to ensure even melting. Pro tip: don’t skimp on the cheese—this is the star inside!

10. Set Up the Pork Floss
Pour the 50g of pork floss into a shallow bowl. This will be the outer coating, so make sure it’s accessible! For best results, use the “child-friendly” finely shredded pork floss—it sticks better and gives a smoother finish. If you’re using regular floss, that’s fine too; just break it up with your fingers to make it less clumpy.

11. Assemble the Rice Balls
Time to get shaping! Put on clean gloves (or wash your hands if you skipped step 8). Take a handful of the seasoned rice and flatten it into a small circle in your palm. Add a few cooled veggies and a couple of cheese pieces in the center. Then, wrap the rice around the filling, pinching the edges to seal. Roll it gently between your palms to make a smooth, round ball—like a tiny snowball!

12. Coat with Pork Floss
Roll the rice ball in the pork floss bowl until it’s completely covered. The floss should stick to the rice—don’t worry if it’s a little uneven; it’ll still taste amazing! You can even press the floss on gently with your fingers to make sure it’s secure. This is where the outside crunch and pork floss flavor come from!

13. Bake to Crispy Perfection
Preheat your oven to 170°C (340°F). Line a baking sheet with parchment paper, place the rice balls on it, and bake for 10 minutes. The oven will toast the pork floss slightly and melt the cheese inside. Keep an eye on them—you want the outside to be crispy, not burnt! If you don’t have an oven, you can pan-fry them in a little oil for 3-4 minutes per side until golden.

14. Add the Ketchup Finish
While the rice balls are baking, get your ketchup ready. Squeeze it into a small bowl and pour it into a squeeze bottle (or a zip-top bag with a tiny hole cut in the corner). When the rice balls come out of the oven, let them cool for 2 minutes. Then, snip the ketchup bag and drizzle a line of ketchup on top—extra flavor, extra yum!

15. Serve and Enjoy!
Your cheese and pork floss rice balls are ready! They’re best eaten warm, but they’re still delicious cold. Serve them as a snack, lunch, or even dessert (okay, maybe not dessert, but close!). My kids beg for these, and even my husband who “doesn’t like rice” is now a convert. Trust me, you’ll be making these again and again!
Pro Tips for the Best Rice Balls
- Use Leftover Rice Only! Freshly cooked rice is too sticky and will make the rice balls mushy. Leftover rice is drier and holds shape better—this is a leftover rice lifesaver!
- Vegetable Swap? Not a fan of cabbage? Use spinach, bell peppers, or even corn! Any veggies work—just chop them small so they mix well.
- Cheese Varieties: Mozzarella = melty, cheddar = tangy, cream cheese = super smooth. Pick your favorite for different flavors!
- Make Ahead! Assemble the rice balls, coat in pork floss, and refrigerate for up to 2 days. When you’re ready to eat, bake for 12 minutes instead of 10—convenient for busy mornings!
- Perfect for Kids: The finely shredded pork floss and melty cheese make these irresistible for little ones. Add a side of fruit, and you’ve got a balanced meal!


![French Savory Tart [Magic Cake] – Sugar-Free, Layered Delight (Forced My Friend’s Recipe to Obsession!)](https://hearthsiderecipes.com/images/5214/5mit2exneu1.jpg "French Savory Tart [Magic Cake] – Sugar-Free, Layered Delight (Forced My Friend’s Recipe to Obsession!)")

