
")


Hey Foodies! Let’s Talk About This Crunchy, Spicy Wood Ear Salad You Need in Your Life
Okay, let’s be real—how many times have you stared at your fridge, empty-handed, and thought, “I need something quick, easy, and actually tasty to eat tonight?” Yeah, me too. I’ve been there: scrolling through recipe apps, getting overwhelmed by complicated steps, or realizing I have zero energy to cook a big meal. But then, I remembered this Refreshing Wood Ear Fungus Salad recipe. It’s like a lifesaver for those “what do I eat now?” moments. Let me tell you why it’s become my go-to go-to in the past month alone!
First off, this dish is refreshing as all get-out. The wood ear fungus has this unique, slightly chewy texture that’s satisfying to bite into, and the spicy chili-garlic sauce? It’s a flavor explosion without being too heavy. Plus, it’s ready in under 30 minutes—perfect for when you’re short on time but still want something homemade and delicious. No fancy gadgets, no weird ingredients, just good old-fashioned Chinese-inspired comfort food that’s 100% mealtime magic.
And let’s not forget about the health factor. Wood ear fungus (also called “mu er” in Chinese) is packed with fiber, which helps with digestion, and it’s low in calories. So you can dig in without feeling guilty—always a win, right? Plus, you can adjust the spiciness to your taste, so even if you’re not a die-hard chili lover, you can tweak it to be milder. Trust me, I’ve made this with just 2 peppers before, and it’s still amazing. So let’s get into the details!
Why This Refreshing Wood Ear Dish is My “I Don’t Feel Like Cooking” Hero
Before diving into ingredients and steps, let’s why this dish stands out from all the other side dishes I’ve tried. For starters, it’s super versatile. Pair it with grilled tofu, dumplings, or even a plain bowl of rice—this salad complements just about anything. It’s also a great appetizer for parties because it’s easy to make in bulk, and people always ask for the recipe. Let me list the top reasons I love it:
- Quick Prep Time: From start to finish, this takes less than 30 minutes. Even if you’re late for lunch or have to throw something together before a movie night, you’re good.
- Crunchy & Chewy Texture: The wood ear fungus isn’t like regular veggies—its texture is unique, almost like a cross between a mushroom and a seaweed salad. It’s fun to eat!
- Customizable Spiciness: As we’ll talk about in the tips, you can adjust the chili peppers to your heat tolerance. No more “I can’t eat spicy food” excuses—just tweak it to your liking!
- Budget-Friendly: Most ingredients are pantry staples (garlic, vinegar, soy sauce, sesame oil) and dried wood ear fungus is cheap. Perfect for anyone on a tight budget.
- Low Effort, High Reward: The steps are straightforward, and you don’t need to stand over the stove stirring constantly. It’s more of a “mix and let sit” dish, so you can multitask while it prepares.
Okay, enough gushing—let’s get to the good stuff: ingredients and how to make it! I’ll walk you through each step like we’re cooking together, so even if you’re new to the kitchen, you’ll feel confident by the end.
Ingredients You’ll Need (Serves 2-3 as a Side)
First, let’s list out what you need. Pro tip: Check your fridge and pantry first—you might have most of these already! Here’s the breakdown:
- Dried Wood Ear Fungus: 20g (that’s about a small handful—don’t go crazy with the amount; a little goes a long way!)
- Fresh Chili Peppers: 9 (I use regular red chili peppers, but if you can’t find those, green ones work too—just adjust based on your heat preference!)
- Garlic Cloves: 4 (minced or crushed—crushed is easier if you’re in a hurry, but minced gives more flavor. Either way, fresh garlic is key here!)
- Salt: 1 small spoon (about 1 teaspoon—we’ll adjust later, so don’t panic if it seems like a lot now)
- Vinegar: 2-3 tablespoons (rice vinegar is traditional here, but apple cider vinegar works too if you don’t have rice vinegar. The tang is essential for that “refreshing” vibe!)
- Light Soy Sauce: 1 tablespoon (adds a subtle umami flavor—if you don’t have light soy, you can use a splash of dark soy, but go easy because it’s saltier!)
- Sesame Oil: 2 tablespoons (this is the secret to that nutty, rich aroma. Don’t skip this—your salad will taste flat without it!)
- Boiling Water: A splash (just enough to pour over the sauce to “activate” the flavors—you’ll see why later!)
Optional extras (totally up to you!): A pinch of sugar to balance the acidity (if you like a tiny bit of sweetness), or a handful of chopped green onions for garnish. But the base recipe is simple—let’s stick to the essentials first, then you can get creative with add-ons!
Step-by-Step Cooking Guide: Let’s Make That Magic Happen
Alright, let’s roll up our sleeves and get cooking! I’ll take you through each step with lots of extra tips to make sure you nail this. Remember, even if you’ve never made wood ear fungus before, this is easy mode—no stress, just success!
Step 1: Soak the Dried Wood Ear Fungus
First things first: the dried wood ear fungus needs to be rehydrated. Grab a bowl, put the 20g of dried fungus in it, and cover with cold water. Let it soak for 20-30 minutes. I know, waiting can be annoying, but trust me—this step is crucial for that perfect texture. After soaking, they’ll expand a lot, so don’t be surprised if they go from tiny, hard bits to big, plump “ears.” If they’re still a bit tough after 30 minutes, soak them for another 5-10 minutes. You want them to be soft but still have a slight crunch—over-soaking will make them mushy, which is not the goal here! 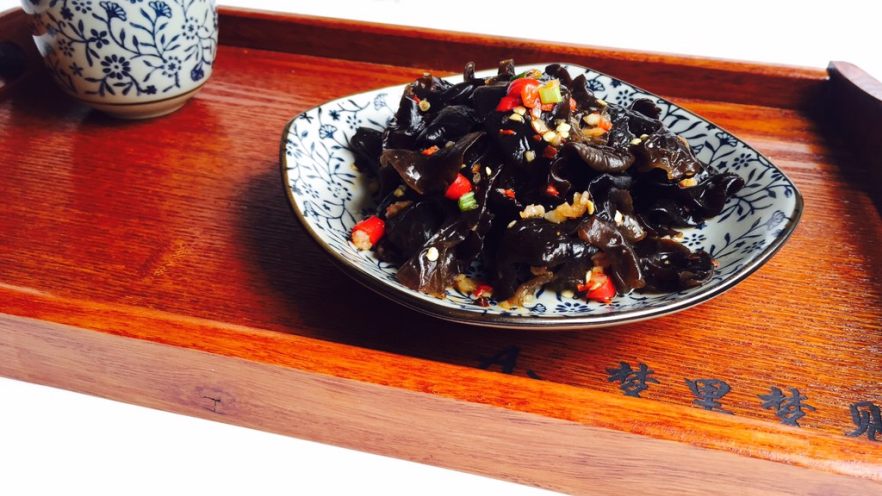
Step 2: Rinse and Trim the Roots
Once soaked, drain the water and rinse the wood ears under running water to get rid of any dirt or grit. Then, look for the tough, white root part at the top of each ear—use a pair of scissors or your fingers to cut that off. It’s not edible, so you definitely want to remove it. After trimming, give them another quick rinse to make sure everything’s clean. 
Step 3: Blanch the Wood Ears in Boiling Water
Now, bring a pot of water to a boil. Once it’s bubbling, carefully add the trimmed wood ears. Let them cook for just 1-2 minutes. I know, 1-2 minutes seems short, but overcooking is the enemy here! You want them to be tender but still have that satisfying crunch. Set a timer—don’t get distracted! After 1-2 minutes, use a slotted spoon to take them out and drain the water. 
Step 4: Shock the Wood Ears in Cold Water (Yes, Cold is Key!)
Here’s a pro tip: immediately after blanching, put the wood ears into a bowl of cold water. This stops the cooking process and keeps them crunchy. Let them sit for 5 minutes to cool down. You can even use ice water if you’re in a hurry—it’ll cool them faster and make them extra crisp. After cooling, squeeze out as much water as possible (you can use a clean kitchen towel or just your hands—just be careful not to burn yourself if they’re still warm!). 
Step 5: Prep the Chili Peppers and Garlic
Now, let’s get the flavors ready! Wash the 9 chili peppers thoroughly under running water. Pat them dry with a paper towel. Then, chop them into tiny pieces—you can use a knife or even a garlic press if you want, but chopping gives a better texture (crushed is fine too, if you’re short on time). For the garlic, peel the cloves, then either mince them or crush them into a paste. I like to mince mine for a more even flavor distribution, but crush if you’re in a rush. 
Step 6: Make the Spicy Garlic Sauce (The Secret Ingredient!)
Here’s where the magic sauce comes in! Grab a small bowl and add the following ingredients: 2-3 tablespoons of vinegar, 1 tablespoon of light soy sauce, 1 small spoon of salt, and 2 tablespoons of sesame oil. Stir these together until the salt and sugar (if you added it) dissolve. Then, pour in a splash of boiling water—about 2-3 tablespoons. The hot water helps the flavors meld together and activates the saltiness. Stir this sauce really well—you want all the ingredients to combine smoothly. 
Step 7: Combine the Sauce and Wood Ears
Now, it’s time to mix everything together! Take the drained, cooled wood ears and put them into a serving bowl. Pour the spicy garlic sauce over the top. Then, add the chopped chili peppers and garlic—this is where the heat and aroma come from! Stir everything gently to make sure the wood ears are coated evenly with the sauce. Taste it right now—does it need more salt? More vinegar? Adjust as you go! 
Step 8: Add the Final Touches (Optional but Recommended)
For extra flavor and color, add a sprinkle of chopped green onions on top. It’s not necessary, but it makes the dish look more appetizing and adds a mild oniony flavor. Then, give it one last stir to make sure everything is mixed. Now, take a bite—how does it taste? Perfect balance of tangy, spicy, and savory? If yes, you’re done! If not, adjust the salt, vinegar, or sesame oil to your liking. 
Pro Tips for the Best Refreshing Wood Ear Salad
Okay, you’ve made the basic version, but let’s take it to the next level with some pro tips. I’ve learned these the hard way (read: burned my tongue from too much chili and overcooked the wood ears), so take my advice!
- Spice It Up (or Down!): The original recipe uses 9 chili peppers, but that’s just a starting point! If you’re sensitive to spice, cut it down to 3-4. If you’re a spice warrior, add more—maybe even some red pepper flakes for extra heat. Remember, it’s all about your taste, so no pressure to stick to the 9!


- Soaking Like a Pro: If you’re in a rush, use hot water to soak the wood ears for 15 minutes instead of cold water. But cold water is traditional and gives a better texture. Either way, check after 10 minutes—they should be pliable, not hard. If they’re still hard, soak longer or blanch them a bit more first.
- Don’t Overcook the Wood Ears: This is the biggest mistake I see people make! Even if you love soft veggies, wood ears should be tender but still have a slight crunch. Overcooking = mushy mess. Set that timer for 1-2 minutes max after blanching!
- Seasoning Balance: Taste as you go! After adding all the seasonings, give it a stir and taste. If it’s too salty, add a splash more vinegar. If it’s too sweet (if you added sugar), add a pinch of salt. The goal is a perfect balance of tangy, spicy, and savory—trust your taste buds!
- Make It Ahead of Time: This dish is great to prep ahead! Assemble everything in a container and keep it in the fridge for up to 2 days. The flavors will meld together even more, and it’ll be ready to eat whenever you want. Perfect for meal prepping or potlucks!
Common Questions & Answers: Let’s Troubleshoot
Got questions? I’ve got answers! Let’s tackle some of the most common questions I’ve gotten from friends and readers:
Q: What if I don’t like spicy food?
A: No problem! Just reduce the number of chili peppers to 1-2, or even leave them out entirely. You can also use sweet bell peppers for a mild, crunchy addition. The vinegar and garlic will still give it that zesty, savory flavor without the heat.
Q: Can I use fresh wood ear fungus instead of dried?
A: Yes! Fresh wood ear fungus is available in some Asian grocery stores. If you can find it, you can skip the soaking step—just wash it, trim the roots, and blanch for 2 minutes. The texture will be similar, but it might be a bit softer, so adjust the blanching time if needed!
Q: How long does the salad keep in the fridge?
A: If stored in an airtight container, it should last 2-3 days. The flavors might get stronger over time, so I recommend eating it within 2 days for the best taste. It’s best served cold, so no need to reheat!
Q: What if I don’t have sesame oil?
A: You can substitute it with olive oil, but it won’t taste the same. Trust me, sesame oil is worth the small splurge for that nutty aroma. If you’re really out, skip it, but your salad will be less flavorful. Alternatively, use a splash of peanut oil, but again, sesame is the classic choice here.
Final Thoughts: Why You Need This Salad in Your Life
Alright, foodie friend—by now, I hope you’re convinced this Refreshing Wood Ear Fungus Salad is a game-changer. It’s quick, easy, customizable, and absolutely delicious. Whether you’re looking for a side dish to pair with your favorite Chinese takeout, a light lunch, or a party appetizer, this recipe has you covered.
Let me just recap the highlights one more time: it’s crunchy, chewy, spicy, and tangy all at once. It’s perfect for hot days or when you want something that feels “light” but still satisfying. And the best part? You can make it in under 30 minutes with ingredients you probably already have.
So what are you waiting for? Grab your ingredients, follow these steps, and let me know how it turns out! Tag me in your photos or leave a comment—I’d love to see your version of this salad. And if you loved it, share it with a friend who needs a quick, delicious meal idea. Happy cooking, and enjoy every bite of your crunchy, spicy, refreshing wood ear salad!
Until next time, keep it simple, keep it spicy, and keep it delicious! 🌶️🥢


 Recipe")


 – A Spicy Hunan Delight")

: A Kid-Favorite Recipe")
