Introduction: Why This Sweet and Sour Chicken Dish Is a Must-Try
Okay, let’s get real—who hasn’t had that moment where you make a delicious dish and then think, “Oh no, I only made enough for one person!” Well, that’s exactly what happened with my sweet and sour chicken wing roots. I swear, I stood in the kitchen stirring the sauce, then took one bite, and immediately thought, “I’m gonna need to make a lot more of this.” But nope, I was too busy enjoying the first batch to double the recipe. Now, my family’s been giving me the side-eye, begging for leftovers. Lesson learned: make twice as much next time. But first, let me share this recipe with you—because trust me, once you try it, you’ll be obsessed too!

Why sweet and sour chicken? Let’s be honest—this dish is a flavor explosion. Tangy from the vinegar, sweet from the sugar, and packed with that savory soy sauce kick. It’s perfect for any meal: serve it as a main with rice, as an appetizer at a party, or even as a late-night snack. Plus, chicken wing roots? They’re so tender, and the meat just falls off the bone once it’s cooked right. I’ve made this for friends before, and they’re always like, “Is this from a restaurant?!” Spoiler: it’s 100% homemade. And it’s easier than you think—no fancy techniques needed, just follow my steps!
Ingredients You’ll Need (and Why Each Matters)
First, let’s gather the goods. You’ll need basic pantry staples, which is great because you probably have most of these already. Let’s list them out:
- Chicken Wing Roots: 500g (about 1 pound, or 2 cups if you’re using a scale—adjust based on how many people you’re feeding! I used 500g, but I’ll definitely go for 1kg next time. Why? Because I want leftovers. Lots of leftovers.)
- Spices & Aromatics:
- 1 green onion, sliced (or use the whole thing—sliced for garnish later)
- 1 small piece of ginger, peeled and sliced (about 2cm thick)
- 2 dried red chili peppers (optional, but they add a nice heat kick! I love a little spice, so I always add these)
- Star anise (1), cinnamon stick (1), bay leaves (1), and Sichuan peppercorns (1 tsp—they make the sauce taste more “restaurant-y”)
- Sweet & Sour Sauce Base:
- 3 tbsp light soy sauce (adds umami and a deep color)
- 2.5 tbsp white rice wine (or cooking wine—this keeps the chicken super tender! If you don’t have rice wine, use white vinegar instead? No, wait, that’s for the tang. Stick with rice wine if you can.)
- 2.5 tbsp white vinegar (the star of the tangy flavor! Adjust if you like more/less sour—more vinegar = more tang, less sugar = less sweet)
- 2 tbsp granulated sugar (or 1 large cube of rock sugar/crystal sugar for a richer sweetness)
- ½ cup water (to thin the sauce and help it coat the chicken)
- Optional: 1 tbsp ketchup (adds a redder color and a hint of tomato sweetness—totally optional but delicious!)
Step-by-Step: How to Make Sweet and Sour Chicken Wing Roots
Okay, let’s get cooking! This recipe is straightforward, but I’ll walk you through every step to make sure you nail it. Let’s start with the sauce—because that’s the heart of the dish!
Step 1: Mix the Perfect Sweet and Sour Sauce
First, grab a large bowl. Add 3 tbsp light soy sauce, 2.5 tbsp rice wine, and 2.5 tbsp white vinegar. Stir these together until everything’s well combined. The sauce should smell fragrant already—vinegar, soy, and rice wine are a match made in heaven!

Step 2: Add the Sugar & Water
Next, pour in 2 tbsp sugar and ½ cup water. Stir this vigorously until the sugar dissolves—this might take a minute, but it’s worth it. The sugar will make the sauce nice and glossy, so don’t rush this part! If you’re using rock sugar, it’ll take longer to dissolve, so maybe use granulated sugar if you’re short on time.

Step 3: Let the Sauce Simmer (Optional but Tasty!)
Now, transfer the sauce to a pot. Heat the pot over medium heat and let the sauce simmer for 3-5 minutes. This helps the flavors meld together and the sugar dissolve completely. You’ll see the sauce start to thicken slightly—this is your cue to move on!

Step 4: Add the Aromatics & Spices
Time to add the spices! Throw in the sliced ginger, green onion, dried chili peppers, star anise, cinnamon stick, bay leaves, and Sichuan peppercorns. Stir everything gently so the spices release their aroma. Oh my gosh, the kitchen will smell incredible—like a mix of ginger, star anise, and sweet vinegar. It’s a vibe.

Step 5: Add the Chicken Wing Roots
Now, it’s time for the chicken! Add the cleaned chicken wing roots to the pot. Make sure they’re evenly spread out so they cook on all sides. If they’re overlapping, that’s fine—they’ll cook down and separate as they absorb the sauce. Pro tip: I like to pat the chicken dry with paper towels first to help it brown, but it’s not strictly necessary if you’re short on time.

Step 6: Cover & Simmer
Cover the pot with a lid and let the chicken cook on low heat for 20-25 minutes. This slow cook time is key—you want the chicken to be tender, so resist the urge to open the lid and check too often! While it’s cooking, the sauce will thicken and coat the chicken, giving it that sticky, sweet-and-sour goodness.

Step 7: Flip & Cook Again
After 25 minutes, check the chicken by lifting one wing root with a fork. If the meat is tender (you should be able to pierce it easily), it’s time to flip them. Use a spatula to gently turn each wing root over. Then, cover again and cook for another 15-20 minutes. Now, the chicken will be fully cooked and coated in sauce!

Step 8: Let It Simmer for Flavor
Now, turn up the heat to medium-high and let the sauce reduce for 5-10 minutes. This is when the magic happens—the sauce will thicken into a glossy, sticky glaze that coats each wing root perfectly. Watch carefully so it doesn’t burn! If the sauce gets too thick, add a splash of water and stir.

Step 9: Serve Immediately (But Be Prepared to Beg for More!)
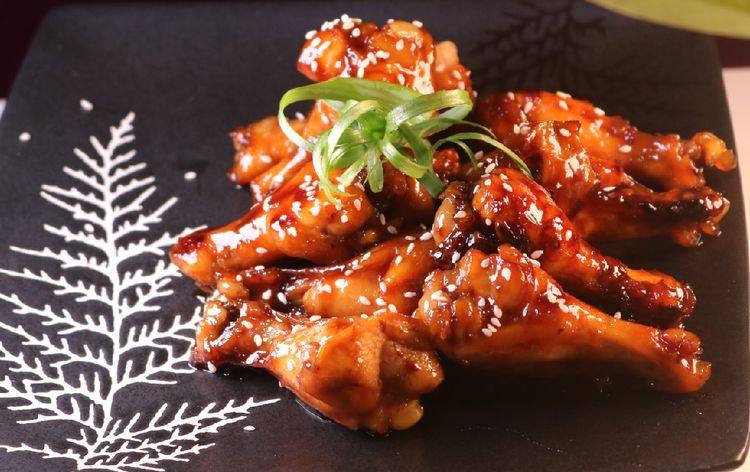
Once the sauce is thick and glossy, turn off the heat and dish out the chicken. I made mine with a plate of white rice (because carbs make everything better) and garnished it with sesame seeds and a sprinkle of green onion. Look at that golden-brown, sticky goodness! But wait—I made only 500g of chicken, and it was gone in 10 minutes. My family kept asking for “just one more,” so next time, I’m doubling the recipe. Trust me, you’ll need it.

Pro Tips for Even Better Sweet and Sour Chicken
Since I’ve made this recipe way too many times, I’ve learned a few tricks to make it even more amazing. Let me share them with you:
- Chicken Swap: If you don’t have wing roots, use chicken wings (mid-joint), drumsticks, or even duck legs! For duck, I’d reduce the cooking time by 10 minutes because duck is darker meat and needs less time. For chicken wings, you might need an extra 5 minutes to cook through.
- Adjust the Sweetness/Sourness: Hate super sweet food? Reduce sugar to 1 tbsp and add more vinegar (up to 4 tbsp). Love sweet stuff? Add a pinch more sugar or a tablespoon of honey. Ketchup is also a game-changer for a deeper, sweeter flavor—add 1 tbsp if you want that classic red hue!
- Spice It Up: Want a kick? Add a fresh Thai chili pepper or a dash of chili flakes. I once added a ghost pepper by accident… let’s just say my nose ran for 20 minutes, but the flavor was worth it! Adjust based on your spice tolerance.
- Marinate for Extra Flavor: If you’re serious about tender chicken, marinate the wing roots in 1 tbsp soy sauce, 1 tsp honey, and a slice of ginger for 30 minutes before cooking. It makes the chicken taste even more seasoned and juicy.
Final Thoughts: I Made Too Few—Here’s Your Reminder
Okay, let’s wrap this up. My sweet and sour chicken wing roots recipe is easy, delicious, and perfect for any occasion. But here’s the truth: I made way too few. They were gone in seconds, and now I’m stuck with leftover rice and a empty plate. So my biggest piece of advice? DOUBLE THE RECIPE. Trust me, your friends, family, and even yourself will thank you. This dish is the ultimate comfort food, and once you make it, you’ll be hooked. So go grab your ingredients, put on your chef hat (even if it’s just a paper towel on your head), and get cooking. And when you do, take a picture, share it with me (tag me!), and tell me how much you loved it. Until next time, happy cooking—and remember: more chicken, please!