
")


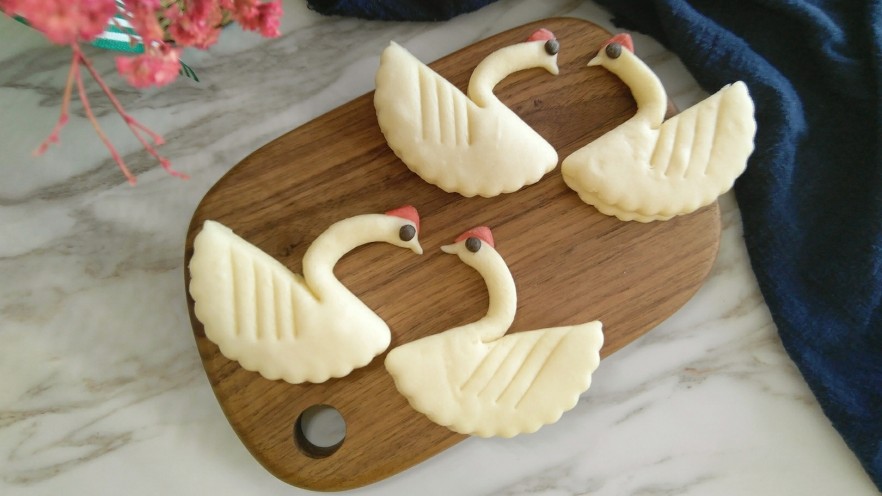
Why You’ll Love These White Swan Steamed Bun Buns
Let’s be real—plain steamed buns are great, but sometimes you want something that’s not just tasty, but also makes your table look like a fancy café (without the fancy price tag). Enter: white swan steamed bun buns! They’re soft, fluffy, and so cute that your family will probably pull out their phones to take photos before even taking a bite. And don’t worry—they’re way easier to make than they look. I’m here to walk you through every step, no baking degree required.
What You’ll Need (Ingredients List)
First things first: gather your stuff. You don’t need any weird specialty ingredients—just basic pantry staples. Here’s what you’ll grab:
- 430g all-purpose flour (yes, regular flour works—no need for bread flour unless you’re feeling extra)
- 5g active dry yeast (make sure it’s not expired! Nothing kills a recipe faster than dead yeast)
- About 170ml water (warm, not hot—you don’t want to cook the yeast)
- A pinch of red yeast rice powder (for the swan’s beak and crown—super tiny amount, promise)
Step-by-Step Guide to Making White Swan Steamed Buns
Okay, let’s get to the fun part! I’ve broken this down into super simple steps so you don’t get lost. Let’s go!
Step 1: Activate the Yeast & Knead the Dough
Winter tip: Since it’s colder, yeast needs a little extra love. Warm up your water (it should feel like lukewarm bath water—if it’s too hot, you’ll kill the yeast). Sprinkle the yeast into the water, stir gently, and let it sit for 5-10 minutes. You’ll know it’s ready when it gets foamy on top—like a tiny beer head (but non-alcoholic, obviously).
Next, pour the yeast water into the flour. Now, roll up your sleeves and knead! Knead for about 10 minutes until the dough is smooth and elastic. If it’s too sticky, add a tiny bit more flour; if it’s too dry, splash in a little more water. Once it’s nice and smooth, pop it in a bowl, cover it with a damp cloth, and put it in a warm spot (like near a radiator or in a turned-off oven with the light on) to rise. This usually takes 1-2 hours—patience, young grasshopper!

Step 2: Check if the Dough Is Fermented
How do you know when the dough is ready? Easy! Poke it with your finger. If the hole doesn’t spring back right away, you’re good to go. If it does, let it rise a little longer. Pro tip: Don’t over-ferment it—you’ll end up with a sour-tasting bun. No one wants that!

Step 3: Roll & Cut the Dough into Circles
Now it’s time to get rid of all that air in the dough (this is called “punching down” or “exhausting” the dough). Knead it a few times to push out the big bubbles, then roll it into a thin, even sheet—about 0.5cm thick. Grab a round mold (a cookie cutter works, or even a clean bowl if you don’t have a mold!) and press it into the dough to cut out circles. Save the leftover dough for later—we’ll use it for the swan’s details!

Step 4: Add a Little Oil
Take each circle and brush a thin layer of cooking oil on one side. Why oil? It keeps the bun from sticking together when you fold it, so you can easily pull it apart later (hello, perfect bun for sandwiches or just plain eating!).

Step 5: Fold the Circle in Half
Fold the oiled circle in half to make a semi-circle. This is the base of your swan’s body—simple, right?

Step 6: Cut the Neck
Take a sharp knife (a butter knife works fine) and cut a long, thin strip from the curved edge of the semi-circle—about halfway down. Don’t cut all the way through! This strip will be the swan’s neck.

Step 7: Shape the Neck & Beak
Gently lift the thin strip you just cut and bend it upward to make the swan’s neck. Then, pinch the end of the strip to form a tiny beak. If it’s a little wobbly, don’t worry—just adjust it until it looks swan-like. You’ve got this!

Step 8: Add the Wings
Take your knife again and make a few small, shallow cuts on the rounded part of the semi-circle (the part that’s not the neck). These will be the swan’s wings—super easy, and it makes the bun look so much more realistic.

Step 9: Make the Red Details
Remember that leftover dough we saved? Take a tiny piece of it and mix in a pinch of red yeast rice powder. Knead it until it’s pinkish-red (you don’t need a lot—just enough for the beak and crown). Roll this red dough into a small square, then cut it into a tiny triangle for the beak. Cut another even smaller triangle for the crown.

Step 10: Attach the Eyes & Red Accents
Use a tiny bit of water to “glue” the red triangle onto the swan’s beak (wait, no—wait, the beak we pinched earlier? Actually, the red triangle is the beak! Oops, my bad—let me clarify: the red triangle goes on the end of the neck strip to make the beak, and the smaller red triangle goes on top of the head for the crown. You can also use a tiny black sesame seed for the eye (or a dot of food coloring if you don’t have sesame seeds). So cute!

Step 11: Steam the Buns
Here’s my go-to steaming trick: use a cold steamer. Place the swan buns on a greased steamer tray (or line it with parchment paper so they don’t stick) and put them in the steamer. Turn the heat to medium-low and let them steam for about 15 minutes. Why cold water? It lets the buns rise a little more while they heat up, making them extra fluffy.

Step 12: Enjoy Your Adorable Swan Buns!
Once the timer goes off, turn off the heat and let the buns sit for 2-3 minutes before opening the steamer (this prevents them from deflating). Then… ta-da! You’ve got a plate of cute white swan steamed buns. Grab one, pull it apart, and enjoy—they’re soft, slightly sweet, and perfect for breakfast, a snack, or even as a fun side dish.

Pro Tips for Perfect Swan Buns
- Don’t over-steam: Since these buns are small, 15 minutes is exactly right. Over-steaming will make them mushy.
- Warm spot hack: If you don’t have a warm place to let the dough rise, put a pot of hot water in the oven and place the dough bowl on a rack above it. The steam will keep it warm!
- Customize: Want to make them sweet? Add a little sugar to the dough. Want to make them savory? Add a pinch of salt and some chopped herbs.
Final Thoughts
Making these white swan steamed buns is such a fun activity—whether you’re doing it alone, with friends, or with your kids. They’re not just delicious; they’re also a great way to add a little magic to your mealtime. Plus, when you serve them, everyone will be like, “Did you buy these? They’re so cute!” And you can say, “Nope—made ’em myself!” Trust me, the bragging rights alone are worth it. So go ahead, grab your flour and yeast, and let’s make some swan buns that’ll “fly” right to your table!


: A Spicy, Tangy Winter Comfort Food You Need to Try")
 Recipe: Spicy, Tender, and Perfect for Winter")