

 & Red Dates Pork Bone Soup Recipe | Nourishing Chinese Wellness Dish")

 for Dragon Boat Festival")
Ah, the Dragon Boat Festival is just around the corner—can you smell that? The sweet, savory aroma of zongzi floating through the air? It’s like the whole neighborhood turns into a zongzi factory this time of year! And let’s be real, no store-bought zongzi can beat the homemade ones, right? Today, I’m spilling my family’s secret recipe for salted egg and pork zongzi—my husband swears they’re better than the famous Wufangzhai brand. Let’s dive in!
Why Homemade Salted Egg and Pork Zongzi Are Worth the Effort
First off, let’s talk about why you should bother making zongzi from scratch. Store-bought ones are convenient, but they’re often skimpy on fillings—like, where’s the pork? Where’s the salted egg yolk? Homemade zongzi let you load up on all your favorite ingredients. Plus, the process is actually fun! It’s a great activity to do with family, and the end result is so satisfying. Trust me, once you take that first bite of a juicy, flavorful homemade zongzi, you’ll never go back to the store-bought kind.
Ingredients You’ll Need
Let’s get down to the nitty-gritty. Here’s what you’ll need to make these mouthwatering zongzi:
- Zongzi leaves (also called bamboo leaves)
- Zongzi strings (cotton or bamboo strings work best)
- Glutinous rice (sticky rice)
- Lean pork (pork shoulder or belly is great for extra flavor)
- Salted duck eggs (preferably with shells for better aroma)
- Cooking wine
- Dark soy sauce (for that rich, brown color)
- Oyster sauce
- MSG (optional, but adds umami)
- Chicken bouillon (or chicken powder)
- White sugar
- Salt
- Edible alkali (also called sodium carbonate, for that classic yellow color and chewy texture)
Step-by-Step Instructions
1. Marinate the Pork (The Most Important Step!)

Okay, listen up—this is non-negotiable. The pork needs to be marinated for at least 10 hours, or even overnight. Why? Because if the pork isn’t fully seasoned, your zongzi will be bland. Here’s how to do it:
Cut the lean pork into small cubes (about 1-inch squares). Then, toss them in a bowl with cooking wine, dark soy sauce, oyster sauce, MSG, chicken bouillon, white sugar, and salt. Mix everything together until the pork is evenly coated. Let it sit in the fridge for at least 10 hours. Pro tip: Don’t be shy with the salt! The rice will absorb some of the saltiness, so the pork needs to be a bit salty to balance it out.
2. Prepare the Zongzi Leaves and Strings

While the pork is marinating, you can prep the zongzi leaves and strings. Soak them in water for the same amount of time as the pork—around 10 hours. This softens the leaves so they’re easier to fold without breaking. Once they’re soaked, use scissors to trim off the hard stems at the end of each leaf. Then, scrub both sides of the leaves with a clean towel to remove any dirt or debris. Rinse them a few times with water to make sure they’re spotless.
3. Prep the Salted Egg Yolks

I’m a firm believer that salted eggs in their shells are way better than pre-packaged yolks—they have a richer, more aromatic flavor. So, buy whole salted duck eggs, wash them thoroughly, then crack them open. Separate the yolks from the whites (you can save the whites for another dish, like scrambled eggs). For each zongzi, you can use half a yolk, but if you’re a yolk lover (like me!), feel free to use a whole one. No judgment here!
4. Prepare the Glutinous Rice

Now, let’s talk about the rice. My grandma always said that washing the rice until the water runs clear is key—it makes the zongzi less likely to spoil. So, take your glutinous rice and rinse it under cold water, rubbing the grains together, until the water is no longer cloudy. Then, drain the excess water. Next, add a pinch of edible alkali and mix it into the rice. The rice will turn a light yellow color—that’s normal! The alkali not only gives the rice that classic zongzi hue but also makes it chewier and more flavorful. Let the rice sit for about 30 minutes to absorb the alkali.
5. Time to Fold the Zongzi!

Okay, this is the fun part (and maybe the tricky part if you’re a beginner). Let’s break it down:
- Take two zongzi leaves and overlap them slightly, with one end higher than the other. This creates a larger surface area to hold the rice and fillings.
- Roll the leaves into a cone shape, making sure the bottom is tight (you don’t want rice to leak out!).
- Add a small amount of rice to the bottom of the cone—about 1/3 full.
- Add a piece of marinated pork and a salted egg yolk (or half a yolk) on top of the rice.
- Fill the rest of the cone with more rice, pressing it down gently to make sure it’s compact.
- Fold the top of the leaves over the rice to form a neat package. Use the zongzi string to tie it tightly—this is crucial! If it’s not tied well, the zongzi will fall apart while cooking.
Don’t worry if your first few zongzi look a bit messy—practice makes perfect! I still remember my first attempt: the rice was spilling out everywhere, and the string was tied so loose that half the filling fell out during cooking. But now? I’m a pro (if I do say so myself).
6. Cook the Zongzi

Once all your zongzi are folded and tied, it’s time to cook them. The easiest way is to use a pressure cooker—it cuts down the cooking time significantly. Place the zongzi in the pressure cooker, add enough water to cover them completely, and cook on high heat until the pressure cooker starts to whistle. Then, reduce the heat to medium-low and cook for another 60 minutes. Turn off the heat and let the pressure release naturally before opening the lid. If you don’t have a pressure cooker, you can use a regular pot, but it will take longer—around 3-4 hours. Just make sure the water doesn’t boil dry!
7. Let’s Eat!

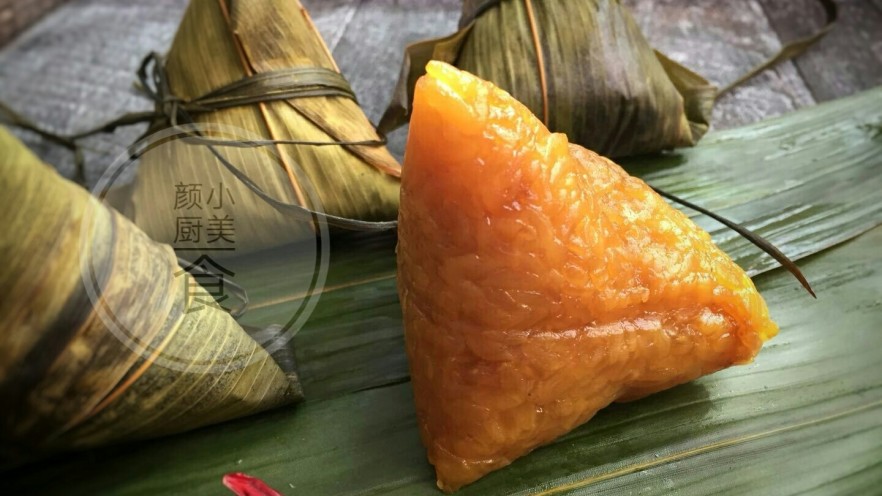
Once the zongzi are cooked, let them cool for a few minutes (they’ll be hot!). Then, untie the string and peel back the leaves. The smell alone will make your mouth water—warm, sticky rice with a hint of alkali, juicy pork, and creamy salted egg yolk. My husband couldn’t wait—he ate five in one sitting and still wanted more! He even said they’re better than Wufangzhai’s zongzi. High praise, indeed.
Pro Tips for Perfect Zongzi Every Time
- Don’t skip the marination time for the pork. I know it’s a long wait, but it’s worth it for the flavor.
- Use edible alkali sparingly—too much can make the rice taste bitter.
- Make sure to tie the zongzi tightly. Loose zongzi = messy cooking and lost fillings.
- If you’re new to folding zongzi, watch a few YouTube tutorials first. Visuals help a lot!
- Store leftover zongzi in the fridge for up to 3 days, or freeze them for up to a month. Just reheat them in a steamer or microwave before eating.
Final Thoughts
Making zongzi from scratch is a labor of love, but it’s so rewarding. Whether you’re making them for the Dragon Boat Festival or just because you’re craving something delicious, this recipe won’t let you down. And hey, if you’re not perfect at folding them the first time, that’s okay—your family will still love them (and probably tease you a little, but in a good way).
If you try this recipe, let me know how it turns out! Leave a comment below, or tag me on social media. I’d love to see your zongzi creations. And if you have any questions, feel free to ask—I’m here to help. Happy cooking, and enjoy your homemade salted egg and pork zongzi!
: A Nostalgic Northeast Chinese New Year Recipe")


 Recipe for Lantern Festival")
 – A Flavor-Packed Chinese Comfort Food Recipe")

")
