

 & Red Dates Pork Bone Soup Recipe | Nourishing Chinese Wellness Dish")


Introduction
Hey foodies! Let me tell you about the snack that changed my life—no exaggeration! I’m obsessed with Chinese pastries, and this pork floss egg yolk crispy takes the classic egg yolk pastry to a whole new level. Picture this: buttery, flaky layers that melt in your mouth, a creamy, rich salted egg yolk center, and a generous sprinkle of savory pork floss… chef’s kiss. It’s like a party in your mouth every time you take a bite.
Now, I know traditional egg yolk pastries are already amazing, but adding pork floss? That’s where the magic happens. The umami from the floss pairs perfectly with the salted, slightly sweet egg yolk, and the crispy crust? It’s everything you could want in a snack. Whether you’re serving them at tea time, gifting them to friends, or just satisfying your late-night sweet-tooth (but let’s be real, they’re more savory than sweet), this recipe is a game-changer.
Trust me when I say—once you make these, you’ll never go back to plain egg yolk pastries. Let’s dive into how to make this crispy, flaky goodness at home!
Why This Recipe is a Must-Try
Okay, let’s break down why this pork floss egg yolk crispy is the ultimate snack. First, the texture—layers upon layers of buttery, flaky crust that shatters when you bite into it. Then, the flavor: the salted egg yolk is rich and creamy, the pork floss is fluffy and savory, and the subtle sweetness from the sugar balances everything out. It’s a perfect harmony of sweet, salty, and umami—you can’t eat just one!
Also, this recipe is surprisingly do-able even if you’re new to baking pastries. The steps are straightforward, and I’ve included pro tips to avoid common mistakes (like under-resting the dough or overcooking the egg yolks). Plus, these pastries store really well in an airtight container, so you can make a batch and enjoy them over the weekend without worrying about them going stale.
Let’s get to the good stuff: the ingredients and the step-by-step guide!
Ingredients You’ll Need
Let’s start with the star of the show: the filling. You’ll need:
- 10 salted egg yolks – I use pre-cooked Gaoyou salted duck eggs (they’re already cooked, so no need to boil them!). Look for ones that are oily and have a sandy texture—those are the best. If you can’t find pre-cooked, boil raw salted eggs for 10-15 minutes until they’re fully cooked.
- 80-100g pork floss – The fluffier, the better! Get a high-quality one with that authentic meaty umami. If it’s too dry, a splash of milk can help moisten it, but try to find a naturally soft floss first.
Now, the pastry dough. You’ll need two parts: the “oil skin” (for the outer layers) and the “shortening layer” (for the flakiness):
- Oil Skin Ingredients:
- 30g lard (or vegetable shortening if you can’t find lard—lard is traditional and gives that extra flakiness, though!)
- 120g all-purpose flour
- 8g granulated sugar (adds a tiny bit of sweetness to balance the saltiness)
- 50g hot water (key for making the dough soft and pliable—use water around 50°C, not boiling)
- Shortening Ingredients:
- 37g lard
- 70g all-purpose flour
- Optional Garnish: 1 egg (beaten, for the egg wash) + black sesame seeds (for that extra crunch and pretty look)
Pro tip: Measure everything carefully! Baking is science, and even a gram or two of extra flour can throw off the texture. I use a kitchen scale for precision, but if you don’t have one, just eye-ball it as best as you can.
Step-by-Step Instructions
Let’s start making the filling first—it needs to chill a bit before we assemble the pastries.
Step 1: Prepare the Filling
Take those salted egg yolks and crush them with a spoon until they’re crumbly. If they’re too dry, add a tiny bit of water to make them moist but not soggy. Then, mix in the pork floss. Use your hands (or disposable gloves!) to combine them until everything is evenly mixed. The total weight should be around 200g—since my 10 yolks weighed 110g, I used 90g floss to reach 200g.  (See? Easy peasy!)
Step 2: Chill the Filling
Divide the mixture into 10 equal portions, about 20g each. Roll each into a ball and place them on a plate covered with plastic wrap. Pop them in the fridge for 10-15 minutes to firm up. This helps the filling stay together when we wrap it in the dough later.  (Trust me, this step is crucial for not having a messy filling everywhere!)
Step 3: Make the Oil Skin Dough
Now, let’s make the oil skin. In a bowl or bread machine, combine the oil skin ingredients: 30g lard, 120g flour, 8g sugar, and 50g hot water. If using a bread machine, select the “dough” cycle (15 minutes works great). If doing by hand, knead until the dough is smooth and elastic—about 5-10 minutes.  (Hot water is key here! It makes the dough super soft, which is why the layers turn out so flaky.)
Step 4: Make the Shortening Dough
In a separate bowl, mix the shortening layer ingredients: 37g lard and 70g flour. Use a spoon to combine until it’s crumbly—no need to knead, just mix until evenly incorporated.  (This is the secret to the flakiness—don’t overwork it, just mix until it’s a sandy texture.)
Step 5: Rest the Doughs
Once both doughs are ready, place them in separate bowls, cover with plastic wrap, and let them rest for 5 minutes. This relaxes the gluten and makes rolling easier later.  (Don’t skip this rest time! Rushing leads to tough pastries.)
Step 6: Divide and Shape the Doughs
Divide both the oil skin and shortening dough into 10 equal pieces. Roll each into a smooth ball. Cover them again with plastic wrap to prevent drying out.  (I like to line them up in the order they’ll be used, so I don’t mix up the oil skin and shortening!)
Step 7: Wrap the Shortening in the Oil Skin
Take one oil skin ball and roll it into a flat circle with a rolling pin. Place one shortening ball in the center, then pull the edges of the oil skin up and around to seal it. Pinch the top to make a tight ball. Repeat with all 10 pieces.  (Imagine wrapping a dumpling—exactly like that! Make sure there are no gaps, or the shortening will leak out.)
Step 8: Rest Again (Critical!)
Place all wrapped dough balls on a plate, cover with plastic wrap, and rest for another 5 minutes. This is when the magic happens—your dough is getting ready to be rolled into those flaky layers.  (I promise, this 5-minute rest is non-negotiable for that perfect flakiness.)
Step 9: Roll and Roll Again
Take one wrapped dough ball and roll it out into a long, thin rectangle (about 15cm long). Then roll it up tightly from the bottom to the top, like rolling a log. Cover with plastic wrap and rest for 5 minutes. Repeat this process with all 10 doughs: roll out, roll up, rest 5 minutes.  (Yes, two rolls per dough! This is what creates those beautiful, flaky layers when baked.)
Step 10: Flatten and Fill
Now, take one rolled dough log and press it gently with your palm to flatten it into a round shape. Roll it out into a thicker circle (about 8cm in diameter). Place one of the pork floss-yolk filling balls in the center.  (Be careful not to overfill! 20g is perfect—too much and it’ll spill out.)
Step 11: Seal and Shape
Fold the edges of the dough up and around the filling, pinching to seal the bottom. Roll the whole thing into a ball, then gently press it to shape it into a round disk. Repeat with all 10 pastries.  (The key is to seal it well so the filling doesn’t leak during baking—you’ll thank me later!)
Step 12: Egg Wash and Baking
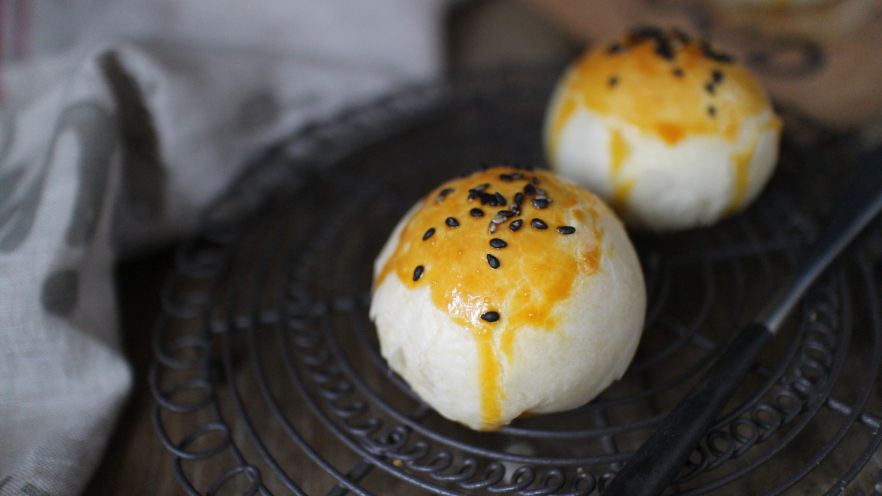
Preheat your oven to 180°C (350°F). Brush each pastry with the beaten egg wash and sprinkle with black sesame seeds. Place them on a baking sheet lined with parchment paper, about 2 inches apart.  (Egg wash makes the pastries golden and shiny—so pretty, right?)
Step 13: Bake to Perfection
Bake for 30 minutes at 176°C (350°F), checking halfway through. If the top is getting too brown, cover with foil. Let them cool for 10 minutes on the baking sheet before transferring to a wire rack to cool completely.  (Pro tip: The longer they cool, the crispier they get! Don’t rush this step.)
Step 14: Enjoy Your Masterpiece!
Once cooled, take a bite and savor the layers, the creamy egg yolk, and the savory pork floss. They’re even better the next day! (I’ve kept these in an airtight container for 4 days, and they’re still crispy—unbelievable!)
Pro Tips for Perfect Crisps
Let’s go over some pro tips to make sure your pastries are restaurant-quality:
- Choose the Right Egg Yolks: Pre-cooked salted duck eggs from Gaoyou are my favorite—they’re naturally oily and have that perfect rich, sandy texture. If you use fresh salted eggs, they might be too dry, so add a bit of oil or milk to the filling to moisten them.
- Master the Dough Rolling: Don’t rush the rolling or resting steps! Each 5-minute rest is crucial. If you skip resting, your dough will be tough, and the layers won’t form. Trust me, I’ve tried cutting corners and ended up with flat, chewy pastries—never again!
- Measure Filling Carefully: The filling should be 20g per ball. If it’s too big, it’ll overflow; too small, and you’ll miss that pork floss flavor. Use a kitchen scale if you can, or just weigh with your hand (but scale is better!).
- Oven Temperature Adjustments: Every oven is different! If yours runs hot, lower the temperature by 10°C. Also, watch the top closely—cover with foil if it’s browning too quickly. I usually start at 176°C (350°F) to get that golden top without burning.
- Storing the Pastries: Keep them in an airtight container at room temperature for up to 4 days. If you want them fresh longer, refrigerate, but let them come to room temperature before eating to restore that crispiness.
Conclusion
Okay, foodie friends—you’re now a pro at making these pork floss egg yolk crisps! They’re the perfect blend of sweet, salty, and umami, with that flaky crust that’s almost addictive. Whether you’re making them for a weekend treat, a tea party, or gifting to friends, these pastries will be a hit.
Remember, the key is patience with the dough rests and choosing the right ingredients. Once you nail the filling and the rolling, you’ll be hooked! Let me know how yours turn out—I’d love to see your crispy creations on Instagram or Tiktok. Happy baking, and enjoy every delicious, flaky bite!
P.S. If you make these, tag me in your photos—I’ll be drooling over them! 😊


")
 Recipe: Super Flaky & Buttery")


