

 & Red Dates Pork Bone Soup Recipe | Nourishing Chinese Wellness Dish")


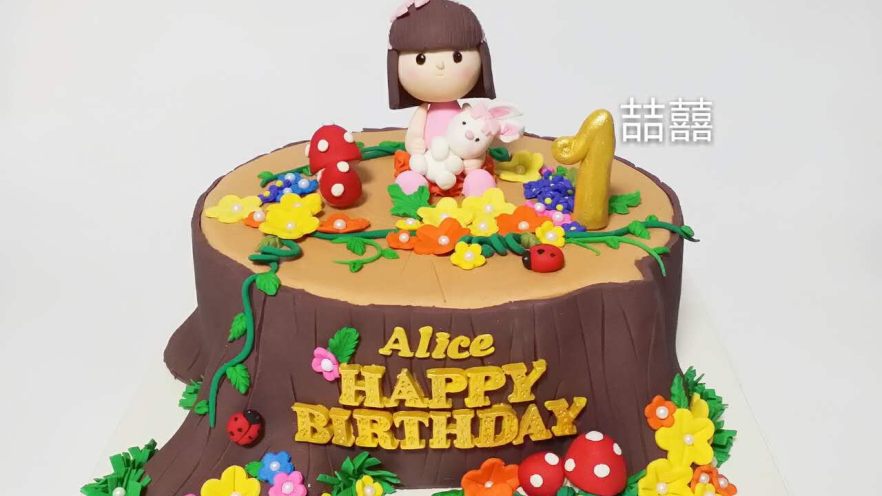
Woodland Stump Girl Fondant Cake: My Favorite 1st Birthday Party Dessert Table Centerpiece
Let me start by gushing about this fun, vibrant fondant cake I made recently! A mom reached out to me for her daughter’s first birthday dessert table, and she absolutely hated the usual pink, frilly baby girl themes. She wanted something bold, warm, and full of personality—no cutesy pastels allowed! That’s how this stump girl fondant cake was born. It’s got rich earthy tones, a sweet little girl sitting with her bunny friend, and it’s perfect for any woodland, rustic, or neutral-toned birthday party. I’m breaking down every single step below so you can make it too, even if you’re new to working with fondant!
First Things First: What You’ll Need for This Stump Fondant Cake
Before we dive into the step-by-step, let’s go over the basic supplies you’ll need to pull this off. I kept the ingredient list simple so you don’t have to track down 20 fancy baking tools:
- 600 grams of premade fondant (I like to use store-bought if I’m short on time, but you can make your own homemade fondant too!)
- 1 fully baked pound cake base (a standard 8-inch round pound cake works perfectly here)
- Food coloring gel (brown, peach, pink, orange, and a tiny bit of white for details)
- Basic baking tools: rolling pin, pastry brush, sharp paring knife, offset spatula, cake board, and a small paintbrush for dusting
- Optional: a fondant smoother, hard bristle brush, and cookie cutters for the little flower details
Pro tip from me: Skip the powdered sugar hand dusting if you want bright, vivid colors! Instead, use a tiny bit of vegetable oil to keep your hands from sticking to the fondant. It makes such a huge difference in how the colors pop.
Step 1: Prep Your Cake Base & Cover It With Fondant

First things first: make sure your pound cake is completely cooled before you start covering it with fondant. I can’t tell you how many times I’ve ruined a cake by trying to cover it while it’s still warm—moisture melts the fondant and makes it slide right off! Let your cake sit on the counter for at least 2 hours, or pop it in the fridge for 30 minutes to speed things up.

Once your cake is ready, grab your largest rolling pin and roll out a big sheet of light brown fondant. You want it to be about 1/8 inch thick and big enough to cover the entire top and sides of your cake with a little extra to trim off. Lay the fondant gently over the top of the cake, then slowly smooth it down over the sides. Don’t pull too tight—fondant is stretchy, and you don’t want it to tear!

Next, use a fondant smoother (or even the back of a clean spoon if you don’t have one) to press out any air bubbles and get the surface nice and smooth. Start from the top of the cake and work your way down to the sides, smoothing out any wrinkles as you go.

If you have any uneven spots or areas where the fondant isn’t sticking perfectly to the cake, grab a hard bristle brush and gently press the fondant down into place. This works way better than your fingers for getting into tight corners and making sure the fondant adheres fully to every curve of the cake.

Once the fondant is smoothed out all over, take a sharp paring knife and trim off the excess fondant from the bottom of the cake. Run the knife along the edge of the cake board to get a clean, straight cut. Wipe off any extra fondant crumbs with a dry paper towel, and you’ll have a perfectly smooth stump base ready for details!
Step 2: Add Realistic Tree Stump Details
This is my favorite part of the whole cake—turning that plain brown covered cake into a real-looking tree stump! Let’s start with those classic tree ring details:

Take a regular dinner fork and press the tines gently into the top of the cake, moving in concentric circles to make tree rings. Don’t press too hard—you just want to etch a shallow line into the fondant so it looks like the natural growth rings of a tree. Start from the center and work your way out to the edges of the cake top.

Next, add some natural-looking cracks to the top and sides of the stump. Use your paring knife to make a few shallow, irregular lines across the cake. You don’t need to go crazy—just a handful of random cracks will make the stump look like it’s been sitting out in the woods for years!

Now let’s add some textured bark details. Grab a small batch of dark brown fondant and roll it out into long, thin strips—about 1/4 inch thick and 6 inches long. You don’t need them to be perfectly straight; in fact, slightly uneven strips will look more realistic!

Take each strip and gently curl it a little bit, then press it onto the side of the cake. Overlap the strips slightly to look like real tree bark, working your way all around the cake. Don’t worry if some of the strips don’t line up perfectly—that’s part of the charm!

Once you’ve covered the entire cake with the bark strips, trim off any excess that hangs over the bottom of the cake with your paring knife. Then use your offset spatula to smooth down the edges of the strips so they stick properly to the cake.


Last step for the stump: add more texture to the bark strips! Use the tines of your fork again to make small, vertical lines along each strip of dark brown fondant. This will make the bark look even more realistic, like you’re looking at the rough, textured surface of a real tree stump.
Step 3: Make the Sweet Little Girl & Bunny Topper
This is the fun, cute part of the cake—making the little girl sitting on the stump with her bunny friend! I’ll break this down step by step so it’s easy to follow:

First, grab a ball of peach-colored fondant and roll it into a small, rounded shape for the girl’s torso. Press it gently flat on one side so it will stick easily to the top of the cake. You don’t need it to be perfect—little imperfections will make her look more human!

Next, make two small, thin sausage shapes for the girl’s legs. Press them gently into the torso to attach them, then bend them slightly to look like she’s sitting cross-legged on the stump.

Now let’s make her adorable dress! Grab a batch of orange fondant and roll it out into a long, thin strip—about 2 inches wide and 8 inches long. Use your rolling pin to gently taper the edges of the strip so they’re thinner than the middle, which will give it that classic ruffled dress look.


Fold the strip in half lengthwise, then press a small line down the center with the back of your fork to create a seam. Wrap the strip around the girl’s torso, pressing the ends together at the back to secure it. Fluff out the edges a little bit to make it look like a full, ruffled dress.


Now let’s make her head! Roll another small ball of peach fondant and gently press it flat on one side to attach it to the top of the torso. Use your fingers to shape the ball into a round, soft face—don’t make it too perfect, since real babies have chubby, slightly uneven cheeks!
Next, make her bunny ears! Grab a small amount of white fondant and roll it into two thin, pointed sausage shapes. Press them flat slightly, then overlap them in the middle and use your paring knife to cut a straight line down the center. Bend the edges of each ear slightly to make them look floppy, then attach them to the top of the girl’s head.


Now let’s make her tiny bunny friend! Roll a small ball of white fondant for the bunny’s body, then a slightly smaller ball for the head. Attach the head to the body, then make four small, thin sausage shapes for the bunny’s legs. Attach the legs to the body, then add a tiny tail by rolling a small ball of white fondant and pressing it onto the back of the bunny’s body.
Don’t forget the bunny’s ears! Make two tiny pointed shapes just like the girl’s, attach them to the top of the bunny’s head, and add a little pink dot of fondant inside each ear for extra cuteness.

Now let’s add the finishing touches to the girl’s face: use a tiny paintbrush and some pink food coloring gel to add a little blush to her cheeks, and a tiny dot of black food coloring for her eyes and mouth. You can also add a little bit of hair by rolling thin strands of brown fondant and pressing them onto the top of her head, then styling them into soft bangs across her forehead.

Last but not least, add a tiny bow to the girl’s hair! Roll a small ball of pink fondant, flatten it, then fold it in half and pinch the center together to make a bow. Attach it to the side of her head with a tiny dot of water, and you’re almost done!

Step 4: Add Final Decorations & Finish the Cake
Now that your toppers are all done, it’s time to put the whole cake together! Gently lift the girl and bunny up with a small offset spatula and place them on the top of the stump cake, right in the center. Arrange them so they look like they’re sitting together having a picnic.

Now let’s add those cute little flower and letter details! Use your favorite cookie cutters to cut out small flowers from pastel colored fondant—yellow, white, and light pink work perfectly with the earthy stump tones. Attach them to the sides of the cake with a tiny dot of water, and add a few green leaves for extra color.
If you want to add a personalized touch, use a small letter cutter to spell out the birthday girl’s name or her first birthday date on a small plaque made of fondant. Attach the plaque to the side of the cake, and you’ll have a one-of-a-kind centerpiece that the whole party will love!
My Top Pro Tips for Making This Stump Girl Fondant Cake
I’ve made a few of these cakes now, so I’ve picked up a few tricks that make the process way easier. Here are my best tips:
- Don’t overdo the hand powder! Like I mentioned earlier, using too much powdered sugar will make your fondant look dull and chalky. Instead, use a tiny bit of vegetable oil on your hands to keep them from sticking.
- When attaching pieces of fondant, only use a tiny bit of water. Too much water will make the fondant soggy and ruin your details. A quick dab with a pastry brush is all you need!
- If you’re new to working with fondant, practice making the toppers first! Roll out some extra fondant and practice making the girl’s dress or the bunny ears before you start on the actual cake.
- Let your fondant pieces sit for a few minutes before attaching them. This will help them firm up a little bit so they hold their shape better on the cake.
- Have fun with it! This cake is all about personality, so don’t stress if your details aren’t perfect. The little imperfections are what make it feel special and handmade.
Final Thoughts on This Woodland Stump Girl Cake
This cake was such a joy to make, and the mom absolutely loved it! She told me that all her guests couldn’t stop talking about the cute little girl and bunny toppers, and how perfect it fit her non-pink birthday party theme. If you’re looking for a unique, customizable fondant cake for a first birthday, baby shower, or even a woodland-themed wedding, this is the perfect project.
Even if you’ve never worked with fondant before, don’t be intimidated! Take it one step at a time, and you’ll have a beautiful, show-stopping cake that everyone will rave about. Let me know if you try making this cake—I’d love to see how yours turns out!

 Recipe – Lunar New Year Prosperity Dish")
")
 Recipe: Super Flaky & Buttery")


")
