

 & Red Dates Pork Bone Soup Recipe | Nourishing Chinese Wellness Dish")

")
Hey, Let’s Make Lollipop Cookies! 🍭
Okay, first off—can we just take a second to appreciate how awesome Children’s Day is? 🎉 I mean, as a kid, it was basically a free pass to candy, toys, and zero homework. And now, as a parent, I get to relive that magic by making these adorable lollipop-shaped chocolate chip cookies! Let me tell you the story: this morning, my little mini-me (aka my 6-year-old) burst into my kitchen, clutching a crumpled drawing of a lollipop and yelling, “Mommy, make it like the one in my dream!” 😂 I swear, I almost cried—how could I say no?
Then I remembered my own childhood: every June 1st, my parents would surprise me with a giant, spiral lollipop. The kind with those hard, colorful swirls that you’d suck on for hours, then feel like a tiny sugar queen. So I thought, why not combine that nostalgic candy feeling with something even better: cookies! And since chocolate chips are basically the kid-approved currency of the universe, I added those too. Voilà—these lollipop cookies were born! They’re crispy on the outside, soft on the inside, and shaped like the lollipops I used to beg for. Plus, they’re so easy to make, even if you’re a total baking newbie. Let’s dive in!
Ingredients You’ll Need (No Fancy Stuff—Promise!)
- 135g cake flour (or all-purpose flour if you don’t have cake flour—cake flour makes them extra tender, but all-purpose works too!)
- 15g cocoa powder (the dark, rich kind—skip the unsweetened unless you want bitter cookies!)
- 4g baking powder (ultra-fine, no gritty bits—this is non-negotiable for fluffy cookies!)
- 45g whole milk (room temp is best, but cold milk is okay—just mix thoroughly)
- 75g corn oil (or vegetable oil—neutral flavor so chocolate shines)
- 48g egg white (about 1.5 large egg whites; if you don’t have enough, use a splash more milk)
- 65g powdered sugar (no grainy texture, just sweet and smooth)
- 80g mini chocolate chips (smaller = cuter “lollipop” effect—trust me, these tiny bits make it pop!)
Step-by-Step: Let’s Bake Those Lollipops! 🧁
Okay, let’s get our hands dirty (but not literally—unless you’re a messy baker, which is totally allowed). Here’s how to turn these ingredients into edible lollipops:
 Step 1: Prep Your Ingredients
First things first—gather all your tools! You’ll need two mixing bowls, a whisk/egg beater (or even a fork), and a sieve. Pro tip: Use mini chocolate chips! The smaller they are, the more evenly they distribute in the batter, so your “lollipops” look extra candy-like. Also, check that your baking powder is super fine—no granules, or your cookies might have weird bumps. Trust me, I’ve made that mistake before…
 Step 2: Mix the Wet Ingredients
Grab your first bowl and add the milk, egg white, corn oil, and powdered sugar. Whisk these together until they’re smooth—no clumps allowed! It should look like a creamy liquid. If it’s too thick, add a tiny splash of milk; if too runny, a pinch more powdered sugar. Easy peasy!
 Step 3: Combine the Dry Ingredients
In the second bowl, mix the cake flour, cocoa powder, and baking powder. Whisk them like you’re stirring up a chocolate storm! This step ensures all the dry ingredients are evenly mixed—no white flour streaks left. If you’re worried about lumps, sift them now (you’ll need that sieve later anyway).
 Step 4: Sift the Dry Mix into the Wet Mix
Ah, the sieve magic! Place the sieve over the wet ingredients and pour the dry mix through it. Why sift? To avoid lumps and make the batter silky-smooth. To speed this up, use a whisk to gently stir the dry ingredients as they fall through the sieve. No more flour clouds in your kitchen—hallelujah!
 Step 5: Fold Until Smooth
Now, fold the dry-wet batter together with a spatula or whisk. Think of it like folding a blanket—gentle, from the bottom up. Keep folding until there are no white flour bits left. The batter should be thick and glossy, like a thick milkshake (but chocolatey, obviously). If it’s too thick, add a splash more milk; if too thin, a tiny bit more flour. Perfect consistency is key!
 Step 6: Add the Chocolate Chip Magic
Now for the fun part—pour in the mini chocolate chips! Fold them in gently so they’re distributed evenly. Some will peek out, which is exactly what we want—like little chocolate candies in a lollipop. If you want extra “lollipop” vibes, you can sprinkle a few more chips on top before baking (but don’t overdo it—they’ll melt!).
 Step 7: Pipe the Batter into Lollipop Shapes
Grab a piping bag (or a Ziploc bag with the corner cut off—cheap hack alert!) and snip the tip to a ½-inch opening. Fill the bag with the batter, then hold it over a parchment-lined baking sheet. Squeeze the batter in a circular motion to make mini “lollipops”—about 2-3 inches wide. Space them 2 inches apart so they don’t merge while baking. Pro move: Use a toothpick to create a tiny hole in the center of each cookie (more on that later!).
 Step 8: Bake & Let the Magic Happen
Preheat your oven to 180°C (350°F) and stick the baking sheet in the middle rack. Bake for 12-15 minutes. Keep an eye on them—every oven is different! The cookies are done when the edges are golden and the tops look slightly puffed. They’ll be soft when you take them out, so let them cool for 5 minutes on the pan before moving them to a wire rack. Trust me, the wait is worth it—those chocolate chips will be melty and dreamy!
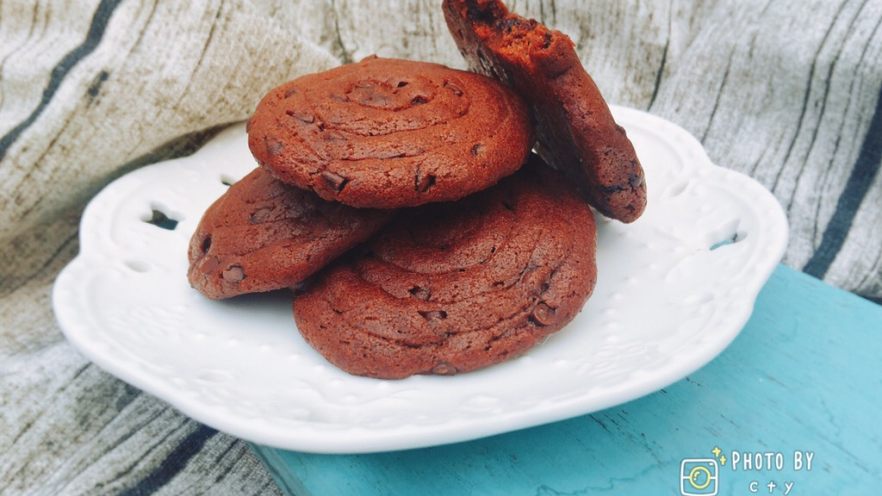
 Step 9: Admire Your Lollipops!
Look at them! Crispy on the outside, soft on the inside—they’re like little edible lollipops! My kid went nuts—she kept saying, “Mommy, they’re just like the ones in my drawing!” 😍 Pro tip: If you used a straw trick (more on that in the tips!), the center hole will make them look like real lollipops. Even the bottom is pretty—no burnt edges, just smooth, golden perfection.
Pro Tips: Make These Cookies Perfect Every Time! 💡
Okay, let’s be real—even if you follow the steps, you might need a little extra help. Here are my secret hacks:
- Straw Trick! If you have colorful straws, use them to shape the cookies while they’re warm (after baking for 5 minutes, so they’re not too hot). Press a straw gently into the center of each cookie, then pull it out. Now you have a cute “lollipop stick” hole! The kids will love this—so interactive and Instagrammable.
- Color Those Cookies! Add a few drops of food coloring to the batter if you want rainbow lollipops. Pastel colors for spring vibes, or bright red/pink for Valentine’s Day—your call!
- Chill the Batter! For chewier cookies, chill the batter in the fridge for 30 minutes before baking. It firms up the dough and gives a deeper chocolate flavor. Lazy? No, just a pro move.
- Storage Hack! Store cookies in an airtight container at room temp for up to 5 days. If you want them fresh longer, freeze them for 1 month. Thaw for 10 minutes, and they’re good as new!
Final Thoughts: Why These Cookies Are a Hit! 🥰
These lollipop cookies are the ultimate “feel-good” treat. They’re nostalgic, easy, and so fun to make with kids—even if they “help” by eating chocolate chips. The chocolate flavor is rich but not overpowering, and the soft, chewy texture is perfect for little hands. Plus, they’re way cheaper than buying store-bought lollipops! I’ve made them for playdates, birthday parties, and even just as a “we’re bored” snack—they always work.
So, what are you waiting for? Grab your ingredients, put on some music, and let the kids decorate their own “lollipops” with extra sprinkles (if you’re feeling fancy). Tag me in your photos—I’d love to see how your version turns out! And if you have other fun cookie ideas, drop them in the comments—I’m always on the hunt for new treats to share with my mini-me. Happy baking, and happy Children’s Day to all the little (and big!) kids out there! 🍭
 Recipe – Tried & True!")
 Recipe: Super Flaky & Buttery")


")

 – A Classic Cantonese Home-Cooked Dish You Need to Try")