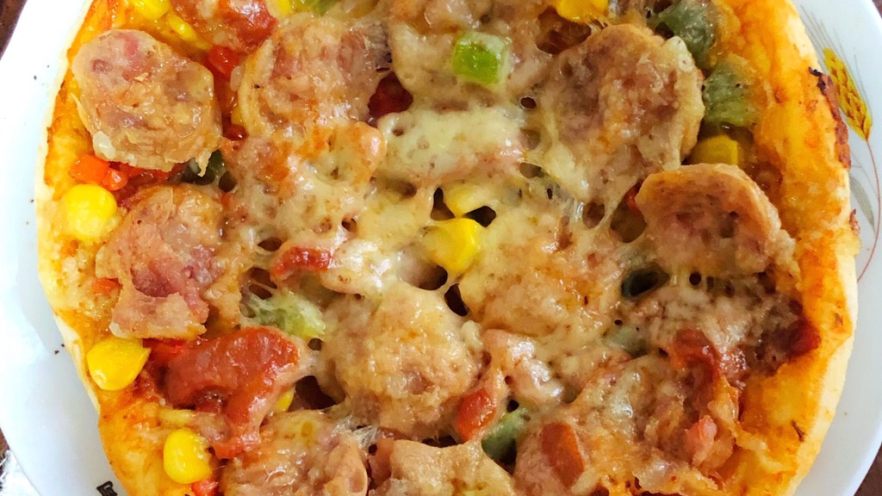
Why Homemade Ham Pizza Beats Takeout Every Time
Let’s be real—who hasn’t stared longingly at a pizza shop line, thinking, “Is it worth the wait?” Spoiler: Yes, but homemade ham pizza? Even better. Sure, we’ve all heard the whispers about pizza being “unhealthy”—cheese, carbs, the works. But here’s the thing: Life’s too short to skip the foods that make you smile. And let’s not forget—those “unhealthy” bits? They’re usually the most delicious. Plus, when you make it at home, you control the ingredients. Want extra cheese? Go for it. Prefer lean ham? Your call. No more sad, soggy takeout slices. Let’s dive into how to make your own perfect ham pizza.
Ingredients You’ll Need
First, let’s gather our troops. This recipe is simple, so no fancy grocery runs required:
- 160g high-gluten flour (gives that nice chewy crust)
- 9g vegetable oil (or olive oil for a fancier touch)
- 2g salt (don’t skip this—it brings out the flavors)
- 2g yeast (the magic that makes the crust rise)
- ½ green bell pepper (adds a fresh crunch)
- ½ onion (sweet or red—your choice)
- 3 ham sausages (or cooked ham slices, if you prefer)
- Tomato sauce (store-bought is fine, but homemade is next-level)
- Mozzarella cheese (shredded—this is non-negotiable for that stringy pull)
- 15g sugar (balances the salt and helps the yeast work)
Step-by-Step Instructions
1. Dough Prep & Rising

Start by tossing your flour, salt, sugar, oil, and yeast into a bread machine. Hit the “dough” setting and let it do its thing. No bread machine? No problem—mix by hand! Just combine dry ingredients first, then add oil and warm water (about 100-110°F) until a soft dough forms. Knead for 5-7 minutes until smooth.

Once the dough is ready, let it rise. Find a warm spot (like your oven with the light on) and cover it with a damp cloth. Wait about 1-1.5 hours until it doubles in size. Pro tip: Poke it gently—if the indentation stays, it’s good to go.
2. Prep Your Toppings

While the dough rises, let’s get those toppings ready. Chop half the onion, half the bell pepper, and one ham sausage into small bits. These will be your “base” toppings—they spread flavor evenly.

Now, for the pretty stuff: Slice the remaining onion into rings, the bell pepper into rings, and the other two ham sausages into thin slices. These will make your pizza look Instagram-worthy (and taste great, too).
3. Shape the Crust

Once the dough has risen, punch it down to release the air (satisfying, right?). Roll it out on a floured surface to fit your pizza pan. Don’t worry if it’s not perfectly round—homemade is charming! Transfer it to the pan, then use a fork to poke holes all over the crust. This prevents it from puffing up too much (we’ve all had that balloon crust disaster).
4. Build Your Pizza

First layer: Tomato sauce. Spread it evenly, leaving a small border for the crust. Don’t overdo it—soggy pizza is a tragedy.

Next, sprinkle those chopped bits (onion, bell pepper, ham) all over the sauce. This is where the flavor builds—every bite gets a little of everything.

Now, the star of the show: Mozzarella cheese. Sprinkle a generous layer over the toppings. Remember, more cheese = more pull. (No judgment if you add an extra handful.)

Arrange your ham slices on top—try to spread them out so everyone gets a piece. Then add the onion and bell pepper rings for color and crunch.

Last but not least: Another layer of mozzarella. Because why not? This locks in the toppings and gives you that perfect golden, cheesy finish.
5. Bake to Perfection

Preheat your oven to 180°C (350°F). Pop the pizza in and bake for 20 minutes. Keep an eye on it—you want the crust to be golden and the cheese to be bubbly and slightly browned.

Once it’s done, let it cool for a minute (we know, it’s hard) before slicing. The wait is worth it—you’ll get clean slices without all the cheese oozing everywhere.
Pro Tips for Pizza Success
- Cheese control: Add more or less mozzarella based on your preference. Want extra gooeyness? Use a mix of mozzarella and provolone.
- Crust hack: For a crispier crust, pre-bake the dough for 5 minutes before adding toppings.
- Topping swap: Don’t have ham? Try pepperoni, chicken, or even pineapple (we won’t judge).
- Storage: Leftovers? Wrap in foil and reheat in the oven for 10 minutes—microwaving makes it soggy.
Final Thoughts
Homemade ham pizza isn’t just about the food—it’s about the experience. Kneading the dough, chopping toppings, and waiting for that first whiff of cheese in the oven? It’s cozy, it’s fun, and it tastes way better than takeout. So next time you’re craving pizza, skip the line and grab your flour. Your taste buds (and wallet) will thank you.