

 & Red Dates Pork Bone Soup Recipe | Nourishing Chinese Wellness Dish")

 Recipe – Tried & True!")
Introduction: Why These Steamed Pork Buns Are a Must-Make!
Okay, let’s be real—there’s nothing like biting into a fluffy, savory steamed bun fresh from the pot. And today, I’m sharing my ultimate jiang rou bao (sauce pork bun) recipe that I’ve tweaked over and over until it’s perfect. Let me tell you, this isn’t just any pork bun recipe—it’s the one that makes my family beg for seconds, even on busy weeknights. Plus, it yields about 20 BIG buns, so there’s plenty to share (or hoard, no judgment here 😂).
These buns have a rich, umami-packed filling with tender pork, sweet-savory sauce, and a soft, chewy skin that stays fluffy even hours later. Trust me, once you make them at home, you’ll never buy store-bought again. Let’s dive in!
Ingredients: What You’ll Need (No Fancy Stuff, Just Good Flavors!)
First, let’s gather the goods. You’ll need ingredients for the filling and the dough—both are equally important for that “I can’t stop eating these” vibe. Here’s the breakdown:
- Filling Ingredients (For 20 Buns):
- Pork (20% fat, 80% lean meat) – 1250g (I use pork belly for extra juiciness, but lean cuts work too!)
- Scallions (green onions) – 250g, chopped into small sections
- Sweet bean paste (or sweet soy paste) – 3 tbsp (this is where the “sweet” magic happens!)
- Granulated sugar – 1.5 tbsp (adds a subtle sweetness to balance the saltiness)
- Monosodium glutamate (MSG) and salt – a pinch (optional, 2g total; skip if you’re low-sodium)
- Dough Ingredients:
- All-purpose flour – 700g (the base of your fluffy bun skin!)
- Active dry yeast – 7g (don’t use instant yeast—this is key for rise time!)
- Warm water – 350ml (plus 35ml extra, just in case your flour drinks more than expected)
- Granulated sugar – 50g (helps the dough rise and adds a tiny sweetness)
Step-by-Step: How to Make These Buns (Pro Tips Included!)
Alright, let’s roll up our sleeves. The filling is the star here, so we’ll start there. Patience is key—cooling the filling is non-negotiable for that perfect texture!
First: Prep the Pork Filling (The Flavor Bomb!)
Let’s start heating up the pan. This is where the magic of the filling begins:

 Heat a small amount of oil in a pan. Lard is chef’s kiss here because it solidifies nicely and adds richness, but vegetable oil works if you’re out. Add the diced pork (remember, 20% fat, 80% lean) and cook until fragrant and slightly browned. Pro tip: Don’t overcook it—we want tender, not dry! Cook for 3-4 minutes max.
 Grab your sweet bean paste! Measure out 3 tbsp—this is where the “sauce” comes from. I like to use a little extra if I’m feeling fancy, but start with 3 tbsp and adjust to taste. If you’re unsure, taste as you go!
 Add the sweet bean paste to the pork. Stir it in well—you want every piece of pork coated in that rich, sweet-savory sauce. Cook for about 3 minutes to let the flavors meld.
 Now, add the chopped scallions. Their fresh, oniony aroma will take this filling to the next level. Stir them in and cook for another minute—you’ll smell how amazing this is!
 Next, add the 1.5 tbsp sugar, a pinch of salt, and that optional MSG. Taste here—adjust if needed! The sugar balances the salt from the bean paste, and a little MSG amps up the umami (but skip it if you’re sensitive to it).
 Once everything’s mixed, transfer the filling to a clean bowl. Let it cool completely—this is important! If you skip cooling, the heat will make the dough collapse later. Let it sit for 30 minutes, then pop it in the fridge for 1-2 hours to firm up. Frozen filling = easier to handle when rolling out!
Next: Make the Fluffy Dough (No Fail, I Promise!)
Now, let’s get the dough ready. It needs to be smooth, stretchy, and rise perfectly—here’s how I do it:
 In a large bowl (or your bread machine!), combine all the dough ingredients: flour, yeast, warm water, and sugar. If using a bread machine, put the wet ingredients first, then the dry ones (to avoid yeast touching water too early). If doing by hand, mix in a bowl!
 Knead the dough! For a bread machine, use the “dough” cycle (about 30-40 minutes). If doing by hand, knead for 10-15 minutes until it’s smooth and elastic—you’ll know it’s ready when you can stretch a piece and it doesn’t tear easily.
 Once smooth, shape the dough into a long log. Then, cut it into equal pieces—about 55g each (this makes 20 buns, so 700g flour ÷ 20 = 35g per bun? Wait, no—wait, 700g flour makes 20 buns, so 700/20=35g? Wait, no, wait—wait, the dough ingredients include 700g flour, 50g sugar, 7g yeast, 350ml water. So 700g flour divided into 20 buns would be 35g per bun. Wait, maybe I miscalculated earlier. Let me check: 700g flour, 20 buns, so 35g per dough ball. Yes, that makes sense. So cut the dough into 20 equal pieces, each around 35-40g. Use a sharp knife for clean cuts!
 Roll each dough piece into a smooth ball. Let them rest for 5 minutes—this relaxes the gluten and makes rolling easier. You’ll thank me later!
 Roll out the dough! Use a rolling pin to flatten each ball into a circle, thicker in the center and thinner on the edges. This ensures the bun keeps its shape when steamed and doesn’t burst open. Dust your work surface with a little flour to prevent sticking. Your goal: a circle about 10cm in diameter—big enough to hold a generous filling!
Finally: Assemble & Steam (The Big Reveal!)
Now, the fun part—filling and shaping the buns. Patience here is key for those perfect pleats!
 Take a rolled-out dough circle. Place about 50g of the cooled filling in the center. Don’t overfill—you want the pleats to close without squishing out! If your filling is too soft, let it sit in the fridge for 10 more minutes to firm up.
 Pinch and pleat! Hold the dough with your left hand, thumb pushing the filling down, and use your right thumb and index finger to make pleats. Start from one side and work your way around, pinching the top to seal. Aim for 15-20 pleats per bun—this makes them look beautiful and ensures even steaming.
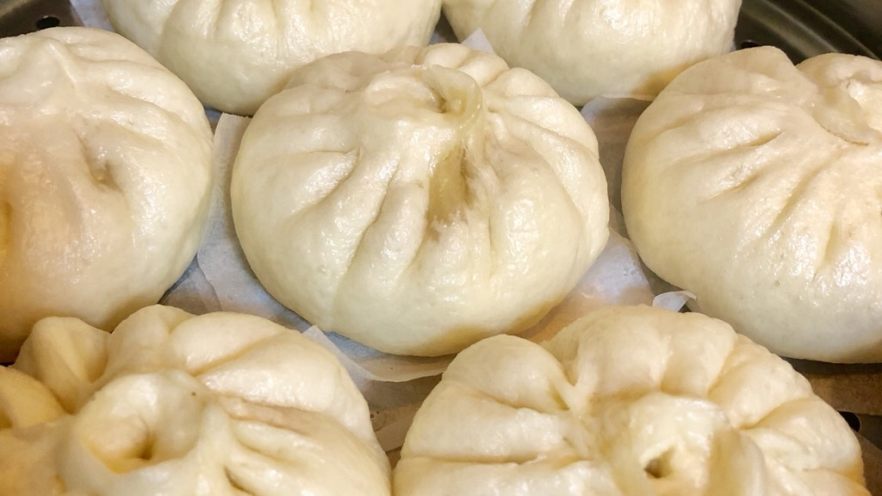
 Place the pleated buns on a parchment-lined steamer tray, leaving 2-3 inches between them so they have room to rise. Cover with a clean kitchen towel and let them rest for 15-20 minutes. Pro tip: If it’s cold, let the dough rest in a warm place (like near a warm oven or on top of a warm pot) to speed up rising. You want them to look puffy but not overdone before steaming!
 Steam time! Fill your steamer pot with water and bring to a boil. Then, reduce heat to medium and place the tray inside. Important: Don’t put the tray directly on the boiling water! Use a rack to keep the buns above the water. Cover and steam for 20 minutes at medium heat. Crash alert! If you open the lid too early, the buns will collapse. So set a timer!
 After 20 minutes, turn off the heat and let the buns rest for 5 more minutes before opening the lid. This helps them cool slowly and set their shape. Trust me, this 5-minute wait is critical for no collapsed tops!
 TA-DA! Your homemade jiang rou bao are ready! Let them cool for 5 minutes, then take one out and bite in. The first bite will hit you with that sweet-savory pork filling, fluffy skin, and aroma that’ll make you want to make another batch immediately. (Guilty—I ate 3 while writing this recipe 😋)
Pro Tips to Avoid Common Mistakes
Let me save you from my early fails! Here’s what I wish I knew before perfecting this recipe:
- Don’t rush the filling: Cooling it is non-negotiable! Warm filling melts butter in the dough and makes buns collapse. Pop it in the fridge for 1-2 hours if needed.
- Check water temperature: Yeast dies in water over 120°F (49°C), so aim for 105-115°F (40-46°C) warm water. If you don’t have a thermometer, mix with your hand—water should feel “warm, not hot” (like holding a cup of tea).
- Steam properly: Use a bamboo steamer for traditional texture, but metal works too. The key is to steam on medium heat (not high!) to prevent the buns from cracking.
- Freeze extras! Once done, you can freeze unbaked buns (after shaping) on a tray, then bag them. Steam from frozen for 25-30 minutes—they’ll taste fresh as if made that day!
Why This Jiang Rou Bao Recipe Works
What makes this recipe special? It’s all about balance: the sweet bean paste, savory pork, and fresh scallions create a flavor explosion, while the dough’s slow fermentation ensures it’s light and fluffy. I’ve tested this with different flours, sugars, and even MSG, and this combo is the golden ticket. Plus, it’s easy enough for beginners—no fancy tools needed (just a rolling pin and a steamer!).
So, if you’re craving that iconic Chinese street food but intimidated by baozi recipes, stop worrying! This one’s foolproof, and your taste buds will thank you. Now, go grab your ingredients, roll up your sleeves, and let’s make these buns—your family will be asking for seconds (and thirds) in no time!

")


")


 Recipe")