Magic Cake: A Sweetly Magical 3-Layer Dessert You Can Make at Home

Whoa, a 3-layer cake with pudding filling? That sounds intimidating, right? Like, “Oh no, do I need a pastry chef diploma for this?” But trust me, it’s actually super easy! Today, I’m going to share this magical dessert recipe with you guys—no fancy baking skills needed. Whether you’re a newbie in the kitchen or a seasoned baker, this cake is gonna make you feel like a pro. Let’s dive in!
What You’ll Need: Ingredients List
- All-purpose flour: 80 grams (about ½ cup)
- Whole milk: 350 ml (1.5 cups, for that creamy base)
- Unsalted butter: 80 grams (melted in advance—don’t skip this!)
- Granulated sugar: 60 grams (adjust if you prefer less sweet)
- Large eggs: 3 (separate whites and yolks)
- Vanilla extract: a few drops (for that cozy vanilla aroma)
Step-by-Step Instructions: Let’s Bake the Magic!
Alright, let’s get your apron on and start mixing! I promise this isn’t as hard as it looks. Let’s go step by step—with lots of pro tips to keep you from stressing out.
Step One: Prep All Ingredients (Butter First!)

First, gather every ingredient on your counter. And here’s the first pro tip: Melt the butter in advance! You can leave it out at room temperature for 15 minutes, or microwave it for 10-15 seconds (but watch it so it doesn’t turn into liquid butter soup, okay?). Once the butter is melted, set it aside to cool slightly. Trust me, this tiny step makes the batter so much smoother!
Step Two: Separate Eggs Like a Pro

Now, separate the egg whites from the yolks. Use a clean, dry bowl for the egg whites—no oil, no water! Even a tiny drop can ruin the meringue (I’ve cried over that mistake before 😅). So make sure that bowl is spotless. Crack the eggs carefully, pour the yolks into one bowl, and the whites into the other. Easy peasy!
Step Three: Whip Egg Whites to Stiff Peaks

Next, whip those egg whites until they form stiff peaks. You know, when you lift the whisk and the tip stands straight up? That’s the one! Use an electric mixer on high speed for 2-3 minutes, or a whisk if you’re feeling strong. Once they’re ready, set them aside in a clean bowl. These will make your cake light and fluffy—like clouds in a pan!
Step Four: Beat Egg Yolks with Sugar

Now, take the bowl with the egg yolks and add all 60 grams of sugar. Beat them on high speed until they turn pale yellow and the volume increases a bit. It might take 2-3 minutes, but trust me, it’s worth it! The sugar dissolves, and the yolks get nice and creamy—this is the base of our cake batter. Look at that, you’re already halfway there!
Step Five: Add Melted Butter and Vanilla

Next, pour in the melted butter and a few drops of vanilla extract. Beat on medium speed for about 1 minute until everything is well combined. The mixture should look smooth and creamy—no more yellow streaks from the butter, just a uniform color. Yum, smells like vanilla heaven already! This is where the magic starts to happen.
Step Six: Mix in All-Purpose Flour

Now it’s time to add the flour. Use a silicone spatula (not a metal one, it might scratch the bowl) and gently fold in the flour. Mix in a “cut and fold” motion—don’t overmix, just until there are no more flour lumps. The batter will be a bit thick, but that’s okay! Think of it like a thick milkshake base—creamy and ready for more.
Step Seven: Alternate Adding Milk

We’re going to add the milk in two parts to keep the batter smooth. First, pour in half of the milk (175 ml) and mix on low speed with an electric mixer for 30 seconds. Then add the remaining milk and mix another 30 seconds. Now the batter should be nice and smooth, like a thick, creamy milkshake consistency—no watery bits, no clumps! Perfect. This is when I start to get excited—almost there!
Step Eight: Combine Egg Whites and Yolk Batter

Now, the big moment: add the egg whites to the yolk batter. Here’s the secret: don’t worry about deflating! Even if you stir quickly, the egg whites will stay stable. Use a spatula to gently fold in the egg whites—cut through the center, scrape the bottom, and fold over the top. Do this quickly (like 20-30 strokes) until everything is well combined. The batter should be light and airy, with no white streaks left. It’s like you’re merging two magical worlds here!
Step Nine: Preheat Oven and Prepare Baking Pan

Before putting the batter in the oven, preheat it to 160°C (320°F). While the oven is heating up, grab a 6-inch cake pan and line it with baking paper. This makes it super easy to remove the cake later—no sticking issues! Grease the paper lightly with butter if you’re worried, but since we’re using paper, it should slide right out. Pro tip: If you don’t have a 6-inch pan, a 7-inch will work too—just adjust baking time by 5-10 minutes.
Step Ten: Bake the Cake Layers

Pour the batter into the prepared pan. It might not fill the pan completely, but that’s okay—it’ll rise a bit. Then, carefully place the pan in the oven’s middle rack (not too high, not too low). Bake for 50 minutes. Pro tip: After 20-25 minutes, cover the top with a piece of aluminum foil to prevent the cake from browning too much. You want a nice golden color, not burnt! Set a timer—50 minutes feels like forever, but trust me, patience pays off.
Step Eleven: Cool and Chill for Pudding Magic

When the timer goes off, take the cake out of the oven and let it cool for 10 minutes in the pan. Then, gently flip it onto a cooling rack and remove the baking paper. Let it cool completely—about 1 hour. Once cool, wrap the cake tightly in plastic wrap and refrigerate for at least 4 hours (overnight is even better!). This chilling step is what makes the pudding filling so silky and delicious—so don’t skip it! I’ve tried eating it right after cooling, and it’s not as good. Chilling = magic.
Step Twelve: Slice and Serve the Magic Cake!

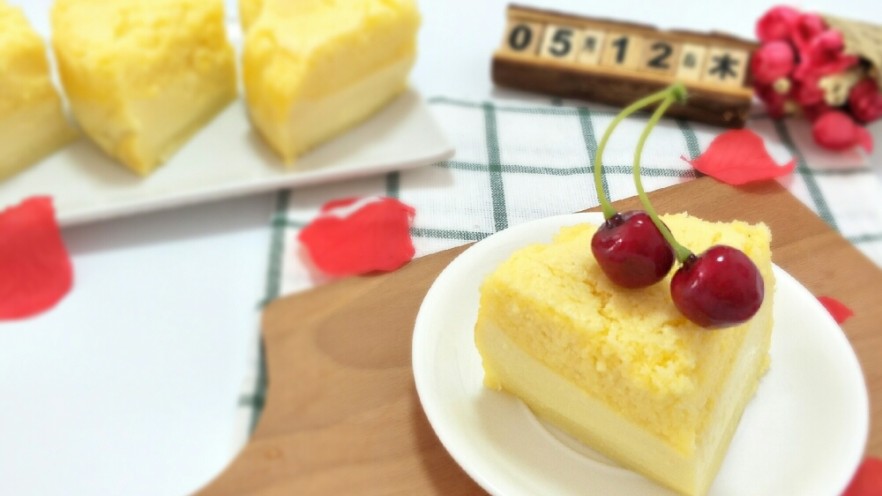
After chilling, take the cake out of the fridge. Unwrap it and slice it carefully—you’ll see that beautiful 3-layer pudding filling inside! The cake should be soft and fluffy, with a creamy center. Serve it with a dusting of powdered sugar, a scoop of ice cream, or just by itself. Either way, it’s pure magic in every bite! I swear, every time I make this, people ask for the recipe. Be prepared to share!
Tips and Tricks for the Perfect Magic Cake
- Egg Whites Safety: As I mentioned earlier, no need to panic about deflating when mixing egg whites into the batter—just fold quickly and the magic holds! I’ve done this a hundred times, and it never fails.
- Butter Melting: If you’re short on time, melt butter in the microwave for 10-15 seconds, but stop and stir halfway—overheating will make it bitter. Aim for room-temperature melted butter, not hot.
- Oven Temperature: 160°C is perfect for slow, even baking. If your oven runs hot, lower it to 150°C. If it runs cold, maybe 165°C—adjust based on your oven’s quirks!
- Chilling Time: The longer you chill (4+ hours), the better the texture. If you’re in a rush, 2 hours is minimum, but overnight gives that dreamy pudding consistency.
- Pan Size: 6-inch is ideal, but 7-inch works too. If using a 7-inch, extend baking time to 55-60 minutes. Trust me, you’ll still get that beautiful 3-layer effect!
There you have it! A magical 3-layer cake with pudding filling that’s easier than it looks. Whether you’re baking for a party, a date night, or just to treat yourself, this recipe is sure to impress. Tag me if you make it—I’d love to see your version of the “magic cake”! Happy baking, and may your cake always be fluffy and delicious! ✨