


Introduction: Why You Need This Corn Cakes Recipe in Your Life
Hey there, food lovers! If you’re obsessed with cozy fall flavors and crave traditional Chinese snacks that make your taste buds dance, let me introduce you to my latest obsession: these amazing Corn Cakes made with corn husks. Fall is the absolute best time for corn, right? That golden, ripe corn straight from the field is like a gift from autumn, and using it to make these little treats is pure magic.
In southwest China, they’ve been using corn husks as a secret ingredient for centuries—they’re not just wrappers; they’re flavor enhancers! These husks add a subtle, fresh corn aroma that makes every bite feel like a trip to the countryside. Today, I’m putting my own spin on it by adding sweet Ruoqiang red dates, which bring natural sweetness and a chewy texture that’s to die for. Trust me, once you try these, you’ll be making them every fall. Let’s get started!
Ingredients: What You’ll Need to Make These Corn Cakes
First, let’s gather all the star ingredients. You’ll need:
- 2 ears of glutinous corn (sticky corn, not the watery sweet corn—more on that later!)
- 7 Ruoqiang red dates (these are special Xinjiang dates, super sweet and juicy—find them at Asian grocery stores if you can’t get Ruoqiang ones, but they’re worth tracking down!)
- 20g of white sugar (adjust if you prefer less sweet, but the dates are already sweet, so this is perfect)
- 30g of glutinous rice flour (this helps bind everything together; we’ll talk about why we need this vs. just corn later)
Oh, and don’t forget the corn husks! You’ll need all the inner husks from the corn cobs—rinse them and set aside. Those are going to be your “baking cups” and flavor boosters!
Step-by-Step: How to Make These Corn Cakes (With Corn Husk Magic)
Let’s get into the fun part—making the corn cakes! Follow these steps, and you’ll have golden, fragrant treats in no time. Pro tip: Use your hands for better mixing—no need for fancy tools here!
Step 1: Prep Your Ingredients
First, lay out all your ingredients on the counter. Take a moment to admire the glistening red dates and the plump glutinous corn. This is going to be easy, I promise! Grab a cutting board, a grater, and a steamer pot ready to go.

Step 2: Peel the Corn (Keep Those Husks!)
Peel off the outer corn leaves—they’re tough and not needed. But the inner green husks? Those are gold! Rinse them under running water to clean off any dirt, then pat them dry with a paper towel. Set them in a bowl to use later as your “corn husk cups.”
Pro tip: Don’t throw away those inner husks! They’re the secret to the cake’s fresh aroma. I’ve seen people throw them out before, but trust me—they’re essential here.

Step 3: Pit and Chop the Red Dates
Wash the Ruoqiang dates, then carefully remove the pits. If you’re nervous about pitting, slice the date lengthwise and use your fingers to pull out the seed. Once pitted, chop the date flesh into small pieces—about 1cm chunks. These little pieces will burst with sweetness when you bite into the cake!

Step 4: Grate the Corn (Don’t Hurt Your Hands!)
Now, take the glutinous corn cob and grate it using a box grater. Go slow—you want to get the corn into small bits, not pure paste. The goal is to have some texture, so the cake doesn’t turn mushy. If you don’t have a grater, use a knife to cut the corn off the cob into tiny pieces, but grating is faster and gives a better consistency.

Step 5: Why Glutinous Corn is the Star Here
Let me explain the corn choice: Glutinous corn (also called waxy corn) has less moisture and a chewy, sticky texture—perfect for these cakes! It’s not as sweet as the watery “sweet corn” you might buy at the grocery store, so you can customize the flavor. If you want sweet, add more dates or sugar; if you want savory, add salt and green onions. The options are endless!

Step 6: Add the Date Magic
Now, mix in the chopped date pieces. Stir them gently into the grated corn—you’ll see the natural sweetness start to mix in. The dates add a rich, caramel-like flavor that balances the corn’s mild taste. It’s like a party in your bowl!

Step 7: Add Glutinous Rice Flour
Sprinkle in the glutinous rice flour. Start with 30g—this is the binder. If your mixture feels too dry, add a little more, but don’t overdo it! Glutinous corn is already sticky, so 30g should be enough. Mix it in with your hands to combine.

Step 8: Sweeten with Sugar
Add the 20g of white sugar. Taste the mixture now—if the dates are extra sweet, you might want to cut back on sugar, but I found 20g is perfect. The sugar enhances the date sweetness without overpowering the corn. Yum!

Step 9: Mix Everything Together
Use your hands to knead the ingredients into a smooth dough. It should be slightly sticky but not too wet. If it’s crumbly, add a splash of water; if it’s too wet, add a bit more flour. You want it to hold together when you press it gently.

Step 10: Shape into Balls
Take small portions of the dough—about 2-3 tablespoons each—and roll them into smooth balls. The size is up to you, but I like making them bite-sized so I can have a few at once. Roll them between your palms to make perfect spheres.

Step 11: Put Your Corn Cakes in the Husks
Now, here’s the fancy part! Take one of the prepared corn husks and fold it into a little cup (like a tiny bowl). Place your dough ball inside, then fold the husk over to cover it. This keeps the cake from sticking to the steamer and adds that lovely corn aroma while it cooks. How clever is that?

Step 12: Steam to Perfection
Bring a pot of water to a boil. Once boiling, place the steamer basket (with the husk-wrapped cakes) inside. Cover the pot and steam on high heat for 20 minutes. Set a timer—you don’t want to overcook them!

Step 13: Enjoy the Aroma Explosion!
After 20 minutes, carefully open the steamer. The kitchen will fill with a sweet corn and date aroma that’s impossible to resist. Let the cakes cool for a minute—they’re hot and soft, so be careful not to burn your fingers!

Step 14: Bite Into the Chewy Goodness
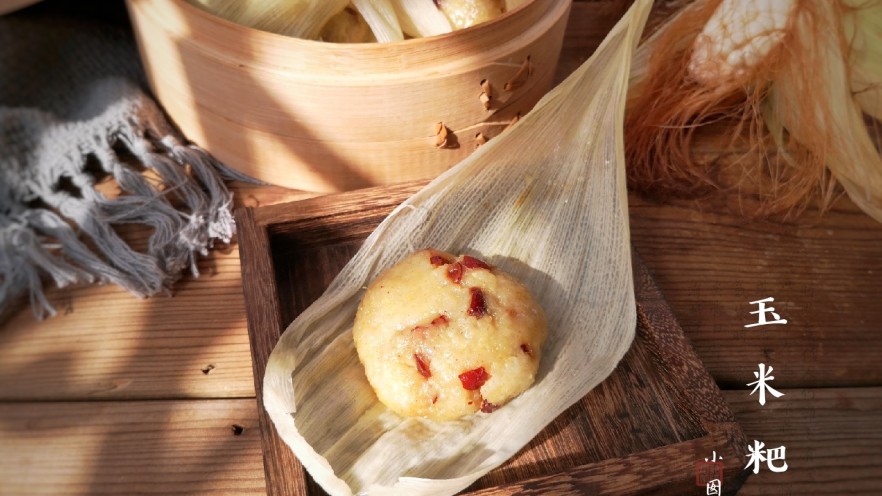
When you take your first bite, you’ll feel the chewy corn pieces and the sweet date chunks. The texture is amazing—soft on the outside, with a slight crunch from the corn bits inside. It’s not too sweet, not too chewy, just perfect. The corn husk adds a subtle, earthy flavor that makes it feel like you’re eating straight from the farm.

Pro Tips for Perfect Corn Cakes Every Time
Let me share some secrets to take your corn cakes to the next level:
- Glutinous vs. Sweet Corn: If you use sweet corn (the watery kind), it’s juicier but harder to shape. In that case, add more glutinous rice flour (up to 60g) to help it hold together. Sweet corn is naturally sweet, so you can skip adding sugar!
- Savory Option: Want something savory instead of sweet? Swap the dates for green onions, a pinch of salt, and a dash of soy sauce. Roll into balls, steam, and enjoy a savory snack!
- Texture Tweak: If you want more texture, don’t grate the corn too fine—leave some bigger chunks. The corn pieces will add a nice crunch when you bite in!
- Date Substitute: If you can’t find Ruoqiang dates, use regular Chinese red dates or even dried cranberries for a tart-sweet twist.
These tips will help you avoid common mistakes and make your corn cakes shine, whether you’re a sweet or savory lover!
Final Thoughts: Why This Recipe is a Fall Must-Try
So there you have it—my go-to fall recipe for these delicious Corn Cakes with Corn Husks. They’re easy to make, full of flavor, and perfect for sharing with friends or enjoying as a cozy dessert. The best part? No fancy tools needed—just a grater, a steamer, and your hands.
Imagine serving these warm, fragrant cakes at a fall gathering or enjoying them with a cup of hot tea on a crisp autumn morning. They’re not just a snack; they’re a tradition. Trust me, once you make them, you’ll be hooked.
Now go grab some fresh corn, Ruoqiang dates, and get cooking! Let me know how yours turn out—I’d love to hear your tips in the comments. Happy baking, and enjoy every sweet, chewy bite!

")

")


