

 & Red Dates Pork Bone Soup Recipe | Nourishing Chinese Wellness Dish")


Why I Switched to Making My Own Bento (and You Should Too!)
Ugh, let’s be real—cafeteria food can be such a letdown, right? Bland, soggy, and never warm when you’re starving. I mean, who wants to pay for a sad salad or mystery meatloaf that tastes like it’s been reheated 50 times? That’s why I decided to take matters into my own hands and start making my own lunch! And let me tell you, nothing beats opening a cute bento box at noon that looks like it belongs on a food blog. Today, I’m sharing my go-to Cat Fish Bento recipe—it’s not just adorable, it’s easy, customizable, and way cheaper than eating out every day. Trust me, once you try it, you’ll never look at your lunch the same way!
What Makes This Cat Fish Bento So Special?
Okay, let’s break down why this bento is a game-changer. First off, it’s Instagram-worthy! The little cat and fish designs are too cute to resist, so you’ll definitely get compliments from coworkers or classmates. But it’s not just about looks—it’s about flavor and fun. You can mix and match ingredients to your heart’s content: want spicy? Add chili flakes. Prefer veggies? Load up on carrots and peas. Plus, it’s portable! No more worrying about spills or soggy rice—this bento stays neat, and you can take it to work, school, or even a picnic.
Oh, and did I mention it’s healthy? Skip the greasy cafeteria meals and enjoy fresh, homemade food packed with veggies, protein, and flavor. It’s the perfect way to treat yourself without derailing your diet. Let’s dive into how to make it!
Ingredients: What You’ll Need for Your Cat Fish Bento
Let’s start with the basics. Most ingredients are probably already in your pantry or fridge—no need for fancy tools! Here’s the list:
- Cooked Rice: 1 bowl of warm, fluffy rice (leftover rice works great here! If you don’t have leftover rice, cook a fresh batch and let it cool slightly)
- Cheese Slice: 1 slice (cheddar or mozzarella works best—we’ll use it for the cat’s face and ears)
- Homemade Dish: 1 serving of your favorite cooked veggies/meat (stir-fried veggies, chicken, tofu, or even leftover pasta—get creative!)
- Carrot: 1 medium carrot (for the fish’s tail and body, or extra decoration)
- Eggs: 2 large eggs (we’ll make an egg roll for the fish’s body and maybe an egg base for the bento)
- Nori (Seaweed): 1 sheet (for cutting out the cat and fish shapes)
- Peas: A handful (for garnish—they add a pop of green!)
- Plastic Wrap: A small sheet (to shape the rice ball without sticking)
- Toothpicks: 1-2 (to hold the egg roll together)
Pro Tip: If you’re feeling fancy, add a pinch of sesame seeds or furikake (Japanese seasoning) to the rice for extra flavor! And if you’re not a fan of peas, swap them for corn or edamame—whatever makes you happy!
Step-by-Step: How to Assemble Your Cat Fish Bento
Let’s get cooking! Follow these steps carefully, and you’ll have a masterpiece in no time. Remember, the key is to keep things simple—no need to be perfect, just have fun with the shapes!

Step 1: Prep Your Ingredients
First, gather all your ingredients on the counter. Lay out the rice, cheese, carrot, eggs, nori, and peas. If you’re using leftover rice, let it sit at room temperature for 10 minutes to make it easier to shape. This step is all about staying organized—no one likes scrambling for ingredients mid-recipe!

Step 2: Blanch the Peas (Optional but Adorable)
Boil a small pot of water and add the peas. Let them cook for 1-2 minutes until they’re bright green and tender. Then drain and rinse with cold water to stop the cooking—they’ll stay crisp and vibrant for your bento. This is just for garnish later, but it adds a nice color pop!

Step 3: Prepare the Rice Base
Take a sheet of plastic wrap and spread a thin layer of rice on it—about the size of your palm. Make sure the rice is even so it doesn’t crumble when you shape it. In the center, add a spoonful of your favorite filling (I love leftover stir-fried veggies or a little bit of shredded pork—anything works!).

Step 4: Shape the Rice into a Cat
Gently lift the plastic wrap around the rice, pulling the edges inward to seal the filling. Now, shape it into a round ball—this will be the cat’s head! If you want a more defined cat shape, press the plastic wrap gently to make the top a bit flat (the cat’s forehead) and the bottom a bit pointed (the chin). Don’t worry if it’s not perfect—imperfections make it cute!

Step 5: Add the Cat’s Face with Nori
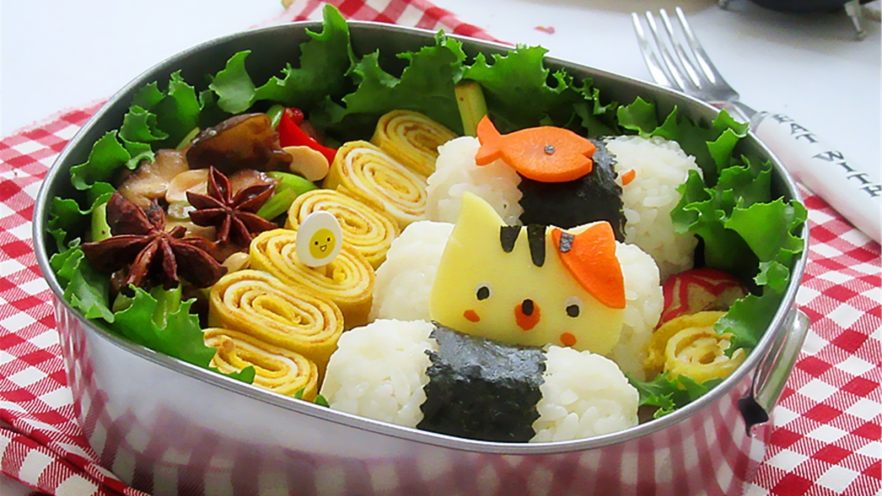
Take a small piece of nori and cut out two tiny triangles for the cat’s ears. Then cut a small circle for the nose and an oval for the mouth. Use a toothpick to hold the nori pieces in place, or gently press them onto the rice ball (be careful not to tear the rice!). This is where the magic happens—your cat is coming to life!

Step 6: Seal the Rice Ball
Once the cat’s face is on, carefully remove the plastic wrap and place the rice ball on a plate. You can smooth out any rough edges with your hands. Now, set this aside while you work on the fish.

Step 7: Make the Fish Shaped Rice Ball
Repeat the rice step for the fish! Spread a layer of rice on plastic wrap, add a filling, and shape it into a long, oval ball (the fish’s body). This one will be a bit longer than the cat, so stretch the rice gently to make it more fish-like. Set the fish aside next to the cat.

Step 8: Cut the Fish and Cat from Cheese
Take the cheese slice and cut out a fish shape—small circles for the eyes, a curved body, and a tail. For the cat, cut a smaller cheese piece for the nose and maybe a little heart for the mouth if you’re feeling extra cute! These cheese pieces will be the finishing touches on your bento.

Step 9: Make the Egg Roll
Crack the eggs into a bowl and whisk them with a pinch of salt and pepper. Heat a small pan with a tiny bit of oil and pour in the eggs. Let them cook until they’re set, then flip and cook the other side for 30 seconds. Once cooked, roll the egg into a tight cylinder and use a toothpick to hold it together—this will be the fish’s body!

Step 10: Prepare Your Homemade Dish
Warm up your favorite homemade dish (I used stir-fried broccoli and carrots today!). You can use leftover food from last night’s dinner, or cook something quick—just make sure it’s not too watery (we don’t want soggy rice!). Set this aside to add to the bento later.

Step 11: Assemble the Bento Box
Take your bento box and line the bottom with a small piece of lettuce (to keep things fresh). Layer the homemade dish next to the lettuce, then place the egg roll on top. Now, position the cat and fish rice balls next to each other—they’ll look like they’re “playing” together!

Step 12: Add the Cheese Cat and Fish Details
Place the cheese cat and fish pieces on top of the rice balls. The cheese cat can go on the rice ball (as the face), and the cheese fish can be next to it. This adds a cheesy, colorful touch! Don’t forget to place the peas around them for extra decoration—they look like tiny fish food!

Step 13: Seal and Pack for Lunch
To keep your bento fresh, cover it with plastic wrap or aluminum foil. If the bento is still warm, let it cool before closing. For easy portability, place it in a insulated lunch bag or bento box. You’re ready to go!
Pro Tips for the Perfect Cat Fish Bento
Here are some extra tricks to make your bento even more awesome:
- Reheating: If you’re not a fan of cold food (like me!), pop the bento in the microwave for 1-2 minutes before eating. Just use a microwave-safe container!
- Prep Ahead: Cook the rice and egg roll the night before, then assemble in the morning. This saves time and ensures everything stays fresh.
- Extra Crunch: Add a few pickled vegetables or thinly sliced cucumbers to the bento for texture—they’ll make the meal more interesting!
- Make It Your Own: Swap ingredients to match your taste! Prefer chicken over pork? Use chicken in the filling. Love spicy food? Add a little chili oil to the rice!
Final Thoughts: Your Lunch Just Got Happy
There you have it! Your very own Cat Fish Bento Box is ready to be enjoyed. Whether you’re tired of the cafeteria, want to treat yourself, or just love cute food, this recipe is for you. It’s easy, customizable, and so much more fun than a sad sandwich. Plus, you’ll save money and eat healthier—win-win!
Now, go forth and share your bento with the world! Tag me if you make it, and I’d love to see your creative twists. Remember, the best part of homemade bento is that it’s yours—so have fun with the shapes and flavors. Happy cooking, and enjoy every adorable bite!
cat fish bento, homemade cat fish bento recipe, cute bento box ideas, easy lunch recipes, microwave safe bento box, healthy homemade lunch, how to make cat bento, fish shaped bento, best homemade bento, bento box for work


")

 Recipe – Lunar New Year Prosperity Dish")
: Easy, Flavorful, and Nutritious One-Pan Meal")
 – Easy Homemade Recipe")
 | Stir-Fried Broccoli with King Oyster Mushrooms")
