")


")
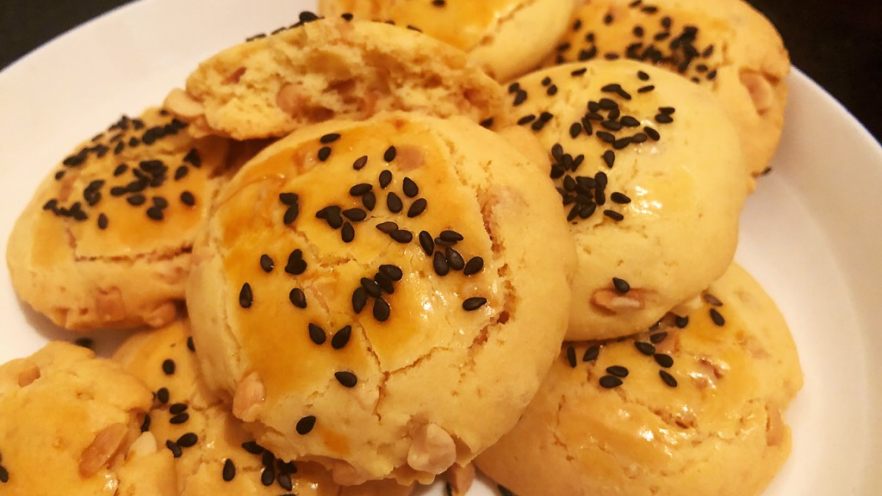
Why This Peanut Butter Shortbread Cookie Recipe Is a Must-Try
Let’s be real—who doesn’t love a cookie that’s crispy, nutty, and doesn’t make you feel guilty? I’ve tried so many shortbread recipes over the years, and most either taste like cardboard, are loaded with butter (hello, calorie bomb), or require a fancy mixer I don’t own. But this peanut butter shortbread? Game. Changer. It’s low on oil, has just the right amount of sugar, and is so easy even my cousin who burns toast nailed it on her first try. Plus, it tastes exactly like the peanut cookies my grandma used to make—warm, crumbly, and packed with peanut goodness. Let’s dive in!
Ingredients You’ll Need (No Fancy Stuff, Promise)
First things first: gather your ingredients. The best part? You probably already have most of these in your pantry.
- 200g cake flour (low-gluten flour works too—just make sure it’s not bread flour, which is too tough)
- 90g corn oil (yes, corn oil! It’s lighter than butter and keeps the cookies crispy without being greasy)
- 40g granulated sugar (adjustable—add 10g more if you have a sweet tooth, or 10g less if you prefer less sugar)
- 1 large egg (room temp is better, but cold works in a pinch)
- 80g crushed peanuts (I use roasted unsalted ones—they’re nuttier! You can chop them yourself or buy pre-crushed)
- 2g baking powder (don’t skip this—it’s what makes the cookies light and crumbly)
- A pinch of black sesame seeds (for garnish—optional, but it adds a nice crunch and looks cute)
Step-by-Step Instructions (100% Foolproof)
Ready to bake? Let’s go—this takes less than an hour total, and most of that is waiting for the oven.
Step 1: Prep Your Ingredients

First, lay out all your ingredients on the counter. I’m the type of person who forgets an egg mid-recipe, so this step saves me from running to the fridge last minute. Measure everything out—200g flour, 90g oil, 40g sugar… you get the idea. Pro tip: Crush your peanuts before you start mixing so they’re ready to go.
Step 2: Mix Wet Ingredients

Grabs a big mixing bowl (no electric mixer needed—just a whisk or a spatula!). Pour in the egg, corn oil, and granulated sugar. Whisk them together until the sugar dissolves a little and the mixture looks smooth. If you like sweeter cookies, now’s the time to add extra sugar—just don’t overdo it, or they’ll get too sticky.
Step 3: Add Dry Ingredients

Now, sift the cake flour and baking powder into the wet mix. Sifting is key here—it keeps the cookies from being lumpy. If you don’t have a sifter, just whisk the flour and baking powder together first. Then, use a spatula to fold everything into a dough. Don’t overmix—just until there are no dry flour spots left.
Step 4: Fold in Peanut Crumbles

Add the crushed peanuts to the dough and fold them in gently. Make sure they’re evenly distributed so every bite has that peanut crunch. I love using chunky crumbles—they add more texture than fine ones.
Step 5: Shape the Dough

Knead the dough a few times (just until it’s smooth—don’t knead it too much, or the cookies will be tough). Then, divide it into 20g balls. I use a small ice cream scoop to get even sizes, but you can just eyeball it. Roll each ball between your palms until it’s round.
Step 6: Arrange on Baking Sheet

Line a baking sheet with parchment paper (no sticking, no mess!). Place the dough balls on the sheet, leaving about 2 inches between them—they will spread a little. Then, use the palm of your hand to gently press each ball into a flat disc (about ½ inch thick). Don’t press too hard—you want them to stay thick enough to be crumbly.
Step 7: Brush with Egg Wash and Add Sesame Seeds

Whisk a little extra egg (or use the leftover egg from earlier) and brush a thin layer over each cookie. This will make them golden brown and shiny. Then, sprinkle a pinch of black sesame seeds on top—optional, but it adds a nice touch.
Step 8: Bake to Perfection

Preheat your oven to 160°C (320°F) for 10 minutes. Then, put the baking sheet in the middle rack and bake for 25 minutes. Important: Keep an eye on them after 20 minutes—every oven is different, and you don’t want them to burn. They should be light golden around the edges when done.
Step 9: Cool and Store

Take the cookies out and let them cool completely on the baking sheet. I know it’s tempting to eat them right away, but trust me—they get crispy as they cool! Once they’re cool, store them in an airtight container. They’ll stay fresh for up to a week (if they last that long).
Pro Tips for Perfect Peanut Shortbread
- Wait to eat them! They’re soft when hot, but they crisp up as they cool—this is the number one mistake beginners make.
- Use roasted peanuts: Raw peanuts don’t have as much flavor. Roast them yourself in a pan for 5 minutes if you don’t have pre-roasted ones.
- Don’t overmix the dough: Overmixing develops gluten, which makes the cookies tough instead of crumbly.
- Adjust sugar to taste: If you’re making these for kids, add a little more sugar. If you prefer less sweet, cut it down to 30g.
Final Thoughts
This peanut butter shortbread recipe is my go-to for lazy afternoons or when I need a quick snack. It’s easy, affordable, and tastes like childhood. Whether you’re a beginner or a pro, you’ll love how simple it is to make. Give it a try—you won’t regret it!

 at Home: Step-by-Step Recipe & Pro Tips")

")
")
![French Savory Tart [Magic Cake] – Sugar-Free, Layered Delight (Forced My Friend’s Recipe to Obsession!)](https://hearthsiderecipes.com/images/5214/5mit2exneu1.jpg "French Savory Tart [Magic Cake] – Sugar-Free, Layered Delight (Forced My Friend’s Recipe to Obsession!)")


 | Easy, Nutritious Recipe")