

 & Red Dates Pork Bone Soup Recipe | Nourishing Chinese Wellness Dish")


Why Purple Sweet Potato Dorayaki? Because Doraemon Would Approve!
Let’s be real—who didn’t grow up watching Doraemon chow down on dorayaki like it was the best thing ever? I know I did! Staring at the TV, thinking, “What does that even taste like?” Back then, I couldn’t find it anywhere near my neighborhood, and my cooking skills were limited to making instant noodles. So that dorayaki craving just sat there, growing stronger year after year. Fast forward to now—I’m finally making it myself, and adding a twist: purple sweet potato filling! Trust me, this combo is chef’s kiss. Let’s dive in!
What You’ll Need (Ingredients List)
First things first—grab these ingredients. They’re super easy to find at any grocery store, no fancy stuff here:
- 100g cake flour (low-gluten flour, perfect for fluffy pancakes)
- 2g aluminum-free baking powder (no weird aftertaste, promise)
- 2 large eggs (room temp works best, but cold is fine too)
- 30ml milk (dairy or plant-based—your call!)
- 10ml corn oil (or any neutral oil, like canola)
- 10g honey (adds a nice floral sweetness)
- 30g granulated sugar (adjust if you like less sweet)
- 1.5g salt (just a pinch to balance the flavors)
- 50g purple sweet potato puree (I steamed mine until soft, then mashed it—no lumps allowed!)
Step-by-Step: Let’s Make Those Fluffy Dorayaki Pancakes
Okay, let’s get cooking. This is way simpler than you think—no fancy equipment needed (except a non-stick pan, which is a lifesaver).
Prep Work First!

Before you start mixing, get everything ready: Make sure your purple sweet potato puree is smooth (microwave or steam the potato until it’s fork-tender, then mash with a fork or blender). Sift the cake flour and baking powder together into a bowl—this is key for a light, fluffy batter. Grab a clean, dry bowl (no water or oil!) and crack in the eggs, pour in the milk, corn oil, honey, sugar, and salt. All set?
Mix the Wet Ingredients

Take a hand whisk (no electric mixer needed!) and stir the egg mixture until the sugar is completely dissolved. Don’t overmix here—just until everything’s combined. You don’t want to whip air into it yet.
Add the Dry Ingredients

Now, slowly pour the sifted flour/baking powder into the wet mix. Stir gently with the whisk—keep going until there are no dry lumps left, and the batter is smooth. Pro tip: Don’t stir too hard! Overmixing makes the pancakes tough. We want them pillowy, remember?
Let the Batter Rest (Super Important!)

Cover the batter and let it sit for 25 minutes. I know, waiting is boring—but this gives the baking powder time to work its magic, and the gluten in the flour relaxes. Your pancakes will be way fluffier because of this step. Go grab a snack or scroll TikTok while you wait.
Time to Cook the Pancakes!

I used a 6-inch non-stick crepe pan (the kind for making pancakes or crepes) and it worked perfectly. If you don’t have one, a regular small non-stick pan is fine—just adjust the size of your pancakes.

Place the pan on the stove, but don’t turn the heat on yet! We want a cold pan to start with—this helps the pancakes cook evenly without burning.

After resting, give the batter a quick stir (it might have separated a little). Then, pour a small ladleful of batter into the center of the pan. You want a circle about 4-5 inches wide—don’t make them too big, or they’ll be hard to flip.

Now turn the heat to the lowest setting (yes, lowest!). Wait until you see tiny bubbles popping all over the surface of the pancake—that’s your cue to flip it! If you wait too long, the bottom will burn. Be gentle when flipping—use a spatula to lift the edge first.

Cook the other side for just 2-3 seconds—seriously, that’s all it needs! The second side cooks super fast. Transfer the pancake to a plate and repeat with the rest of the batter. You should get about 6-8 pancakes.
Assemble Your Dorayaki!

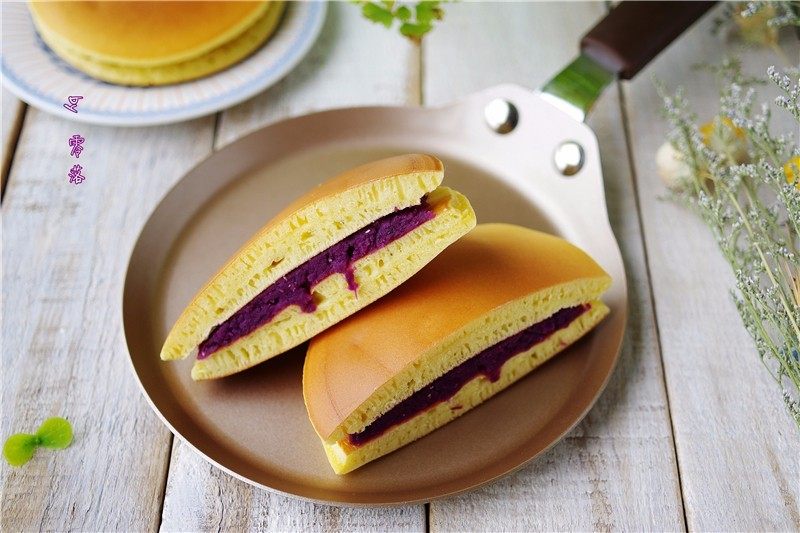
Take one pancake (the flat side up) and spread a generous layer of purple sweet potato puree on top. Don’t skimp—this is the good stuff!

Top it with another pancake (flat side down) and press gently to make sure the filling stays put. Voila—your purple sweet potato dorayaki is done!

Since these are a bit bigger, I like to cut them in half with a knife—they look cuter that way, and they’re easier to eat. Trust me, one bite and you’ll be transported back to your childhood (but with a fancy upgrade).
My Pro Tips for Perfect Dorayaki
- Non-stick pan is a must! I used the Xuechu WK9115 6-inch pan, and it didn’t stick at all—my pancakes came out perfectly round and intact.
- Adjust the batter thickness: If you want thicker pancakes, add a little less milk. Thinner? Add a splash more. Just make sure it’s pourable but not runny.
- Don’t overmix the batter! Lumps are okay (as long as they’re small)—overmixing makes tough pancakes.
- Low heat only! High heat will burn the bottom before the top is cooked. Patience is key here.
Final Thoughts: Worth the Wait!
Making dorayaki at home was so much fun—and way easier than I thought! The purple sweet potato filling adds a natural sweetness and a beautiful color, which makes these even better than the store-bought ones. I can’t wait to make them again (maybe next time I’ll try red bean filling, like the classic Doraemon version). If you’re a fan of sweet snacks or nostalgic treats, this recipe is for you. Go give it a try—you won’t regret it!

")


: Easy, Crispy, and Irresistibly Delicious Stir-Fry")


