


")
Let me tell you a quick story first. A friend of mine hit up the grocery store earlier this week, came home with a giant bag of chicken wings, and texted me panicking: “Dude, I have zero clue what to do with these. Send help.”
Oh man, chicken wing recipes are endless, right? You could do buffalo wings, lemon garlic wings, salt and pepper wings, the list goes on. But I thought for, like, 5 whole seconds, and immediately told him to make honey coke chicken wings. Let’s be real—this is probably the first home cooked dish a ton of us ever learned to make as kids, right? It’s sweet, savory, sticky, and basically impossible to mess up if you do it right.
But wait, if you’ve ever made coke chicken wings before, you might’ve ended up with dry, tough meat that’s all sauce and no juiciness. I’ve been there too! I used to slash the wings with a knife to let the flavor in, and half the time they’d come out like little chicken jerky pieces. So today I’m spilling all my little hacks to make this classic dish taste 10x better, with super juicy meat inside and that perfect glossy, sticky honey coke glaze outside. Let’s get into it!
What You Need to Make Juicy Honey Coke Chicken Wings
I keep this ingredient list super simple, no fancy stuff you can’t find at your regular grocery store. This makes 2-3 servings, perfect for a weeknight dinner or a small game day snack spread.
- 6 mid-joint chicken wings (you can use more if you’re feeding a crowd, just scale up the rest of the ingredients)
- 1 bottle of cola (I use Pepsi personally, but I’ll explain the difference between Pepsi and Coke for this recipe later!)
- 10 rock sugar crystals (you can use regular granulated sugar if you don’t have rock sugar, but rock sugar gives a smoother, less sharp sweetness)
- 2 slices of licorice root (trust me, this tiny addition makes a huge difference in flavor, don’t skip it!)
- 1 bay leaf
- 5g salt (that’s roughly 1 teaspoon, adjust to your taste later if you want more)
- 10g cornstarch (about 2 tablespoons, regular all-purpose flour works too in a pinch)
Step-by-Step Honey Coke Chicken Wings Recipe (With All My Secret Hacks)
Step 1: Get all your ingredients laid out first

I know, I know, this sounds like a super obvious first step. But hear me out—there’s nothing worse than being mid-recipe, pan-frying your wings, and realizing you forgot to get the cola out of the fridge, or you can’t find your cornstarch. I’ve done that, and by the time I found what I needed, my wings had overcooked. Save yourself the stress and set everything on your counter before you start. It takes 2 minutes, I promise it’s worth it.
Step 2: Marinate the wings (and don’t slash them!)

First, rinse your chicken wings under cold water, then pat them really dry with paper towels. Dump the salt over top, then get your hands in there and massage the salt into every part of the wings. Squeeze them a little, rub the salt around until it’s mostly dissolved, then let them sit for 5 to 10 minutes to marinate.
Now, let’s talk about the two biggest hacks here, okay?
- Stop cutting slits into your chicken wings! I see so many recipes tell you to do this to let the marinade soak in, but all it actually does is let all the juicy moisture inside the wing leak out while you cook it. That’s exactly why your wings turn out dry and tough. The salt is strong enough to soak into the meat on its own, I promise.
- Salting the wings ahead of time does two awesome things: first, it seasons the meat all the way through, so you don’t end up with a flavorful outside and bland inside. Second, salt breaks down the tough muscle fibers a little, so the meat stays soft and juicy even after you cook it.
Step 3: Dry the wings again (yes, again)

After the 10 minutes of marinating are up, grab more paper towels and wipe off any excess moisture from the wings. If you don’t have paper towels, you can hold them over the sink and shake them off really well, but paper towels work way better.
Why do this? If you put wet wings into hot oil, the oil is going to splatter everywhere. I’m talking tiny hot oil pops all over your arms and your stove. Not fun. Drying them off keeps the splattering to a minimum. Simple as that.
Step 4: Coat the wings in a thin layer of cornstarch

Drop the cornstarch into a bowl, toss the wings in it, and shake off any excess. You just want a thin, even coating on each wing, not a thick batter.
This is another one of my game-changing hacks, y’all. The cornstarch does two key things:
- It soaks up any last little bits of moisture on the outside of the wings, so you get even less oil splatter when you put them in the pan.
- Cornstarch sets at around 80°C (that’s 176°F for my US friends), so it forms a little protective layer on the outside of the wing as soon as it hits the hot pan. That layer locks all the juicy moisture inside the wing, so you don’t lose it while frying. The meat stays so tender, you’ll be shocked.
Step 5: Heat your pan properly before adding oil

Get a non-stick or cast iron pan, put it on the stove over high heat. Let it heat up for 2 to 3 minutes first, before you add any oil. How do you know it’s hot enough? Hold your hand a few inches above the surface of the pan. If you can feel the heat radiating up and it’s almost too hot to keep your hand there, it’s ready. Then pour in 2 to 3 tablespoons of neutral cooking oil (canola, vegetable, sunflower, whatever you have) and let the oil heat up for 30 seconds or so.
Trust me, this step is how you stop your wings from sticking to the pan. If you put wings into a cold pan, the skin will glue itself to the surface, and when you try to flip them, you’ll tear the skin off. No one wants a sad wing with no crispy skin. Heating the pan first fixes that entirely.
Step 6: Fry the wings skin side down first

Don’t dump all the wings into the pan at once! Place them in one by one, skin side down, so you don’t splash hot oil on yourself. If you’re nervous about splatters, you can turn the heat down to medium for this part, but turn it back up to high right after all the wings are in the pan.
High heat is your friend here, okay? We want to sear the outside of the wings fast so that cornstarch layer sets and locks in all the juice.
Step 7: Don’t flip the wings until they’re ready

I know it’s tempting to poke and prod and flip them right away, but don’t do it! Let them fry for 3 to 4 minutes first, then gently nudge one with a spatula or a pair of chopsticks. If it moves easily without sticking, it’s ready to flip. If it’s still stuck to the pan, leave it for another 30 seconds and check again.
If you try to force them loose before they’re ready, you’ll tear the skin, and all that juicy moisture will leak out. Your wings will get dry, and they’ll look all messy. Just be patient, I promise it’s worth the wait. Keep the heat on high the whole time you’re searing them.
Step 8: Flip and fry the other side

Flip each wing over to the other side, then let them fry for another 2 to 3 minutes. The skin on both sides should be a nice golden brown, crispy, and fully sealed.
Step 9: Give them one last quick fry

Give the pan a little shake to move the wings around, then let them fry for another 1 minute or so. We just want to make sure the outside is fully crispy and golden, no pale spots left.
Step 10: Take the wings out of the pan

Use tongs to take the wings out of the pan and set them on a plate lined with paper towels to drain any excess oil. Don’t leave them in the pan any longer than this, or they’ll overcook and get dry.
Step 11: Make the sugar glaze in the same pan

Don’t wash the pan! All those little brown bits stuck to the bottom are full of flavor, we’re going to use them. Turn the heat down to low, add the rock sugar to the pan, and stir it gently as it melts. We’re making a light caramel here, to give the glaze a deeper, richer sweetness and that perfect glossy color.
A lot of people get stressed about burning the sugar, but don’t worry! You don’t need to cook it until it’s dark amber. Even if it’s just melted and a light golden color, it’s totally fine. We just want a little caramel flavor, not a full hard candy. If you’re nervous, you can add a teaspoon of water to the pan to help the sugar melt slower.
Step 12: Toss the wings in the melted sugar

As soon as the sugar is fully melted and light golden, dump all the wings back into the pan immediately. If you wait too long, the sugar will burn and taste bitter, and you’ll have to start over. Toss the wings around quickly so every single one is coated in that melted sugar. Look how pretty that glossy color is already!
Step 13: Pour in the cola

Pour the cola into the pan until it’s almost covering the wings, just about level with the top of them. You don’t need to use the whole bottle, save the rest to drink while you wait for the wings to cook! I use Pepsi for this recipe because it’s a little less sweet than Coca-Cola, but if you love super sweet wings, go ahead and use Coca-Cola, it works just as well.
Step 14: Add the aromatics and simmer

Throw in the licorice root and the bay leaf, give everything a good stir, then put a lid on the pan. Turn the heat up until the cola starts boiling, then turn it down to low and let it simmer for 15 minutes.
Wait, you might be asking, why do I need licorice root and a bay leaf? Great question! The bay leaf adds a warm, earthy depth to the sauce that cuts through the sweetness, and the licorice root adds a tiny, subtle sweet herbal note that makes the whole dish taste more complex, and it cuts through the richness so you don’t get sick of eating them after 2 wings. I used to skip these two all the time, but once I started adding them, I never went back. They make such a huge difference, you have to try it.
Step 15: Check the sauce after 15 minutes

After 15 minutes, take the lid off. The sauce should have reduced by about half, right? If it’s still super watery, let it simmer for another 2 to 3 minutes with the lid off. Make sure you keep the heat on low here, you don’t want it to boil too fast and reduce too much.
Step 16: Thicken the sauce over high heat

Turn the heat up to high now, and stir the wings constantly as the sauce bubbles and thickens. Keep stirring until the sauce is sticky and glossy, and it coats every wing evenly. Don’t walk away during this part! The sauce can burn in 10 seconds if you’re not paying attention. As soon as it’s thick enough, turn the heat off immediately.
Pro tip: If you want extra sticky wings, you can add a tiny splash of honey at this point, hence the “honey” in honey coke chicken wings! I do that sometimes when I’m craving extra sweet wings.
Step 17: Plate and serve (and make it look fancy if you want)

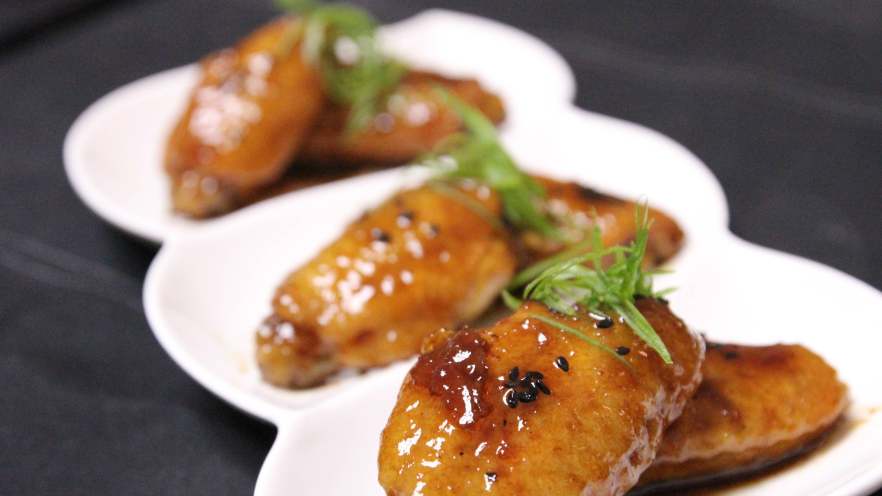
Transfer the wings to a long plate for a nice presentation, sprinkle some toasted sesame seeds over top, and add a few chopped green onions for a pop of color. That’s it! Serve them hot, right away. They’re best fresh, when the glaze is still sticky and the meat is juicy.
See? That’s so easy, right? Even if you’ve never cooked anything more complex than instant noodles, you can nail this recipe. My friend who asked for the recipe made it last night, and he texted me saying it was the best chicken wings he’s ever made, no lie. I’m telling you, those little hacks I shared make all the difference. No more dry, tough wings, just perfectly sticky, sweet, savory, juicy honey coke chicken wings every single time.
If you make this recipe, hit me up and let me know how it turns out! I love seeing your versions. I post more easy, delicious home cooking recipes all the time, so stick around for more foolproof meals that don’t require fancy skills or ingredients.

")

 – Easy Recipe for Soft, Chewy Treats")

: A Step-by-Step Guide with Tips")
")

