


Hey Bakers! Let’s Make Margaret Cookies—Crispy, Buttery, and Perfect for New Year Sharing!
Have you ever wanted a cookie recipe that’s actually easy, tastes like a hug, and looks cute enough to share with friends and family? Look no further! Today, we’re diving into the world of Margaret Cookies—those classic, melt-in-your-mouth treats with that signature cracked top, perfect for New Year’s gatherings or just satisfying a sweet tooth. And the best part? Even if you’ve never baked before, this recipe is basically foolproof. Let’s get started!
Why Margaret Cookies? (Spoiler: They’re Too Good to Resist!)
First off, let’s talk about what makes these cookies so special. They’re:
- Buttery & Melt-in-Your-Mouth: The secret? One simple cooked egg yolk! It adds a rich, creamy depth that makes every bite feel indulgent.
- Beginner-Friendly: No fancy tools or tricky techniques here. Just follow the steps, and you’ll be a cookie pro in no time.
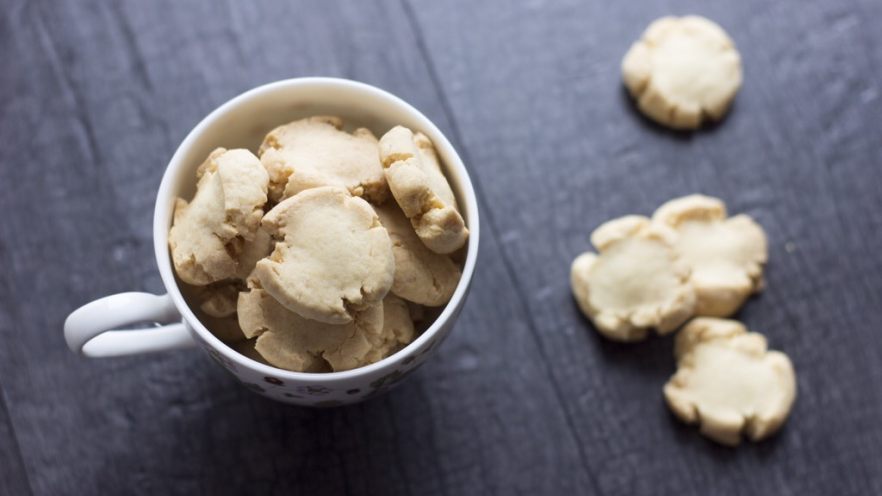
- New Year-Ready: Their delicate, golden appearance and crispy texture make them ideal for gifting or sharing with loved ones during the holiday season.
- Thumprint Magic: When you press them with your thumb, they crack beautifully—giving them that iconic, homemade look.
Trust me, once you try these, you’ll be hooked. They’re the kind of cookies you’ll want to make again and again, whether it’s for a last-minute snack or a thoughtful gift. Let’s jump into the ingredients first!
What You’ll Need: Ingredients Breakdown
Let’s gather everything. Don’t worry—most ingredients are pantry staples, and you probably have them on hand already!
- 1 cooked egg yolk: Yep, just one! Use a leftover hard-boiled egg yolk if you have one, or cook an extra egg just for this recipe.
- 50g softened butter: Soft, not melted! Let it sit at room temperature for 15-20 minutes until you can easily press a finger into it. If you’re in a rush, microwave it for 10 seconds (but watch it—no melting!).
- 30g powdered sugar: This is key for sweetness and smooth texture. Skip granulated sugar here—powdered sugar dissolves better!
- 50g low-gluten flour: Also called cake flour in some places. It’s lighter than all-purpose flour, which keeps the cookies tender. If you don’t have it, substitute with all-purpose flour mixed with 1 tbsp cornstarch (per 50g all-purpose flour).
- 50g cornstarch: Adds extra tenderness and helps the cookies stay crispy. Cornstarch is magic for texture here!
Double-check your ingredients, and let’s move to the fun part: mixing and baking!
Step-by-Step: Making Your Margaret Cookies
Okay, let’s get our hands dirty! This is where the magic happens. Follow these steps, and you’ll have cookies that look and taste amazing.

Step 1: Prep the Dry Ingredients
First, take a medium bowl and add the low-gluten flour and cornstarch. Give them a good sift together—this removes any lumps and mixes them evenly. Trust me, sifting = smoother dough = better cookies! Set this aside for now.

Step 2: Cream the Butter & Sugar
Now, in a larger mixing bowl, add the softened butter. If you’re using a stand mixer, grab the paddle attachment; if not, a hand whisk or spatula works too. Add the powdered sugar and mix on low speed (or by hand) until everything is combined. It should look light and fluffy—this is called “creaming,” and it traps air, making the cookies tender later. Keep mixing for about 2-3 minutes until pale and airy!

Step 3: Beat Until Light & Fluffy
Now, crank up the mixer to medium speed for another minute (or whisk by hand!). The butter-sugar mixture should get even lighter in color and slightly bigger in volume. It’s like magic—you’ll see the texture change from thick to creamy and smooth. This is the secret to those crispy edges and soft centers!

Step 4: Add the Egg Yolk Magic
Time for the egg yolk! Take your cooked egg yolk and hold it over the mixing bowl. Use a fine sieve to sift the yolk into the butter mixture. This will give you a fine, powdery yolk (no chunks, promise!). Sifting is important here—otherwise, you might get a gritty cookie later. Once all the yolk is sifted in, mix on low until everything is fully combined. The dough should now be a smooth, pale yellow color.

Step 5: Combine Dry & Wet Ingredients
Now, gently fold the sifted flour and cornstarch into the butter-yolk mixture. Use a spatula to scrape down the sides of the bowl and mix everything until just combined—don’t overmix! Overmixing can make the cookies tough, so stop when there are no dry streaks left. The dough should be soft and slightly sticky, like playdough.

Step 6: Knead the Dough
Time to get your hands in there! Take the dough and knead it gently with your palms for 30 seconds. This smooths it out and makes sure all ingredients are mixed. The dough should come together into a single, smooth ball. If it’s too dry, add a tiny bit more softened butter; if it’s too sticky, dust your hands with a little cornstarch.

Step 7: Chill the Dough (This Step is CRUCIAL!)
Wrap the dough tightly in plastic wrap and press it into a flat disk (to make it easier to store). Pop it in the fridge for at least 1 hour. Chilling the dough is what makes the cookies hold their shape when baked—otherwise, they’ll spread too much and lose that cute thumbprint crackle. While it chills, clean up the kitchen or binge-watch a show—you’ve earned it!

Step 8: Shape the Dough Balls
After chilling, take the dough out of the fridge. It should be firm but not rock-hard. Grab a small spoon or a scale to portion out 8g of dough per cookie (about 1 tablespoon). Roll each portion into a smooth ball with your palms—keep them uniform for even baking! If the dough gets too warm, pop it back in the fridge for 5 minutes to firm up.

Step 9: Press Those Thumbprints!
Line a baking sheet with parchment paper (or a silicone mat—parchment is cheaper and works great!). Place each dough ball on the sheet, then press firmly with your thumb in the center. Don’t press too hard, or the cookie will break; just enough to create those signature cracks. The cracks happen naturally as the dough relaxes, so even if they’re uneven, they’ll still look amazing!

Step 10: Bake & Watch the Magic Happen!
Preheat your oven to 180°C (350°F) first. Once preheated, reduce the temperature to 170°C (338°F) and bake the cookies for 18-20 minutes. Keep an eye on them—every oven is different! They’re done when the edges turn golden brown, and the tops look set. If they’re pale after 20 minutes, leave them in for 2-3 more minutes. Avoid overbaking—they’ll still taste good, but they’ll be harder than intended.

Step 11: Cool & Enjoy!
Once baked, let the cookies cool on the baking sheet for 5 minutes (they’ll firm up as they cool). Then transfer them to a wire rack to cool completely. Now, take a bite—crunchy on the outside, soft and buttery on the inside, with that hint of egg yolk that makes them so unique. Perfect with a cup of tea or coffee, or pack them up in cute little bags for friends!

See? Told you it was easy! These cookies are so simple, yet they taste like a million bucks. Let’s check out some pro tips to make yours even better!
Pro Tips for the Perfect Margaret Cookies
Want to avoid common mistakes? Here are my top tips for success:
- Sift Everything: Sifting the powdered sugar, flour, and egg yolk ensures no lumps—trust me, lumps = gritty cookies, and we don’t want that!
- Butter Temperature is Key: Soft butter (not melted, not cold) is the sweet spot. Cold butter = hard cookies; melted butter = flat, greasy cookies. Aim for room temp where you can press a finger into it easily.
- Chill, Chill, Chill: If you skip chilling the dough, your cookies will spread into a sad, flat mess. Chilling firms up the butter, so they hold their shape and get that signature crackle.
- Don’t Over-Press Thumbprints: A gentle press creates those beautiful cracks. Press too hard, and the cookie breaks; too light, and the cracks don’t show. Find that sweet spot!
- Adjust Oven Times: If your cookies are browning too fast on the edges, lower the temp by 10°C (18°F). If they’re pale after 20 minutes, try 180°C for the last 5 minutes.
- Use Leftover Egg Yolks: Hard-boiled eggs are perfect for this! If you have leftover yolks, save them in the fridge for future recipes—they’re a game-changer here.
With these tips, you’ll be a Margaret Cookies master in no time. Now, let’s think about why these cookies work so well!
Why This Recipe Works: The Science (and Magic) Behind It
Let’s break down the science of these cookies to understand why they’re so special:
- Egg Yolk = Melt-in-Your-Mouth Texture: The yolk adds fat that keeps the cookies tender, even as they cool. Without it, they’d be dry and crumbly!
- Cornstarch = Crispy & Tender: Cornstarch is less gluten-forming than flour, so the dough stays soft and the cookies stay crispy. It’s like a secret texture hack!
- Low-Gluten Flour = Fluffy Edges: This flour has less protein, so the cookies don’t get chewy—they’re light and airy, perfect for beginners.
- Soft Butter = Even Baking: Soft butter creames with sugar easily, creating air pockets that expand during baking, making the cookies rise slightly and stay tender.
Putting it all together, these ingredients work in harmony to create a cookie that’s crispy, buttery, and infinitely shareable. They’re not just any cookie—they’re a hug in a bite!
Final Thoughts: Margaret Cookies—A Year-Round Favorite
So, whether you’re a baking newbie or a seasoned pro, Margaret Cookies are the perfect choice. They’re easy, delicious, and versatile—great for New Year’s parties, tea dates, or even as a last-minute gift. No matter the occasion, these little thumbprint cookies will make everyone smile.
Now, go grab your ingredients, follow the steps, and let’s get baking! I can’t wait to hear how your Margaret Cookies turn out—tag me in your photos on social media, or drop a comment below if you have any questions. Happy baking, and enjoy every crunchy bite!

")


")
 at Home – Easy Recipe with Step-by-Step Photos")
")
")
")
