


Introduction: That Adorable Mold I Can’t Stop Obsessing Over 🎀
Okay, first things first—look at this mold! I found it on Amazon Global Store, and when I saw the little plum blossom shape, I knew I had to have it. Let me be real: I’ve been baking more at home lately, and cute molds just make the whole process so much more fun. This was my second time using it, and I wanted to try a two-tone matcha version this time. The first time was good, but the color wasn’t as vibrant as I hoped. So I’m sharing the recipe here, plus what I’ll adjust next time (spoiler: more matcha powder and oven temp tweaks!). Let’s dive in!
Ingredients: What You’ll Need
For this matcha two-tone plum blossom toast, we’re using a Polish starter (a type of pre-ferment) which makes the bread extra soft and airy. Here’s the breakdown:
Polish Starter (Poolish)
- 30g high-gluten flour (bread flour works best!)
- 30g water (room temp is fine, maybe even a bit cool if it’s hot)
- 1g active dry yeast (or instant yeast, same thing)
Main Dough
- 120g high-gluten flour
- 25g egg white (I used the white from a medium egg—leftover yolks can be saved for smoothies!)
- 30g water (adjust if your egg white is more or less wet)
- 20g sugar (a little sweetness to help the yeast grow)
- 1g salt (don’t overdo it, or the dough will be tough)
- 20g milk powder (adds a creamy flavor and softness)
- 1g active dry yeast (same as the starter)
- 10g unsalted butter (softened, not melted—room temp works best)
- 1g matcha powder (I used “Wakasa” matcha for this, but any good quality will do; more on color later)
Step-by-Step: Making the Toast (Let’s Get Fluffy!)
Okay, let’s start with the Polish starter because that’s the secret to the softness. It takes a bit of patience, but trust me, it’s worth it!
Step 1: Prepare the Polish Starter
First, combine all the Polish starter ingredients: 30g flour, 30g water, and 1g yeast. Grab a small bowl, add the water, sprinkle in the yeast, then mix in the flour. Use a chopstick to stir until there are no dry flour bits left—just a shaggy dough. Then cover the bowl loosely with plastic wrap or a plate (I just used a clean plate for this). Let it ferment at room temperature.

Step 2: Let the Polish Starter Ferment
How long does this take? It depends on room temp—if it’s hot, maybe 45 minutes; if cool, up to 3 hours. The key is patience! Cover the bowl and let it sit. I usually check after an hour to see if it’s ready.

Step 3: Check the Polish Starter Fermentation
Your starter is done when the surface is bubbly with lots of tiny air pockets. If you stick a chopstick in, it should leave a hole that looks like a honeycomb! The dough will feel light and slightly puffy, with a sweet, yeasty smell. That’s your signal to move on to the main dough!

Step 4: Mix the Main Dough with the Polish Starter
Now, add all the main dough ingredients except the butter to the bowl: 120g flour, 25g egg white, 30g water, 20g sugar, 1g salt, 20g milk powder, 1g yeast, and the fermented Polish starter. Mix these together until a shaggy dough forms—no kneading yet!

Step 5: Knead the Main Dough to a Rough Film
Time to knead! If using a stand mixer, use the dough hook attachment and knead on medium speed for about 8 minutes. You’ll know it’s ready when the dough is stretchy enough to form a thin, rough “windowpane” (not perfect yet). If hand-kneading, it’ll take 15-20 minutes. Keep going until it’s smooth and elastic!

Step 6: Add Butter and Knead to Gluten Development
Now add the softened butter. Let it sit at room temp for 10-15 minutes to soften (not melt). Add it to the dough and continue kneading for another 10-12 minutes (stand mixer) or 25-30 minutes (hand). The goal is a “glove membrane”—when you stretch the dough thin, you can see light through it, and the hole you poke has smooth edges.

Step 7: Verify the Gloves Membrane
Once the dough has that perfect glove membrane, you’re good to go! The dough should be smooth, stretchy, and resilient. Now, we’re ready to divide it into two colors: white and matcha.

Step 8: Prepare the Matcha Dough
First, dissolve the matcha powder. Take 1g matcha and mix it with a tiny bit of water (about 5ml) until it’s a smooth paste. Then, take 100g of the main dough (reserve the rest for white dough) and mix in the matcha paste by hand. Since it’s small, no need for a mixer—just knead a few times until the green color is even.

Step 9: Mix Matcha Dough
Your matcha dough should now be a lovely green! If you want a deeper color, add a little more matcha next time—I only used 1g this time, which was too light. The dough will feel soft and slightly sticky, which is normal. Keep it covered for now!

Step 10: Proof Both Doughs (First Fermentation)
Cover both the white and matcha doughs with plastic wrap. Let them ferment at room temp for 60-90 minutes until they double in size. The dough should feel light and springy when pressed gently. This step is crucial for the final texture—don’t rush it!

Step 11: Punch Down and Rest
Once fermented, take the doughs out and gently press down to release air bubbles (this is “punching down”). Shape each into a ball and let them rest for 10-15 minutes. This relaxes the gluten, making rolling easier later.

Step 12: Roll Out the Doughs
Roll out the white dough into a rectangle (about 20x30cm). Try to make edges even and smooth. Then roll out the matcha dough into a similar rectangle. They don’t need to be exact, just close enough to layer neatly.

Step 13: Layer the Doughs
Place the rolled matcha dough on top of the white dough. Align them so when you roll up, the colors are balanced. Smooth the edges if needed—this creates a clean two-tone look!

Step 14: Roll Up the Dough
Starting from one long side, roll the dough tightly like a cinnamon roll. Seal the edge well so layers don’t separate during baking. The log should be about the same size as the mold—adjust if needed!

Step 15: Prep the Mold
Ah, the plum blossom mold! Since it’s uncoated, brush with oil and dust with flour to prevent sticking. This is key for easy unmolding later—no soggy bottom!

Step 16: Place Dough in the Mold
Transfer the rolled dough into the mold, seam side down. Push gently to fill the mold—no need to overcrowd; the dough will rise into the shape!

Step 17: Second Fermentation
For the final rise, put the mold in the oven with a bowl of hot water at the bottom rack (humid environment = fluffy bread!). Let it rise 60-90 minutes until 80-90% puffed. I overdid mine a bit this time (90% vs 80%), so the top spread out—aim for 80%!

Step 18: Check Fermentation Progress
Gently press the dough—it should spring back slowly. If it doesn’t, let it ferment 10 more minutes. Under-proofing = dense bread; over-proofing = collapsed shape.

Step 19: Bake the Toast
Preheat oven to 180°C (350°F). Place the mold on the middle rack and bake 30 minutes. Keep an eye on the top—if browning too fast, cover with foil. The key is steady heat for even rising!

Step 20: Cool and Unmold
After baking, cool 5 minutes in the mold, then shake gently to release. The plum blossom shape will pop right out—no sticking if you prepped the mold right!

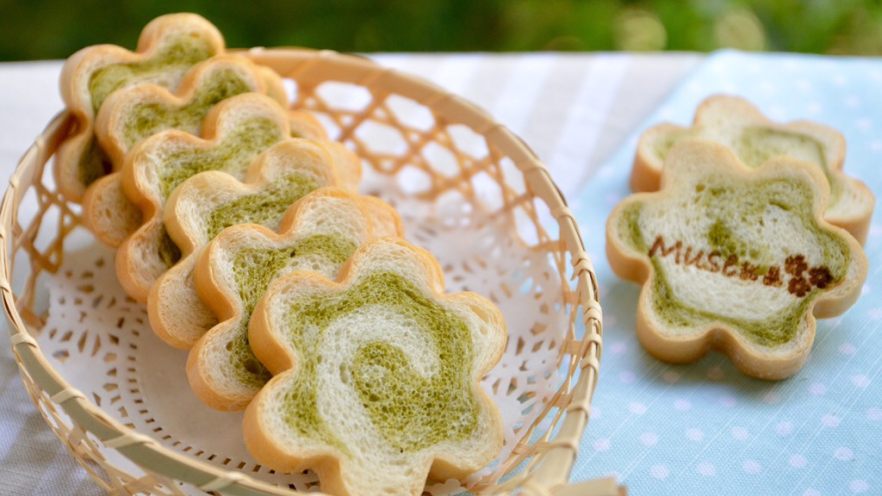
Step 21: Admire the Results!
Look at that cute two-tone plum blossom toast! The mold makes it look professional, and the crumb is soft and airy. Perfect for breakfast or tea time—so Instagrammable!

Step 22: Final Check on Texture
The inside should be open and fluffy, with the matcha adding a subtle bitterness that balances the sweetness. Next time, I’ll try 1.5g matcha for a deeper green—you can adjust to your taste!
Pro Tips & Tricks for Perfect Matcha Toast
Based on my trials, here are key tips to avoid mistakes and get the best results:
- Fermentation Temp: Keep poolish at 25-28°C (77-82°F); second proof at 38°C (100°F). In summer, chill ingredients to keep dough cool—warm dough kills yeast!
- Polish Starter Flexibility: Ferment at room temp (1-2h) or fridge (7-8h). Fridge method = better flavor, no rush!
- Liquid Ratios: Substitute egg white with whole egg or milk; total liquid (egg + water) should be ~55-60g. Bread is forgiving, just keep ratios close!
- Matcha Boost: Add 0.5-1g extra matcha for deeper color; dissolve in warm water first to avoid clumps.
- Oven Care: Preheat fully, don’t open door first 20 mins. Reduce temp by 10°C if oven runs hot—prevents over-browning!
I hope this recipe makes your kitchen smell like matcha heaven! It’s perfect for beginners and seasoned bakers—just don’t skip the Polish starter for that signature softness. Tag me if you try it—I’d love to see your plum blossom toast! Happy baking!
")


")
")
![French Savory Tart [Magic Cake] – Sugar-Free, Layered Delight (Forced My Friend’s Recipe to Obsession!)](https://hearthsiderecipes.com/images/5214/5mit2exneu1.jpg "French Savory Tart [Magic Cake] – Sugar-Free, Layered Delight (Forced My Friend’s Recipe to Obsession!)")


 | Easy, Nutritious Recipe")
