

 & Red Dates Pork Bone Soup Recipe | Nourishing Chinese Wellness Dish")


Introduction: Why This Bread Tastes Like a Hug from My Childhood
Oh man, let me tell you about this crispy honey small bread. It’s not just a recipe—it’s a time machine. Every bite takes me back to my grandma’s kitchen, where the counter was always sticky with flour and the air smelled like warm honey and freshly baked magic. These little golden bites have that perfect balance: a crackly, caramelized bottom that crunches when you bite into it, and a soft, fluffy top that melts in your mouth. Trust me, once you make these, you’ll wonder how you ever lived without that nostalgic taste!
Let’s Gather the Ingredients: The Stars of the Show
First things first—you need the right ingredients to nail that childhood flavor. Let’s break it down into parts, so you don’t miss a single thing:
Ingredients Breakdown
These ingredients are key for that crispy crust and sweet, fluffy interior. I’ll split them into what I call “the dough base,” “the crispy bottom mix,” and “the finishing glaze.”
- Dough Base (Zhongzhong + Main Dough): This is where the magic happens. You’ll need:
- Active dry yeast: 2g (fresh yeast works too, but dry is easier for most home bakers)
- Warm water: 100ml (about 35°C—not boiling! This activates the yeast without killing it)
- High-gluten flour: 155g (for the zhongzhong pre-dough, which gives structure)
- High-gluten flour: 95g (added to the main dough for extra stretchiness)
- Egg liquid: 30g (adds richness and a beautiful golden color)
- Condensed milk: 12g (this is the secret! It’s what makes the bread taste like childhood)
- Water: 30ml (adjust if your dough is too dry; start with 30ml and add more if needed)
- Milk powder: 15g (gives a subtle milky depth—totally optional but recommended)
- Butter: 12g (softened, room temperature—this makes the dough smooth and tender)
- Crispy Bottom Mix: The Crunch Factor:
- White sugar: 20g (caramelizes when baked for that golden, sweet crust)
- Low-gluten flour: 20g (prevents the bottom from getting hard—don’t skip this!)
- White sesame seeds: A handful (for that classic Chinese bakery look and nutty crunch)
- Cooking oil: A few drops (to grease the pan so the bread doesn’t stick)
- Finishing Glaze: Shine and Sweetness:
- Water: 1-2 tablespoons (for a thin glaze)
- Honey: 1-2 tablespoons (the star flavor that ties everything together)
Step-by-Step: Let’s Bake That Nostalgic Magic
Alright, let’s get started! This recipe takes a little patience, especially with the fermentation steps, but trust me—the crispy, sweet payoff is worth it. Let’s dive in!
Step 1: Make the Zhongzhong Pre-Dough (First Fermentation)

Start with the zhongzhong dough. In a small bowl, mix the 2g yeast with 100ml warm water. Stir gently until the yeast dissolves—you’ll see tiny bubbles if it’s fresh. Then add the 155g high-gluten flour. Knead by hand for 5-7 minutes until the dough is smooth and stretchy (or use a stand mixer with a dough hook for 10 minutes). The key? A “windowpane test”: stretch a small piece until it’s thin enough to see light through without tearing. That means your gluten is ready!
Place the dough in a greased bowl, cover with a cloth, and let it rise in a warm spot until doubled in size (1-2 hours). I usually put it near my oven with the light on—it’s the perfect warm spot!
Step 2: Combine the Main Dough (Second Fermentation)

Once the zhongzhong dough is doubled, add the 2g yeast, 95g high-gluten flour, 30g egg liquid, 12g condensed milk, 30ml water, 15g milk powder, and 12g softened butter to the bowl. Knead again until the dough is smooth and elastic (another 5-7 minutes by hand). The combined dough should be even softer and fluffier than the first dough.
Place it back in a greased bowl, cover, and let it rise until doubled in size again (another 1-1.5 hours). This second fermentation is what gives the bread its light, airy texture—don’t rush it!
Step 3: Punch Down and Shape the Dough

When the main dough is doubled, gently press your fist into it to deflate all the air bubbles. This is called “punching down”—it helps the bread keep its shape during baking. Knead lightly for 1 minute to redistribute the gluten, then shape it into a smooth ball.
Let the dough rest for 5 minutes, then use a sharp knife to divide it into 8 equal pieces. Each should be about 50-60g (use a scale if you can, but a knife works too!).
Step 4: Rest the Dough Before Shaping

Take each dough piece, roll it into a ball, and place them on a clean surface. Cover with plastic wrap or a damp cloth and let them rest for 15 minutes. This “relaxation” time is crucial—it makes the dough easier to shape without tearing!
Step 5: Prep the Crispy Bottom Mix

While the dough rests, mix the crispy bottom ingredients: 20g sugar, 20g low-gluten flour, and a handful of white sesame seeds in a small bowl. Stir well until everything is evenly combined. This is what makes the bottom so satisfyingly crunchy!
Step 6: Make the Honey Water Glaze

In another small bowl, mix 1-2 tablespoons of honey with 1-2 tablespoons of water to make a thin glaze. Stir until the honey dissolves—this will give the top of the bread a shiny, sweet finish. Set this aside for later!
Step 7: Shape the Dough for the Perfect Roll

Take one rested dough piece and press it flat with your palm. Roll it out into a long, thin “tongue” shape (about 6 inches long). Then roll it up tightly from the long side, pinching the seam to seal it. This creates a smooth roll that will expand nicely during baking.
Repeat with all 8 dough pieces—they’ll look like little logs now!
Step 8: Cut and Dip for the Crunchy Bottom

Take a rolled dough log and cut it in half lengthwise (don’t cut all the way through!). Dip the cut side into the honey water glaze, then immediately press it into the crispy bottom mix (sugar, flour, sesame seeds). This double-dip ensures the bottom gets that sweet, crunchy coating.
Place the dough seam-side down (so the coated cut side is the bottom) in a greased baking pan. Repeat with all 8 pieces, leaving space between them for rising.
Step 9: Final Rise Before Baking

Cover the pan loosely with plastic wrap and let the bread rise again until doubled in size (30-40 minutes). To help with rising, place a small bowl of hot water in the bottom of your oven (but don’t let the pan touch the water). This creates a humid environment, which keeps the crust soft during baking.
When the dough is puffed and springy, brush the tops with the honey water glaze and sprinkle extra sesame seeds if you like!
Step 10: Bake to Crispy Perfection

Preheat your oven to 190°C (375°F). Place the pan on the middle rack and bake for 20 minutes. The bread should turn golden brown on top and the bottom should be crispy and caramelized. Check by tapping the bottom—if it sounds hollow, it’s done!
Pro tip! If the top browns too quickly, cover with a piece of foil halfway through. But trust me, the sugar in the bottom mix will caramelize beautifully on its own!
Step 11: Let It Cool and Enjoy!

Take the pan out of the oven and let the bread cool for 5 minutes in the pan. Then transfer it to a wire rack to cool completely. The longer it cools, the crispier the crust gets!
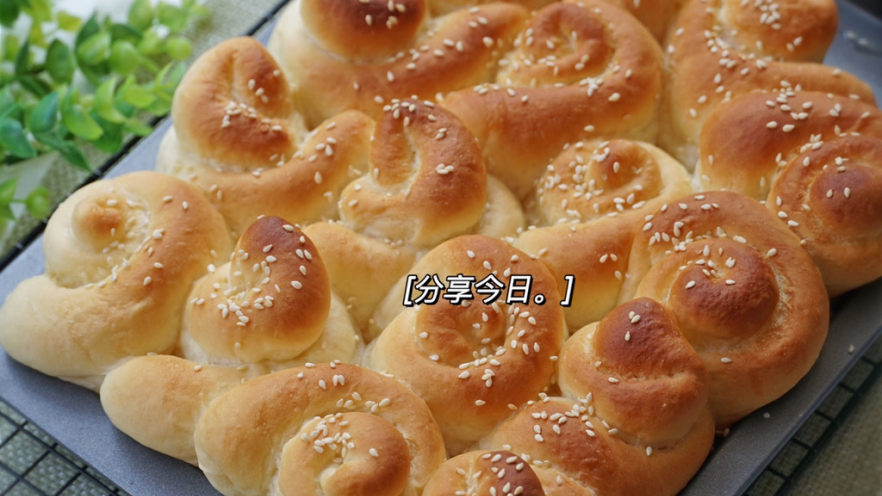
Oh my gosh—look at that crackly bottom! Break one open, and that satisfying crunch will make you smile. The inside is soft and fluffy, with that perfect honey sweetness. It’s exactly like the ones I remember from my childhood. Pure magic.
Final Thoughts: Why You Need This Recipe
These crispy honey small breads aren’t just a treat—they’re a memory in every bite. Whether you’re missing your grandma’s kitchen or just love sweet, crispy, homemade treats, this recipe is for you. The key is patience with the two fermentations, and trust me, it’s worth it.
Tag me if you bake them—I’d love to see your versions! Happy baking, and may your bread always be golden and your memories always be sweet.
")


")

")

")
