
Why Scallion-Golden Steamed Bun Slices Are My Go-To Quick Breakfast
Let’s talk about steamed buns—they’re low-key magic, right? Warm and fluffy straight from the steamer? Delicious. But when they go a little stale (we’ve all been there, forgetting a leftover bun in the fridge), they transform into something even better: crispy, flavor-packed bun slices. No fancy ingredients, no complicated steps—just a few pantry staples and 15 minutes, and you’ve got a breakfast that tastes like a treat. My kids even said it tasted like “fancy bread” the first time I made it—win!
What I love most about this recipe is how versatile it is. It’s perfect for busy school mornings (I can throw it together while the kids brush their teeth), lazy weekends, or even a quick snack. Plus, it uses up leftover buns, so no food waste—score for both my wallet and the planet.
Ingredients You’ll Need (Super Simple, No Fancy Stuff)
Before we dive in, let’s round up the ingredients. You probably already have most of these at home:
- 2 white steamed buns (leftover or fresh—leftover works better for crispiness!)
- 2 eggs (I use farm-fresh eggs for extra richness, but regular ones are fine)
- 1 small bunch of scallions (green parts are best for that bright flavor)
- 1/4 tsp five-spice powder (trust me, this adds a cozy, warm kick)
- Pinch of salt (to bring out all the flavors)
- 1 tbsp cooking oil (for greasing the waffle maker or pan)
- 1 tsp roasted black sesame seeds (for garnish—optional but adds a nice crunch)
Step-by-Step Guide to Making Crispy Scallion-Golden Bun Slices
Ready to get cooking? Let’s break this down into super easy steps—even if you’re a beginner, you’ve got this!
1. Prep Your Ingredients First (5 Minutes Max)

First, gather all your ingredients on the counter. No last-minute fridge raids—let’s keep this stress-free!
2. Slice the Steamed Buns

Take your buns and slice them into 1-inch thick pieces. Pro tip: Don’t make them too thin—thin slices get soggy fast, and we want that perfect crispy-outside, soft-inside vibe. 1 inch is just right.
3. Chop the Scallions

Chop your scallions into tiny pieces (the smaller, the better—you want that oniony flavor in every bite). If you’re not a fan of strong onion taste, you can use just the light green parts, but I love the dark green bits for color.
4. Make the Scallion-Egg Mixture

Grab a medium bowl and crack in the 2 eggs. Whisk them up until they’re smooth—no clumps allowed!

Add the salt and five-spice powder to the eggs. Give it another whisk—you want those spices evenly mixed so every bite has that warm, cozy flavor.

Toss in the chopped scallions. Mix everything together until the scallions are spread throughout the egg mixture.

Take a second to smell that mixture—mm, already delicious, right?
5. Prep Your Waffle Maker (Or Pan!)

I use a multi-functional waffle maker for this because it’s quick and gives the bun slices those fun grid marks (plus, it cooks both sides at once!). If you don’t have a waffle maker, a regular frying pan works too—just flip the slices halfway through.

Pop the waffle maker’s mold in (if it’s detachable) and plug it in. Let it preheat for 2 minutes—you’ll know it’s ready when it’s hot to the touch.

Brush a thin layer of oil on both the top and bottom plates of the waffle maker. This prevents the bun slices from sticking and adds extra crispiness.
6. Coat the Bun Slices in Egg Mixture

Dip each bun slice into the scallion-egg mixture. Make sure both sides are fully coated—you want that golden crust! Don’t let them sit in the mixture too long, though—they’ll get soggy.
7. Cook Until Golden Brown

Place the coated bun slices on the preheated waffle maker. Don’t overcrowd it—cook 2-3 slices at a time, depending on the size of your maker.

Close the lid and let them cook for 3-4 minutes. The exact time depends on your waffle maker—keep an eye on it!

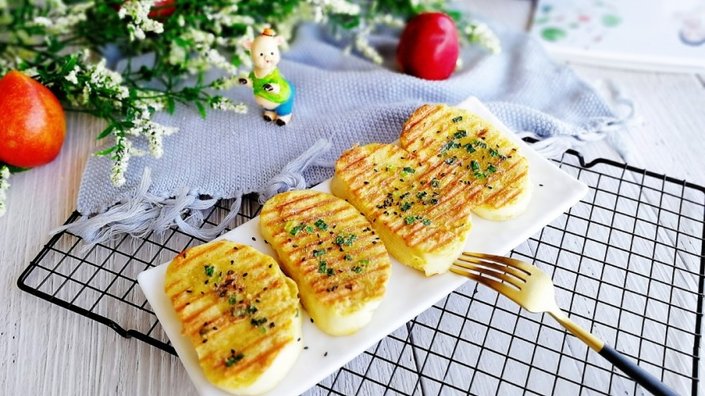
Open the lid when the slices are golden brown and crispy. If they’re still pale, give them another minute—you want that perfect crunch.
8. Serve and Enjoy!

Take the golden slices out and place them on a plate. Sprinkle a little roasted black sesame seeds on top for extra flavor and a pop of color.

That’s it! Serve them hot—they’re best right out of the waffle maker. Pair them with a cup of milk, yogurt, or a side of fruit for a complete breakfast.
Final Thoughts: Why This Breakfast Works So Well

Let’s be real—mornings are chaos. Between getting the kids dressed, packing lunches, and remembering your own keys, the last thing you need is a complicated breakfast. This recipe is a lifesaver because it’s:
- Quick: 15 minutes from start to finish
- Affordable: Uses cheap, easy-to-find ingredients
- Delicious: Crispy, savory, and full of flavor
- Versatile: Works for breakfast, snacks, or even a light dinner

My kids beg for these scallion-golden bun slices every weekend now. They love the crunch, and I love that it’s a healthyish treat (no processed stuff here!). Plus, it’s a great way to use up leftover buns—no more throwing away stale bread!

So next time you have leftover steamed buns, don’t toss them—try this recipe. I promise you won’t regret it. And if you don’t have a waffle maker, a pan works just as well—just flip the slices and cook until both sides are golden. Let me know how it turns out in the comments!

Happy cooking, and here’s to stress-free mornings!