


Spicy Garlic Oil-Poached Crayfish: A Must-Try Summer Dish
Okay, let me start by admitting something: I used to be a total crayfish scarecrow. Like, the thought of those spiny little guys with their claws made me want to run in the opposite direction. Live ones? Nope, too jumpy. Dead ones? Even worse—what if they’re rotten? But guess what? I finally got the chance to try making this garlic oil-splashed crayfish recipe, and now I’m hooked! It was surprisingly easy to clean, and the result? Oh my goodness, it’s like a party in your mouth with every bite. Let me walk you through how I did it… and trust me, you’re gonna want to make this ASAP.
Why This Garlic Oil-Poached Crayfish is a Must-Try
First off, let’s talk about the vibe. This dish is perfect for summer nights—think: cool breeze, cold beer, and garlicky-spicy crayfish that’s so fresh you’ll lick your fingers clean. The secret here is the garlic oil sauce—creamy, fragrant, and packed with that numbing, spicy kick from Sichuan peppercorns. Plus, there’s something so satisfying about cracking open a crayfish tail and seeing that tender, juicy meat coated in that golden oil. And the best part? It’s not rocket science to make—even if you’re new to cooking seafood, this recipe’s forgiving. (Just don’t skip the cleaning steps, okay? Trust me on that one.)
Ingredients You’ll Need
- Crayfish: 350g (fresh is key! I was nervous at first, but the ones I ordered were shockingly fresh—only a quarter dead, which was totally manageable. If yours are a bit dead, no stress, just clean them extra well.)
- Oil: 30g (vegetable or canola oil works great here—neutral, so it doesn’t overpower the garlic)
- Green onions/scallions: 6g (for steaming, plus 5g for garnish at the end)
- Ginger: 6g (fresh, peeled and sliced into thick pieces)
- Garlic: 80g (yes, 80g! That’s a lot, but that’s where the flavor lives. You can scale back if you’re not a garlic fanatic, but don’t skimp too much—trust me.)
- Chili powder: 30g (adjust to your spice level! I’m a spice fiend, so I used 30g, but if you want milder, try 15-20g.)
- Sichuan peppercorns: 5g (these add that signature numbing “ma la” flavor—so key for authenticity, but if you don’t have them, black peppercorns work in a pinch, though they won’t give that “tingly” kick.)
- Soy sauce: 5g (adds the umami boost, don’t overdo it or it’ll be salty)
- Salt: 3g (for the water when soaking the crayfish)
- Oyster sauce: 6g (this is optional, but it takes the flavor to 11! If you don’t have it, skip it, but your sauce might be a bit lighter. Add a pinch more soy sauce if you want.)
- Chicken seasoning (or chicken bouillon powder): 2g (optional, but it amps up the savory flavor—great if you want a deeper taste)
Step-by-Step Cooking Guide
Alright, let’s get into the kitchen! This is where the magic happens. I promise, even if you’re a crayfish newbie, you can nail this with these steps. Let’s go!

 First, clean the crayfish like a pro: Grab a toothbrush (the old one you don’t mind using for this!) and scrub every single part of the crayfish—those tiny legs, the shell, everything. It’s gross, I know, but trust me, you don’t want grit in your crayfish later. Then, pop them into a bowl of salt water (about 1-2 tablespoons salt per liter of water) and let them soak for 15 minutes. This helps them spit out any sand or impurities that got stuck. Perfect, right? No more weird bits in your food!
 Trim the crayfish for easy eating: Using scissors, snip off the tiny “side claws” (the ones that aren’t the big pincers—they’re sharp, so be careful!). Then, cut off the gills (those feathery parts under the head) and the little “antennae” if they’re too long. Finally, give them another quick brush with the toothbrush—you’re done with the prep! Now, they’re ready for the pot.
 Steam the crayfish to lock in moisture: Bring a pot of water to a boil. Once boiling, add the sliced ginger and green onions. Let them simmer for a minute to infuse the water with flavor. Now, carefully place the cleaned crayfish into the boiling water. Wait, no—I actually used a steaming basket for this step! Steaming is better than boiling because it keeps the meat juicier. If you don’t have a steamer, a pot with a rack works too. Just make sure the water isn’t touching the crayfish directly.
 Steam for 15 minutes: Cover the pot and steam for exactly 15 minutes. Set a timer—overcooking makes the meat rubbery, so don’t rush this. Check with a fork: the tail should pull out easily, and the meat should be opaque white, not pink. Perfect, they’re done!
 Prep the garlic: While the crayfish steam, peel the garlic cloves. Rinse them quickly, then cut off the root end (the little white part at the bottom). This makes mashing the garlic into a paste way easier. No more big chunks of garlic in your sauce!
 Mash the garlic into a smooth paste: Use a garlic press for this—so much faster than chopping! Squeeze all that garlic into a bowl. You’ll have a nice, fragrant paste ready to go. If you don’t have a press, you can mince it with a knife, but it’ll take longer and might leave some chunks. Either way works, though!
 Heat the oil gently for the garlic: In a small pan, pour in the 30g of oil. Turn the heat to low and let it warm up until it’s about 60% hot. How to tell? Drop a tiny bit of garlic into the oil—it should sizzle gently, not explode. Once it’s at that stage, turn off the heat immediately! We don’t want burnt garlic, and this step is crucial for that “infused” flavor without charring.
 Slow-fry the garlic to make it fragrant: Add a small spoonful of the garlic paste to the warm oil. If it doesn’t burn (i.e., it stays a pale golden color), pour the rest of the garlic in. Use the back of a spoon to gently push the garlic around and break up any clumps. The residual heat will cook the garlic just enough to make it fragrant, not burned. Let it sit for a minute or two—you’ll smell that garlicky goodness filling the room!
 Make the garlic oil-chili base: Scoop out about 3 spoonfuls of the garlic-oil mixture into a heatproof bowl. Add the 30g of chili powder and sprinkle the Sichuan peppercorns on top. This is where the sauce gets its spicy kick—be excited, it’s almost ready!
 Pour the hot oil over the chili-garlic mix: Now, heat the remaining oil in the pan over medium-low heat (don’t let it get too hot!). Once it’s shimmering and just about to smoke, pour it slowly over the chili and garlic. Whoa, that’ll sizzle! It’s okay, that’s the flavor happening. Stir everything together quickly with a spoon—you want the chili to coat evenly and the garlic to stay fragrant.
 Add the finishing touches to the sauce: Now, add the soy sauce, salt, oyster sauce (if using), and chicken seasoning to the bowl. Stir everything until well combined. Taste it—adjust salt or chili if needed. You want it to be spicy, garlicky, and a little salty, but not overpowering.
 Assemble the crayfish with the sauce: Once the crayfish are done steaming, let them cool for 2-3 minutes. Grab a few at a time and mix them with some of the garlic-chili sauce. Make sure every crayfish is coated—this is the fun part! Arrange them on a plate, then spoon the remaining sauce over the top. It should look glossy and delicious.
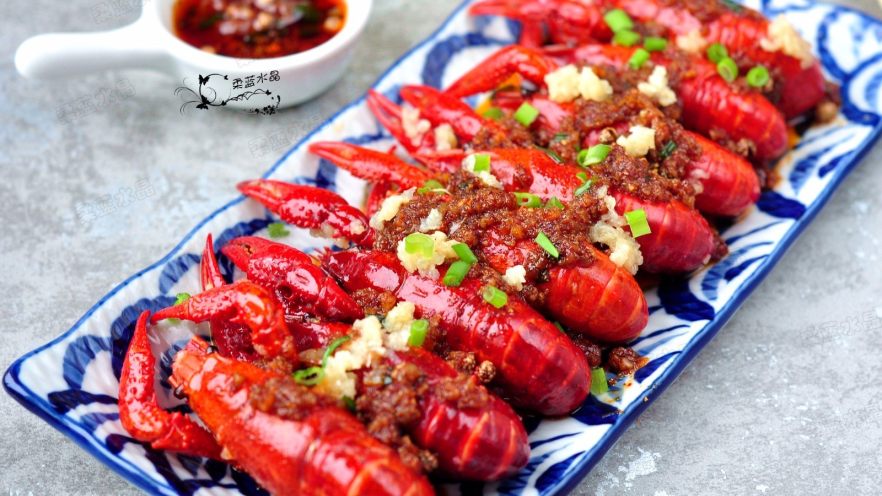
 Garnish and serve! Finally, sprinkle on the extra green onions for a pop of color. And maybe a little more garlic paste if you’re feeling fancy. Now, take a big whiff—garlic, chili, and that fresh crayfish smell. It’s like summer in a bowl.
 Check out that texture! Look at those crayfish tails—they’re plump, tender, and perfectly cooked. The meat should be QQ (chewy but not rubbery), and the shell should peel off easily. Take a bite—you’ll feel the garlic oil burst in your mouth, with a hint of chili heat and that numbing Sichuan peppercorn flavor. Chef’s kiss.
 Pair with a cold beer: I swear, this dish is made for beer. The spiciness of the sauce pairs perfectly with a crisp, cold brew. If you’re indoors, maybe with a glass of iced lemonade to cool the heat, but beer is my top pick. Trust me, you’ll want to share this with friends or enjoy it alone while binge-watching a show.
Pro Tips for the Best Crayfish Ever
Okay, let’s get into the “hacks” I wish I knew before I started cooking this. These tips will save you from disasters, trust me! I’ve learned a lot from trial and error, so take notes:
- Cleaning Technique: Always use a toothbrush to scrub the crayfish. Those little crevices hold dirt, so don’t skip this. Also, soak them in salt water for 15-20 minutes to let them expel any sand or poop (yes, crayfish poop—gross, but necessary!). This makes the meat taste cleaner.
- Removing the “Guts”: When you steam the crayfish, the head will still have the stomach (that tiny black thing) and the tail will have a “sand line” (the vein). To fix this, once the crayfish is cool enough to handle, pinch the head gently and pull out the stomach with a small knife. For the tail, pull the shell back a bit and remove the thin, dark line. This step ensures no gritty bits and keeps the meat firm!
- Garlic Frying 101: This is the make-or-break part! When you add the garlic to the oil, turn off the heat immediately once it’s heated to 60%. If you leave the heat on, the garlic will turn brown and bitter. Also, while frying, use the back of a spoon to break up any clumps of garlic—this way, every bit gets fried evenly and stays fragrant.
- Chili Oil Safety: The second time you heat the oil (for the chili sauce), keep it low-medium. If it’s too hot, the chili powder will burn and turn dark brown, making your sauce bitter. Watch it like a hawk—just enough to make the chili smell toasted, not charred.
- Steaming vs. Boiling: Steaming is non-negotiable here. Boiling would make the crayfish meat tough and dry. The 15-minute steam time is perfect—check the tail by poking with a fork: if it’s soft and easily pulled out, it’s done. Over 15 minutes and it’ll be rubbery.
Okay, so that’s my garlic oil-splashed crayfish recipe in a nutshell! I was nervous at first, but now that I’ve made it twice, I can say it’s become my go-to summer dish. The key is that it’s fresh, it’s flavorful, and it’s surprisingly simple. Even if you’re not a seafood expert, this recipe is forgiving—just follow the steps, and you’ll have a restaurant-quality dish at home.
Let me know in the comments if you try this! Did you have any hiccups, or did it come out perfect on the first try? And if you have your own crayfish hacks, share them—I’m always looking to learn new tricks! Happy cooking, and enjoy your garlicky, spicy crayfish night!


")


