

 & Red Dates Pork Bone Soup Recipe | Nourishing Chinese Wellness Dish")

 at Home: A Step-by-Step Recipe Guide")
How to Make Glutinous Rice Siomai (Shao Mai) at Home: A Step-by-Step Recipe Guide
Okay, let’s talk about one of my absolute favorite dim sum treats: glutinous rice siomai, or what many call Shao Mai. My husband is obsessed with anything made from sticky rice. Seriously, it’s a whole thing. But let’s be real—the options for delicious glutinous rice dishes can feel a bit limited. You’ve got your pumpkin cakes, your sweet rice balls… and then there’s siomai. The ones you buy from restaurants or frozen sections? They’re often way too salty for my taste, and the filling is mostly just greasy rice with a tiny hint of pork. Not exactly exciting, right?
That’s why I started making my own. And wow, what a game-changer! You can pack in all your favorite ingredients, control the seasoning perfectly, and the homemade wrapper? It’s on a whole different level—chewy, elastic, and so much more satisfying than store-bought dumpling skins. Trust me, once you try these, you might not go back.
Why You’ll Love This Homemade Glutinous Rice Siomai Recipe
This isn’t just another recipe. It’s a project, but a totally rewarding one. Here’s why it’s worth the effort:
- Flavor Control: No more overly salty, one-note fillings. You’re the boss of the seasoning.
- Ingredient Freedom: Love mushrooms? Add more! Want some crunch? Throw in water chestnuts. The filling is your canvas.
- Superior Texture: The homemade dough wrapper is bouncy and sturdy, making the whole eating experience so much better.
- Impressive Results: These look and taste like they came from a professional kitchen. Perfect for family gatherings or when you want to treat yourself.
The Complete Ingredient List
Gathering everything is the first step. Here’s what you’ll need to make a generous batch of these delicious parcels.
For the Glutinous Rice Filling
- Glutinous Rice (Sticky Rice): 500 grams
- Pork (with some fat): 350 grams, diced (separate fat from lean meat)
- Carrot: 1 medium, finely chopped
- Dried Shiitake Mushrooms: 6 pieces, soaked and finely chopped
- Corn Kernels: 20 grams
- Green Peas: 15 grams
- Green Onion: 1 stalk, finely chopped
For the Seasoning & Cooking
- Salt: 1 small teaspoon
- MSG (optional) or Chicken Powder: 1/2 teaspoon
- Sugar: 1/2 teaspoon
- Oyster Sauce: 1 tablespoon
- Light Soy Sauce: 1/2 tablespoon
- Spicy Fresh Flavor Powder (or white pepper): 1/2 teaspoon
- Dark Soy Sauce: 3 tablespoons (for color)
- Cooking Oil: 3 tablespoons
For the Homemade Wrappers
- All-Purpose Flour: 400 grams
- Water: 200 grams (adjust as needed)
Step-by-Step Cooking Instructions
Follow along with the pictures! I’ve broken it down into manageable stages: prepping the rice, making the dough, cooking the filling, and finally, assembling and steaming.
Stage 1: Preparing the Glutinous Rice
This is where we build the base of our filling. Patience is key here for perfectly cooked, separate rice grains.

Step 1: First things first, give your glutinous rice a good rinse under cold water until the water runs clear. Then, soak it in plenty of water for at least one hour. This step is crucial for even cooking.

Step 2: After soaking, drain the rice. Steam it over boiling water. A pro tip: spread it out in a thin, even layer in your steamer for faster and more uniform cooking. My steamer basket was small, so my layer was a bit thick—I had to give it a couple of gentle stirs halfway through to make sure everything cooked evenly. Steam until the grains are fully cooked and tender.

Step 3: And here’s our steamed glutinous rice! Fluff it up gently with chopsticks or a fork and set it aside. Now, let’s move on to the dough while the rice cools a bit.
Stage 2: Making the Dough from Scratch
Yes, we’re making the wrappers. No, it’s not as hard as you think, and the payoff is huge.

Step 4: While the rice is soaking/steaming, start your dough. Place the flour in a large mixing bowl. Make a well in the center and pour in most of the water. Don’t add all the water at once! Just like with bread dough, different flours absorb liquid differently. We’ll adjust as we go.

Step 5: Use a fork or your fingers to mix until it forms a shaggy, crumbly mixture (the “cotton wool” stage).

Step 6: Now, get your hands in there! Knead the dough on a clean surface. We’re aiming for the “three smooths”: smooth dough, smooth hands, and a smooth bowl (no sticking!). Once you achieve that, cover the dough with plastic wrap and let it rest for 30 minutes. This relaxes the gluten, making it much easier to roll out later.
Stage 3: Cooking the Flavor-Packed Filling
This is where the magic happens and your kitchen will smell amazing.

Step 7: As the dough rests, prep your filling ingredients. Dice the pork, keeping the fatty bits separate from the lean meat.

Step 8: Finely chop the rehydrated shiitake mushrooms and the carrot.

Step 9: Have your corn kernels and green peas ready. I’m using frozen peas, so I just gave them a quick rinse.

Step 10: Heat a wok or large skillet over medium heat. Add a little oil, then toss in the diced pork fat. Render it slowly until the fat melts out and the bits turn crispy and golden. This is our flavor base!

Step 11: Add the lean pork dice to the rendered fat. Stir-fry until they change color and are cooked through.

Step 12: Time for the veggies! Add the chopped mushrooms, carrots, corn, and peas. Stir-fry for a few minutes until everything is fragrant and the carrots start to soften.

Step 13: Now, for the seasoning. The “spoon” measurements I use refer to a standard Chinese soup spoon, like the one in the picture. It’s about 15ml for a tablespoon.

Step 14: Add all the seasonings—salt, sugar, oyster sauce, soy sauces, and pepper powder—to the wok. Give it a really good stir so every piece is coated.

Step 15: Here comes the star! Add all of the steamed glutinous rice into the wok.

Step 16: This is the arm workout part. Keep stir-frying, breaking up any clumps of rice, until all the rice grains are evenly coated in that delicious, savory sauce and have absorbed all the flavors. It should look uniformly colored and glossy.

Step 17: Turn off the heat. Stir in the chopped green onion for a fresh finish. Transfer the filling to a large plate or bowl and let it cool completely before wrapping. Hot filling will make the dough soggy and hard to handle.
Stage 4: Wrapping and Steaming to Perfection
The final stretch! Let’s assemble these beauties.

Step 18: Your dough should be nicely rested. Divide it into small, equal-sized pieces. I just eyeballed it and pinched them off, so mine are a bit rustic and varied in size—it adds charm!

Step 19: Take one piece, flatten it slightly with your palm, then start rolling it out with a rolling pin.

Step 20: Aim for a round wrapper that’s slightly thicker in the center and thinner around the edges. This structure is perfect for holding the filling without the bottom breaking.

Step 21: Wrapping time! Here’s my method: Place a good amount of cooled filling in the center of the wrapper. Use the thumb and forefinger of your right hand (your “tiger’s mouth”) to circle the wrapper’s edge. Use your left hand to gently press the filling down. As your right hand rotates and pinches the wrapper upwards, the siomai will naturally form a pouch with a gathered, open top. It’s easier than it sounds once you get the motion!

Step 22: Line your steamer with parchment paper or cabbage leaves to prevent sticking. Arrange the siomai with a little space between them. Steam over rapidly boiling water for about 30 minutes.

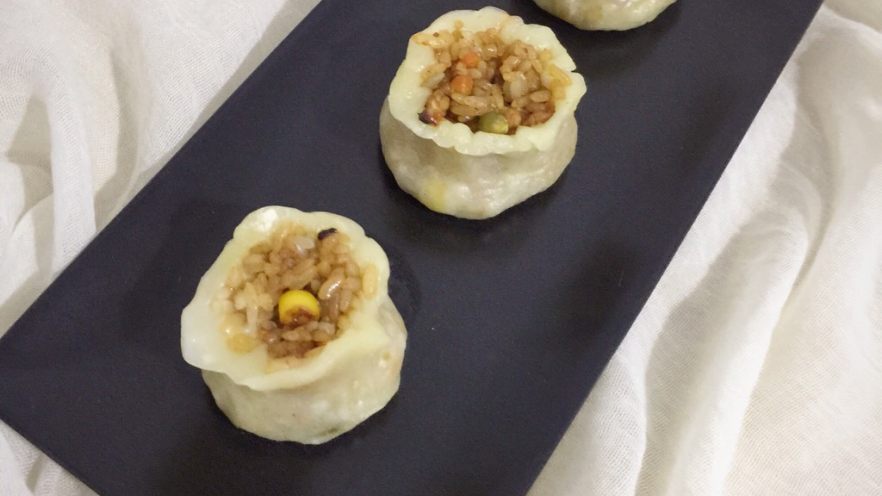
Step 23: And here they are! Aren’t they gorgeous? The real test is the taste: sticky, chewy, savory, with little bursts of vegetable sweetness and rich pork flavor. The homemade wrapper has just the right amount of bite. So much better than anything from a bag!
My Top Tips for Siomai Success
I’ve learned a few things through trial and error. Keep these in mind for the best results:
- Tip #1: Water is Flexible. Please, please adjust the water in your dough based on your flour. Start with less, and add more tablespoon by tablespoon until you get a smooth, pliable dough that isn’t sticky. Humidity affects this too!
- Tip #2: Skip the Store-Bought Wrappers (If You Can). I know it’s tempting to use pre-made dumpling or wonton skins. And yes, you can in a pinch. But honestly? They’re often too thin and lack elasticity, which makes them tear easily when you pack in the dense rice filling. The homemade dough is sturdier, chewier, and frankly, tastes better. It’s worth the extra 15 minutes of work.
- Let the Filling Cool. I’m saying it again because it’s that important. A cool filling is a friendlier filling to work with.
- Don’t Overcrowd the Steamer. Give them room to expand a little and steam properly. You might need to steam in batches.
There you have it! Making glutinous rice siomai at home is a labor of love, but every single bite is a reward. It’s a fantastic weekend cooking project. Give it a try, customize the filling to your heart’s content, and enjoy the delicious, homemade dim sum feast!


 Recipe – Tried & True!")


