

 & Red Dates Pork Bone Soup Recipe | Nourishing Chinese Wellness Dish")


Pea Pork Skin Jelly
If you’re tired of the same old summer salads and want a cozy, protein-packed appetizer that’s actually super easy to make, let me introduce you to my family’s go-to pea pork skin jelly! This stuff is a total crowd-pleaser—every time I whip up a batch, it vanishes off the platter in under 20 minutes, no exaggeration. What makes it so good? The light, fresh pea flavor cuts through the rich, gelatinous pork skin, and the homemade drizzle sauce ties everything together perfectly. Let’s dive into how I make this summer staple!
Why Pork Skin Jelly Is Worth Making
First off, let’s talk nutrition, because I know a lot of folks sleep on pork skin! Did you know that pork skin has 2.5 times more protein than regular pork? It also has 4 times more carbohydrates than lean pork, but way less fat—only half the fat content of regular pork cuts. That’s a win-win for anyone who loves flavorful food without feeling guilty afterwards.
Plus, pork skin is loaded with collagen, which is great for slowing down cell aging in your body. I’ve been making this for my mom who deals with occasional sore throats and low-grade fevers from time to time, and she swears it’s so soothing to eat. It’s mild, easy to digest, and hits just the right spot when you’re under the weather. Even if you’re not sick, though, this is perfect for a hot summer day—it’s cold, refreshing, and tastes way fancier than it is to make.
Full Ingredient List For Pea Pork Skin Jelly
Let’s go over everything you’ll need before we get started. No fancy specialty ingredients here—just basic pantry staples and a few fresh bits:
- 250g pork skin
- 150g fresh peas (frozen works too, just thaw first!)
- Enough water to cover everything
- 10g cooking wine
- 10g soy sauce
- 10g oyster sauce
- 5g granulated sugar
- 3g minced garlic
- 10g apple cider vinegar
- 1g fine salt
- Optional: red chili flakes or fresh sliced chili for a little heat
- 10g peanut oil (or any neutral cooking oil)
Step-by-Step Tutorial For Perfect Pea Pork Skin Jelly
Step 1: Prep Your Peas

Start with your peas! Grab a big handful of fresh pea pods, and pick out any that look wilted, discolored, or have holes in them—you only want plump, bright green pods for the best flavor.
Step 2: Shell The Peas

Next, shell all those pods! Pop each pod open with your thumbnail and squeeze the peas out into a clean bowl. Don’t stress if you miss a few tiny peas—just pick them out of the pods later and toss ‘em in. This part is kinda meditative, honestly, perfect for putting on a podcast while you work.
Step 3: Clean And Prep The Pork Skin

Now for the pork skin! First, give it a quick rinse under cold water, then drop it into a pot of boiling water with a splash of the cooking wine to get rid of any gamy smell. Let it boil for about 5 minutes, then pull it out and let it cool just enough to handle safely.
Here’s the most tedious part, but it’s so important for texture: use a sharp knife to scrape off every last bit of excess fat from the inside of the pork skin. I’m talking every single little chunk—if you leave fat in there, the jelly will get greasy and won’t set right. While you’re at it, pluck out any stray pig hairs you see. Gross, but necessary!
Step 4: Cut The Pork Skin Into Thin Strips

Once all the fat is gone, lay the pork skin flat on your cutting board and slice it into thin, matchstick-sized strips. How thin you cut them doesn’t have to be perfect, but thinner strips will break down better when you cook them, and they’ll mix more evenly with the peas. Pro tip: this affects the final texture, so don’t rush this part!
Step 5: Cook The Pork Skin

Put your sliced pork skin into a large pot, and add water at a 3:1 ratio—so for every 1 cup of pork skin, add 3 cups of water. Pour in the remaining cooking wine too, to keep that gamey taste away entirely.
Step 6: Simmer The Pork Skin

Turn the stove to high heat and bring the whole thing to a rolling boil. Once it’s boiling, turn the heat down to low and let it simmer gently for about 20 minutes. Keep an eye on it and skim off any foamy gunk that rises to the top—this will keep your jelly looking clear and clean instead of cloudy.
Step 7: Add The Peas

Once the 20 minutes are up, test a little strip of pork skin—it should be soft enough to bite through easily without being mushy. If it’s still a little chewy, let it simmer for 5 more minutes. When it’s perfect, toss in your shelled peas and let them cook for just 2 minutes total.
Quick note: I like my peas with a little crunch, so 2 minutes is exactly what I use. If you prefer softer, mushier peas, go ahead and cook them for 3 or 4 minutes instead—totally up to your taste!
Step 8: Set The Jelly

Turn off the heat, and let the mixture cool down for about 10 minutes so it’s not scalding hot. Then pour it into a shallow glass dish or storage container. I love using a 9×13 inch pan because it makes the jelly easy to cut later, but any shallow container works.
Cover the dish with plastic wrap and stick it in the fridge to chill for at least 4 hours. Overnight is even better, but 4 hours should be enough for it to set up completely into a firm jelly.
Step 9: Unmold And Cut The Jelly


When you’re ready to serve, pull the jelly out of the fridge. It should be totally firm, like a gelatin dessert. Run a knife around the edges of the container to loosen it, then flip it onto your cutting board (don’t worry if it breaks a little—no one will judge!).
Cut it into bite-sized squares or rectangles—whatever size you prefer. I usually do 1-inch squares because they’re easy to pick up with a fork or your fingers (yes, it’s totally okay to eat this with your hands at a summer cookout!)
Step 10: Make The Famous Drizzle Sauce


This is the secret that makes my family’s jelly way better than store-bought versions! Grab a small bowl and mix together all the sauce ingredients: soy sauce, oyster sauce, sugar, minced garlic, apple cider vinegar, salt, and a little bit of peanut oil. If you want a little heat, toss in some red chili flakes or a sliced fresh chili pepper here.
Stir everything together until the sugar and salt have completely dissolved. Taste it and adjust if needed—add a little more vinegar for tang, more sugar for balance, or a splash more soy sauce for saltiness.
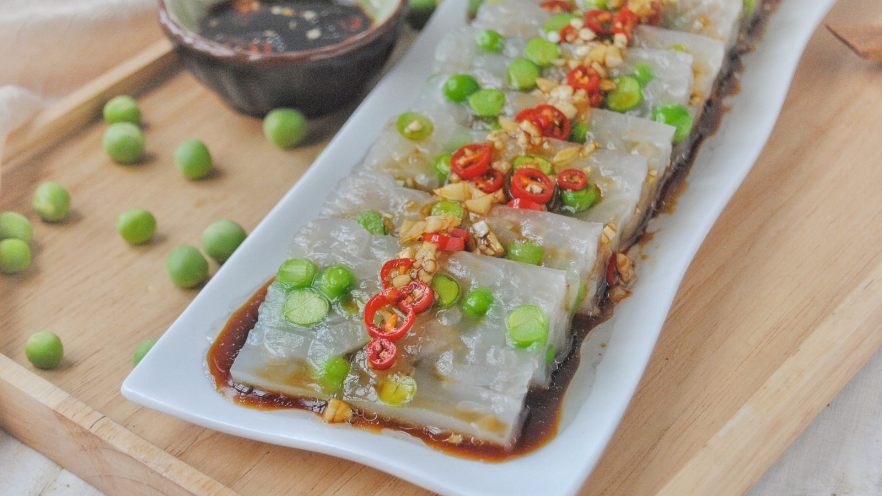
Step 11: Dress And Serve


Arrange your cut jelly pieces on a big serving platter, then pour the sauce all over the top. You can also pass the sauce around separately so people can add as much or as little as they want—great for guests who don’t like too much garlic or heat!
Garnish with a handful of extra fresh peas if you have them, and serve immediately. This is perfect as an appetizer at a summer barbecue, a side dish for a weekday dinner, or even a late-night snack straight from the fridge.
Pro Tips For Perfect Pea Pork Skin Jelly Every Time
- Don’t skip scraping the fat off the pork skin—this is the #1 mistake people make that leads to greasy, runny jelly.
- If you don’t have fresh peas, frozen peas work perfectly! Just thaw them first and add them in during step 7.
- The simmering time can vary depending on how thick you cut your pork skin strips. If you cut them extra thick, add 5 or 10 minutes to the cooking time.
- For a clearer, shinier jelly, strain the pork skin broth through a fine-mesh sieve before adding the peas—this will get rid of any tiny bits of pork or debris.
- Leftovers keep great in the fridge for up to 3 days! Just cover them tightly with plastic wrap so they don’t dry out.
I hope you love this recipe as much as my family does! It’s such a simple, comforting dish that’s perfect for summer, and it’s way healthier than you’d think. Let me know in the comments if you make it—tag me if you post photos, I’d love to see your version of this classic appetizer!


 – Fluffy, Moist, and Easy to Make")