

 & Red Dates Pork Bone Soup Recipe | Nourishing Chinese Wellness Dish")


Why Japanese Milk Bread Rolls Are My New Obsession
Let me start by saying—if you haven’t tried Japanese milk bread rolls yet, you’re missing out on one of life’s softest, most comforting joys. I first saw these chubby little “bread dumplings” on Instagram, and I immediately knew I had to bake them. They looked so pillowy and squishy, like tiny clouds you could eat. Spoiler: They taste even better than they look.
What makes these rolls special? The tangzhong (or “sponge dough”) method. I know, “tangzhong” sounds fancy, but trust me—it’s just a pre-fermented dough that makes the bread extra soft and keeps it fresh longer. No more stale bread by day two! Plus, the milk and butter give them a rich, creamy flavor that’s hard to resist. Let’s dive into how to make them.
Ingredients You’ll Need
First, let’s gather all the stuff. I like to lay everything out before I start—no last-minute fridge raids! Here’s what you’ll need for the tangzhong (sponge) and the main dough:
Tangzhong (Sponge Dough)
- 210g high-gluten flour (I use bread flour—trust me, it makes a difference!)
- 130g milk (whole milk is best for that creamy taste)
- 15g granulated sugar (just a little to feed the yeast)
- 3g active dry yeast (make sure it’s fresh—old yeast = sad bread)
Main Dough
- 90g high-gluten flour
- 10g milk powder (adds extra milkiness—don’t skip this!)
- 45g granulated sugar (sweet but not overpowering)
- 3g salt (balances the sweetness—important!)
- 40g egg liquid (about one large egg, beaten)
- 38g milk (start with this, but adjust if needed—flour is finicky!)
- 30g unsalted butter (softened to room temp—no rock-hard butter!)
- 1g active dry yeast (yes, a little more yeast for the main dough)
Step-by-Step Instructions
Okay, let’s get baking! I promise this is easier than it looks. Just follow along, and you’ll have cute little rolls in no time.
1. Make the Tangzhong (Sponge Dough)

First, mix the tangzhong ingredients in a stand mixer bowl (or a regular bowl if you’re kneading by hand—props to you!). Stir until everything is combined, then knead on low speed until the dough is smooth. It shouldn’t be sticky—just soft and elastic.
2. Chill the Tangzhong

Shape the tangzhong into a ball, put it in a container, and cover with plastic wrap. Stick it in the fridge for at least 17 hours—overnight works perfectly! This slow fermentation is what makes the bread so soft.
3. Prep the Main Dough

After 17 hours, take the tangzhong out of the fridge. It should be puffy and have a slightly sour smell (that’s good—it means the yeast is working!).

Now, add all the main dough ingredients except the butter to the stand mixer bowl. Tear the tangzhong into small pieces and add those too.
4. Knead the Dough

Knead on medium speed until the dough comes together and starts to pull away from the bowl. This takes about 5-7 minutes. Then, add the softened butter and keep kneading.

At first, the butter will make the dough look messy—don’t panic! Keep kneading until the butter is fully incorporated and the dough becomes smooth and elastic.

How do you know when it’s ready? Do the “windowpane test”: take a small piece of dough and stretch it thin. If you can see light through it without it tearing, you’ve got a “gluten window” (or “glove membrane”)—that’s perfect!
5. First Fermentation

Shape the dough into a ball, put it back in the bowl, and cover with plastic wrap. Let it rise in a warm, humid place (I use my oven with the light on) for about 1 hour, or until it’s 2-2.5 times bigger.

To check if it’s done: stick your finger in the dough (flour it first!). If the indentation stays and doesn’t spring back, it’s ready. If it springs back immediately, let it rise a little longer.
6. Shape the Rolls

Punch down the dough to release the air (satisfying, right?). Divide it into 10 equal pieces (I use a kitchen scale for this—no guesswork!). Cover with plastic wrap and let them rest for 10 minutes. This relaxes the gluten so they’re easier to shape.

Take one piece of dough and roll it into a long, thin oval (like a tongue—hence the “cow tongue” shape people talk about).

Fold the top and bottom edges towards the center, then press gently to seal.

Roll it out again into a long strip—make sure the width is even.

Roll it up tightly from one end to the other. Don’t make it too loose, or the rolls won’t hold their shape.

Repeat this with all 10 pieces. They’ll look like little caterpillars—so cute!
7. Second Fermentation

Place the rolled dough on a baking sheet lined with parchment paper. Leave some space between them—they’ll grow! Spray them with a little water to keep them moist, then put them back in the warm oven to rise for another 40 minutes.

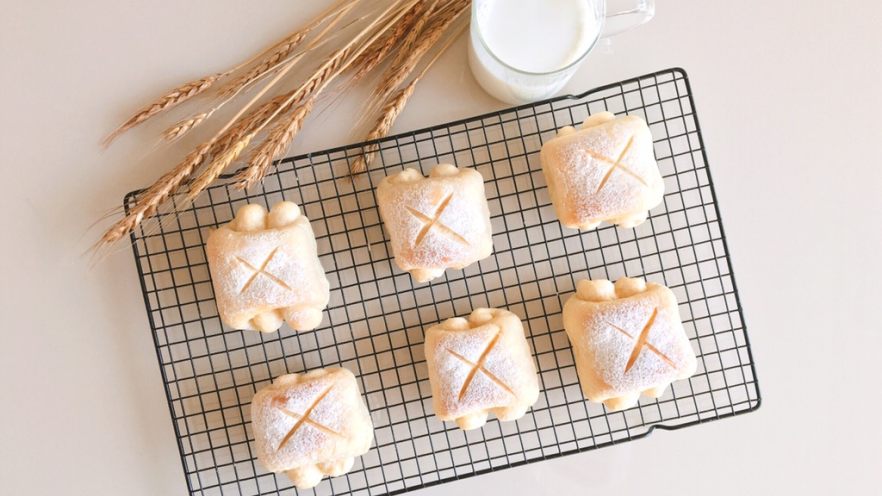
After rising, they should be 1.5 times bigger and look puffy. Sift a little high-gluten flour on top (for that rustic look) and make a small slash on each roll with a sharp knife or blade.
8. Bake the Rolls
Preheat your oven to 160°C (320°F) while they’re rising. Once preheated, bake the rolls for 25 minutes. Keep an eye on them—if they start browning too quickly, cover them with aluminum foil.
When they’re done, take them out and let them cool on a wire rack for a few minutes. Resist the urge to eat them right away—they’re hot! But trust me, the wait is worth it.
The Big Reveal

Look at these little cuties! They’re so plump and soft—like tiny pillows. I can’t get over how cute they are.

And the taste? Oh my goodness. They’re buttery, milky, and so soft you can squish them and they’ll bounce back. Perfect for breakfast with jam, or as a snack on their own.

Go ahead—take a bite. You won’t regret it.

See? So soft! I could eat these every day.
Pro Tips for Success
- Make the tangzhong the night before. It saves time the next day, and the slow fermentation makes the bread even better.
- Adjust the milk amount! Different flours absorb moisture differently. If the dough is too sticky, add a little more flour. If it’s too dry, add a splash more milk.
- Don’t skip the butter. It adds richness and makes the bread extra soft.
- Use fresh yeast. Old yeast won’t make the dough rise properly, and you’ll end up with dense bread.
- Let the bread cool completely before storing. If you put it in a container while it’s still warm, it’ll get soggy.
Final Thoughts
Baking Japanese milk bread rolls is a labor of love, but it’s so worth it. The process is fun, and the result is a batch of soft, fluffy rolls that everyone will love. Whether you’re a beginner or an experienced baker, this recipe is easy to follow and yields amazing results.
So what are you waiting for? Grab your flour, milk, and butter, and let’s bake some cute little rolls. Trust me—your taste buds (and your Instagram feed) will thank you.
 – Easy Homemade Recipe")


 – Fluffy, Moist, and Easy to Make")


 – A Cozy Winter Treat")

