

 & Red Dates Pork Bone Soup Recipe | Nourishing Chinese Wellness Dish")


What is Osaka Okonomiyaki?
Let’s talk about Osaka okonomiyaki—Japan’s beloved “savory pancake” that’s basically a flavor party on a plate! Translating to “grilled as you like it,” this dish is all about customization. Think crispy cabbage, savory pork, umami-packed dashi, and a drizzle of tangy sauce—what’s not to love? Whether you’re a Japanese food newbie or a seasoned home cook, this recipe is super doable. Let’s dive in!
Osaka Okonomiyaki Ingredients
First, let’s round up what you’ll need. No fancy gadgets here—just basic kitchen stuff and fresh ingredients:
- 120g pork slices (thinly sliced belly pork works best—hello, crispy edges!)
- 100g low-gluten flour (regular all-purpose is fine too, don’t stress)
- 2 tsp bonito flakes powder (this is the umami secret—skip it and you’ll miss out!)
- 160cc water (room temp is perfect)
- 300g cabbage (shredded thin—pro tip: use a mandoline if you have one, but a knife works too)
- 1 tbsp dried shrimp (adds a salty, briny kick)
- 2 tbsp tempura bits (tenkasu—these make it extra crispy! Grab them from Asian markets)
- 2 eggs (large ones, please)
- 2 tbsp oil (neutral oil like canola or vegetable)
- 3 tbsp okonomiyaki sauce (store-bought is great—look for Kewpie or Otafuku brands)
- Mayonnaise (Kewpie mayo is non-negotiable here—trust me, it’s creamier!)
- Aonori (dried green laver—for that classic seaweed flavor)
- Katsuobushi (dried bonito flakes—they “dance” on top, so fun!)
Step-by-Step Osaka Okonomiyaki Recipe
Okay, let’s get cooking! I’ll walk you through each step with pics—no confusion, promise.
Step 1: Prep the Cabbage

First up: shred that cabbage! You want it thin enough to cook through but still have a little crunch. If you’re using a knife, slice the cabbage into 1cm strips—don’t worry if they’re not perfect, it’s homemade, after all!
Step 2: Cut the Pork

Take your pork slices and cut them into bite-sized pieces. Thin belly pork is ideal because it renders fat and gets crispy, but if you’re not a pork fan, swap it for bacon or even shrimp—remember, okonomiyaki is all about what you like!
Step 3: Make the Batter

In a big bowl, mix the flour and bonito powder first. Then crack in the eggs and pour in the water. Stir it up until it’s smooth—no lumps allowed! Wait, actually, a few small lumps are okay, don’t overmix or the batter will get tough.
Step 4: Add the Veggies and Bits

Now throw in the shredded cabbage, tempura bits, and dried shrimp. Mix everything gently—you want the cabbage to stay intact, not turn into mush. This is the “heart” of the okonomiyaki, so make sure it’s well combined but not overworked.
Step 5: Toss in the Dried Shrimp (Wait, Did We Miss That?)

Oh right, the dried shrimp! Sprinkle them in and give it another quick stir. These little guys add a salty, ocean-y flavor that ties everything together. If you don’t like shrimp, skip ’em—no judgment here!
Step 6: Heat the Pan and Pour the Batter

Heat a non-stick pan or a teppan (Japanese griddle) over medium heat. Add a tablespoon of oil—wait, let it get hot but not smoking! Then scoop about a cup of the batter onto the pan. Use a spatula to spread it into a round, about 20cm wide.
Step 7: Top with Pork

Now lay the pork pieces on top of the batter. Don’t overlap them too much—you want each piece to get crispy. This is where the magic happens—pork fat rendering into the batter? Yes, please!
Step 8: Cook the First Side

Cover the pan with a lid and let it cook for 2 minutes. Then give the pan a gentle shake—if the okonomiyaki slides around as a whole, the bottom is crispy and ready to flip! If it sticks, let it cook a little longer—patience is key here.
Step 9: Flip and Cook the Other Side

Here’s the tricky part: flipping! Use a large spatula (or two, if you’re nervous) to flip the okonomiyaki over. Don’t worry if it breaks a little—you can patch it up with the spatula. Cook the other side for another 2-3 minutes until it’s golden brown and crispy. If it’s still soft, flip it again and cook a bit more—you want that perfect crunch.
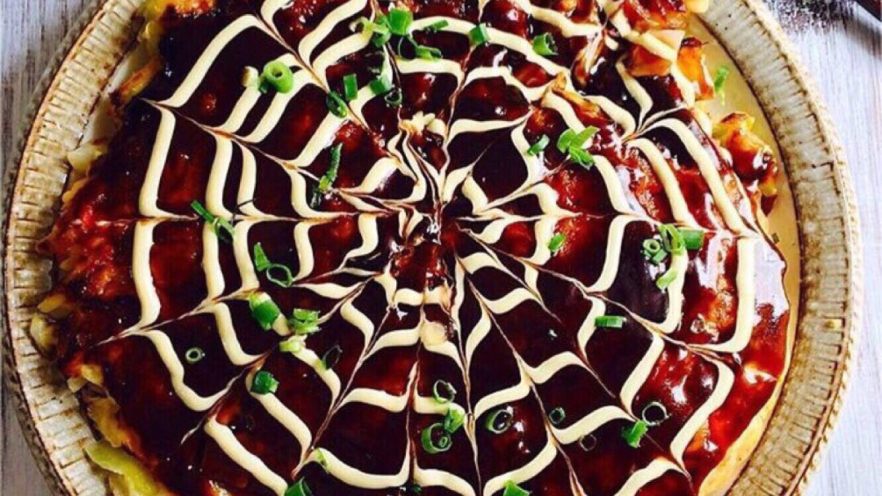
Step 10: Drizzle with Sauce and Mayo

Transfer the cooked okonomiyaki to a plate. Now the fun part: drizzling! First, slather on the okonomiyaki sauce—be generous, it’s tangy and sweet. Then add a zig-zag of Kewpie mayo—this is non-negotiable, folks. The combination of sauce and mayo is chef’s kiss.
Step 11: Add the Final Toppings

Sprinkle on the aonori (dried seaweed) and katsuobushi (bonito flakes). Watch the bonito flakes “dance” from the heat—it’s such a cool effect! Then dig in—say “Itadakimasu!” (ee-tah-dah-kee-mahs) which means “I’ll eat now” in Japanese. Enjoy!
Pro Tips for Perfect Osaka Okonomiyaki
Before you go, here are some quick tips to make your okonomiyaki even better:
- Don’t overmix the batter: Lumps are okay! Overmixing makes the okonomiyaki tough.
- Use a non-stick pan: This makes flipping way easier—no stuck pancake disasters!
- Customize it: Add cheese, kimchi, or even noodles (yakisoba okonomiyaki is a thing!). Remember, it’s “grilled as you like it”!
- Don’t rush the cooking: Low and slow is better—you want the inside to cook through and the outside to be crispy.
Why You’ll Love This Osaka Okonomiyaki Recipe
Osaka okonomiyaki is more than just food—it’s a fun, interactive dish that’s perfect for family dinners or casual gatherings. It’s crispy, savory, and packed with umami. Plus, it’s so customizable—you can make it exactly how you want. Whether you’re a beginner or a pro, this recipe is easy to follow and tastes like the real deal from Osaka.
So what are you waiting for? Grab your ingredients and start cooking—your taste buds will thank you!


 – Fluffy, Moist, and Easy to Make")


 – A Cozy Winter Treat")


