

 & Red Dates Pork Bone Soup Recipe | Nourishing Chinese Wellness Dish")


Introduction: What Are Kai Kou Xiao?
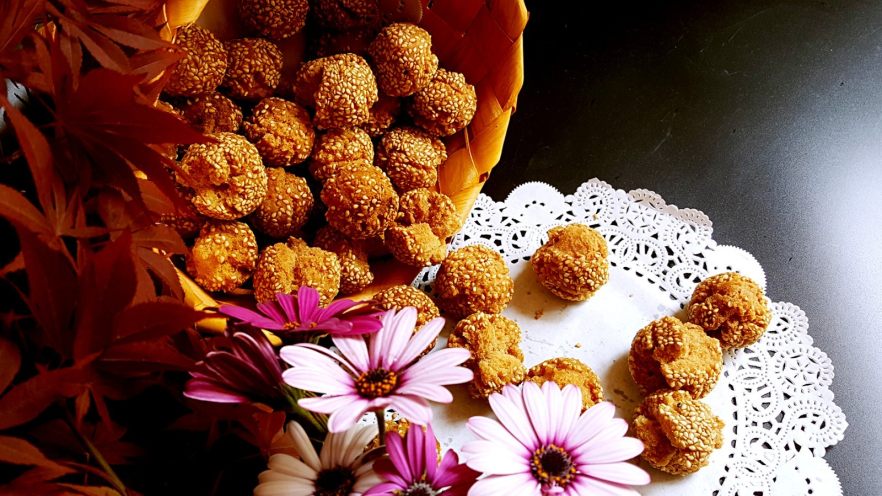
Hey there, foodie friends! 👋 Let me introduce you to one of my all-time favorite Chinese snacks: Kai Kou Xiao (pronounced “Kigh-Kow-Shiao”). Translated, it means “Smiling Mouth”—and let me tell you, once you take a bite, that name makes perfect sense! These little golden balls are crispy on the outside, chewy on the inside, and packed with a sweet, nutty sesame flavor that’s impossible to resist. Think of them as the ultimate sweet treat for tea time, or just a midday pick-me-up when you need something crunchy and delicious. Trust me, once you try them, you’ll be grinning from ear to ear too!
What makes Kai Kou Xiao special? They’re easy to make at home, require only a few simple ingredients, and the frying process is surprisingly satisfying. No fancy equipment, no complicated techniques—just good old-fashioned comfort food with a Chinese twist. Whether you’re a seasoned cook or a kitchen newbie, this recipe is totally doable. Let’s dive in!
Why You’ll Love This Kai Kou Xiao Recipe
- Crispy Texture: The outside crackles with every bite, while the inside stays soft and slightly chewy—pure heaven!
- Easy Ingredients: Most items are pantry staples (flour, sugar, eggs, sesame seeds—you name it, I’ve got it covered).
- Customizable: Want less sugar? More sesame? Adjust to your taste! I’m all about that flexibility.
- Traditional Flair: A classic Cantonese snack perfect for sharing, parties, or just treating yourself.
- Fun to Make: Rolling the dough balls in sesame seeds is like a little craft project—plus, watching them “smile” when fried is satisfying AF.
Ingredients: What You’ll Need
First, let’s gather all the ingredients. Don’t panic if you don’t have everything—we’ll note substitutions where possible! Here’s the list:
- 500g low-gluten flour (or cake flour—this keeps the texture light and crispy; high-gluten flour would make it tough, so stick to low-gluten!)
- 35g all-purpose flour (adds a bit of structure without making it heavy)
- 150g white sugar (adjust if you’re not a sugar lover—I like 150g for that sweet pop, but go lighter if needed)
- 30g peanut oil (vegetable oil works too, but peanut oil gives a subtle nuttiness that’s chef’s kiss)
- 1 egg (room temp is best, but cold works in a pinch—just don’t overmix!)
- 3.5g baking soda (this is NON-negotiable! It’s what makes the dough crack open and expand—like magic in a pan!)
- 140ml warm water (not boiling, not ice cold—around body temp, so your hands don’t get scalded)
- White sesame seeds (as much as you want! More = more crunch, so pile them on)
Pro tip: If you’re gluten-free, swap the flour for a gluten-free blend, but I haven’t tested that yet—let me know how it goes if you try! Also, toasting the sesame seeds in a dry pan for 2 minutes first makes them extra fragrant—totally worth the extra step.
How to Make Kai Kou Xiao: Step-by-Step
Okay, let’s get frying! This part is where the magic happens. Follow these steps, and you’ll have smiling mouth balls in no time.
Step 1: Mix the Sugar Water

Start by dissolving the sugar in warm water. Grab a bowl, pour in the 140ml warm water, then add the 150g sugar. Stir like your life depends on it until there’s no grit left—you want that sugar to fully dissolve! If the water’s too hot, let it cool for a minute before mixing. Trust me, no one likes a soggy dough because of overheated water.
Step 2: Sift the Flour and Baking Soda

Time for dry ingredients! In a large bowl, combine the low-gluten flour, all-purpose flour, and baking soda. Sift them together—this removes lumps and ensures the dough is smooth. If you don’t have a sieve, use a colander; just shake it over the bowl to get rid of big clumps. A smooth base = happy dough later!
Step 3: Prep the Sesame Seeds

While the dry ingredients chill, grab a small plate and pour in your sesame seeds. You can leave them raw, but toasting them for 2 minutes in a dry pan (over low heat) makes them smell amazing. Let them cool before using—no need to burn your fingers! Once toasted, spread them out to cool completely. You’ll thank me later for the extra aroma.
Step 4: Combine Egg and Oil

Crack the egg into a small bowl and whisk it lightly with a fork. Add the 30g peanut oil and mix again—this is the emulsifying step! The egg and oil will blend into a silky, creamy mixture. If it looks a bit messy, don’t stress—it’ll all come together in the end. This is what binds the dough and keeps it tender.
Step 5: Emulsify the Mixture

Stir that egg-oil mixture until it’s smooth and slightly cloudy—this is emulsified, which means the oil and egg are friends! It might look weird at first, but trust the process. This step is key for a soft, not crumbly, dough. If it separates, just whisk a bit more—you’ve got this!
Step 6: Add the Sugar Water to the Mix

Pour the sugar water into the egg-oil bowl and stir vigorously. You want everything to combine evenly—no sugar pockets left! The sugar water adds sweetness and helps the dough stick together. Keep stirring until it’s a uniform, slightly runny liquid. If it’s too thick, add a splash more warm water (but we’ll add more flour later, so don’t overdo it).
Step 7: Mix in the Flour

Now, pour the sifted flour and baking soda into the wet mixture. Use a spoon or your hands to combine everything into a soft dough. Mix just until it comes together—don’t overmix! Overmixing gluten makes the dough tough, so stop when there are no dry bits left. If it’s too sticky, add a tiny bit more flour; if it’s too dry, a splash more water. Balance is key!
Step 8: Divide the Dough into Small Portions

Once the dough is smooth, it’s time to cut it into bite-sized pieces! Grab a dough scraper or knife and divide the dough into 15-20g portions. Smaller is better because they’ll expand when fried—aim for about 1-inch balls. If you make them too big, they’ll crack unevenly or stay dense. I speak from experience here—my first batch was a little too big… oops!
Step 9: Roll Dough Balls in Sesame Seeds

Time to get rolling! Lightly dampen your hands or a clean cloth with water (to prevent the dough from sticking), then take a small dough piece. Roll it between your palms to remove air, then dip it into the sesame seeds. Roll it around until it’s fully coated—you want that golden, crunchy exterior! If the seeds fall off, add a bit more water to the dough or your hands. Patience, grasshopper!
Step 10: Let the Coated Balls Rest

Once all the balls are coated, spread them out on a plate or tray lined with parchment paper. Let them rest for 5-10 minutes. This resting time helps the surface dry a bit, so when they hit the hot oil, the sesame seeds stay put. While they rest, prep your frying station: heat the oil, get a slotted spoon ready, and clear some counter space. Multitasking = pro chef mode!
Step 11: Heat the Oil and Fry the First Batch

Okay, the moment you’ve been waiting for—frying! Grab a deep pot or skillet and pour in enough oil to reach 3-4 inches up the side. Heat over medium-high until it hits 350°F (175°C). Test with a tiny dough piece: if it sizzles and rises quickly, you’re good! Once hot, reduce heat to medium, and carefully drop in 4-5 balls at a time (don’t overcrowd the pan). Let them sit for 1-2 minutes without stirring—this is when they’ll crack open and “smile”!
Step 12: Flip and Fry Until Golden

Once the first side is golden and they’ve cracked, use a slotted spoon to flip them. Let the other side fry for 1-2 minutes until they’re a deep golden brown. Watch closely—they cook fast! If they start to burn, reduce the heat. You want that crispy outside and soft inside, not charred bits. Once golden, scoop them out and drain on paper towels.


Step 13-15: Enjoy Your Crispy Kai Kou Xiao!
Look at those beautiful, golden Kai Kou Xiao! They’re crispy, sweet, and ready to eat. Let them cool for 5 minutes—they’ll still be hot but less sticky. Serve them with hot tea, coffee, or even milk for a perfect snack. Store leftovers in an airtight container for up to 3 days, but let’s be real—they’ll be gone before then!
Final Tips: If your Kai Kou Xiao aren’t smiling, check the baking soda—maybe it’s expired? Or maybe the oil was too hot. Adjust oil temperature (350°F is ideal) and let the dough rest longer if needed. Also, if you want more texture, try adding a pinch of salt to the sugar—subtle, but adds depth!
So, what are you waiting for? Go grab your ingredients, preheat the oil, and make these “smiling” treats today. Trust me, your taste buds will thank you. Tag me if you try them—I’d love to see your golden balls! Happy cooking, and happy snacking! 😊


 – Fluffy, Moist, and Easy to Make")

