


Celery Stir-Fried with Dried Tofu: A Must-Try for Glowing Skin & Healthy Living
Let’s be real—who hasn’t been there? You’re swamped at work, order the greasiest takeout possible, and then wake up with skin that looks like it’s seen better days. 🙈 I’ve definitely been there, especially when I’m buried under spreadsheets all day. But here’s the secret: this Celery Stir-Fried with Dried Tofu recipe is like a magic reset button for your body. It’s not just a quick meal—it’s a natural detox, a blood pressure helper, and your ticket to dewy, glowing skin. Trust me, your liver and your complexion will thank you.
Let’s cut to the chase: if you’re an office worker who survives on takeout, this dish is a savior. No more feeling sluggish after greasy meals! The celery and dried tofu combo flushes out toxins, keeps your blood flowing smoothly, and gives your skin that healthy, radiant look. Think of it as a free facial from the inside out—no fancy creams needed! ✨
Why This Recipe Works for Your Skin & Blood
Let’s break down the science (or, you know, the delicious science). Celery is basically a superfood for your skin and blood. It’s packed with antioxidants, vitamin K, and fiber that helps your body get rid of waste. Plus, celery has compounds that naturally lower blood pressure—perfect for us stress-filled office warriors! 🚀
Then there’s the dried tofu (xianggan). It’s low-fat, high in protein, and full of calcium. But the real hero here? It’s gentle on the liver, which means your body can filter out toxins faster. No toxins, no dull skin—just that fresh, dewy glow we all want. And don’t sleep on the garlic and red chili! They add anti-inflammatory goodness and a spicy kick that boosts metabolism (hello, extra calorie burn without even trying!).
Ingredients You’ll Actually Find in Your Pantry
You don’t need a fancy grocery list for this one. Here’s what you need (all easy to find!):
- Celery: 150g (trimmed, leaves removed, cut into small sections)
- Dried Tofu (Xianggan): 100g (cut into thick strips—grab this at your local Asian market)
- Garlic: 2 cloves (sliced thin)
- Dried Red Chili: 3 small pieces (sliced diagonally—adjust for spice preference!)
- Sugar: 1 tsp (just enough to balance flavors)
- Soy Sauce: 1 tbsp (low-sodium if you’re watching salt—this adds that umami pop)
- White Pepper: ¼ tsp (subtle warmth, trust me)
- Chicken Bouillon Powder (or Jīngjīng): ¼ tsp (optional, for extra umami—skip if vegan)
- Salt: ¼ tsp (adjust to taste, no over-salting!)
- Cooking Oil: 2 tbsp (neutral oil like canola or vegetable)
Step-by-Step: Let’s Get Cooking (No Fuss, Promise!)
Okay, let’s make this happen. Even if you’re a kitchen newbie, these steps are easy. And I’ll add pro tips to make it perfect every time! 👩🍳

Step 1: Prep the Celery
Wash the celery thoroughly! Trim off the tough ends and any wilted leaves (compost those, they’re done). Then slice into 1-2 inch sections—crunchy but not too big to bite. Trust me, these little chunks will make the stir-fry easier to eat and cook evenly.

Step 2: Prep the Dried Tofu
Rinse the dried tofu under cold water to get rid of dust. Slice into thick strips—about ½ inch wide. Dried tofu can be chewy, so slicing thick keeps it sturdy but still tender. You’ll thank me later for not cutting it too thin!

Step 3: Chop the Aromatics
Peel the garlic and slice it thin—tiny pieces work best. For the red chili, cut off the top, remove seeds if you want less heat, then slice diagonally. These little guys add that “wow” flavor without overpowering the dish.

Step 4: Blanch the Dried Tofu
Boil a pot of water. Once it’s bubbling, add the tofu strips and let them cook for 1-2 minutes. This blanching step softens the tofu and removes excess salt. Drain and set aside—your tofu is now prepped and ready!

Step 5: Drain & Set Aside
After blanching, use a colander to drain the tofu. Pat it gently with a paper towel to remove excess water. Set it aside while you heat the oil—no soggy tofu allowed! 🍳

Step 6: Heat the Oil
Now, heat the cooking oil in a pan or wok over medium heat. Let it shimmer a bit—this is your cue to add the garlic and chili for that fragrant base. Don’t rush this step; warm oil makes all the difference!

Step 7: Blanch the Tofu Again (Wait, Why?)
Okay, this might look like a repeat of Step 4—don’t panic! When you boil the tofu the first time, you’re removing salt. The second time? It’s to make sure it’s extra soft. Boil water again, add the tofu, cook 1 minute, drain. This is optional but makes the tofu creamier. Pro move! 🤫

Step 8: Stir-Fry the Celery
Now add the celery to the pan. Stir-fry on medium-high heat until it’s 70% cooked—still a little crisp but not raw. Overcooking celery makes it mushy, so keep an eye on it! You want that fresh crunch.

Step 9: Add the Tofu
Pour the drained tofu into the pan. Give it a quick stir with the celery—they’re about to become best friends! Make sure everything is coated evenly. This is where the magic happens.

Step 10: Stir Until Even
Stir everything together for 30 seconds. The celery and tofu should be dancing in harmony. If it’s too dry, add a splash of water—we don’t want burnt veggies here!

Step 11: Sweeten It Up
Add the sugar. Give it a stir—this balances the savory with a hint of sweetness. You’ll notice the flavor profile start to lift here. Pro tip: add sugar slowly; you don’t want it to overpower the dish!

Step 12: Soy Sauce Time
Pour in the soy sauce. Stir gently—this adds the umami flavor that makes you go “mmm.” Taste as you go! If it’s too salty, add a bit more sugar or water to balance.

Step 13: Spicy Warmth (White Pepper)
Sprinkle in the white pepper. This is the “secret ingredient” that adds a subtle kick without being spicy. If you like more heat, add a pinch of chili flakes now! 🌶️

Step 14: Umami Boost (Optional)
Add the chicken bouillon powder (or skip if vegan). This is for extra flavor—like a tiny flavor explosion. Stir quickly so it dissolves evenly. No one will guess it’s optional!

Step 15: Season with Salt
Finally, add the salt. Taste one more time—adjust if needed. You want the flavors to pop but not make your lips pucker. A little goes a long way here!

Step 16: Serve Immediately!
Stir everything one last time, then turn off the heat. This is ready to eat—no waiting around! The dish should be glossy, evenly colored, and full of that fresh, savory aroma. Dig in!

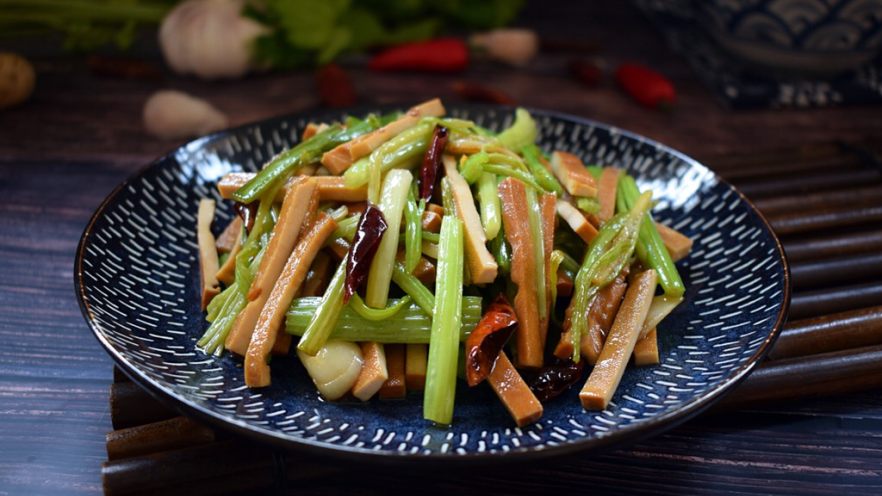
Step 17: The Finished Dish
Look at that! Golden celery, tender tofu, and a beautiful balance of flavors. Serve this hot with rice or as a side—either way, you’ll be hooked. Your skin will thank you tomorrow, I promise! 🍚
Pro tip: Leftovers taste even better the next day! The flavors meld overnight, so make extra and store in the fridge. Reheat with a splash of water for that fresh-from-the-stove feel. 👩🍳
So, what are you waiting for? Grab your ingredients, fire up the pan, and treat yourself to a delicious, skin-loving meal. Your body and your taste buds will high-five you later! 😊


")
")


