 Recipe for Lantern Festival")


: My Friend’s Request + 3 Easy Dishes You’ll Love")

Introduction: Why This Toothpick Meat is a Game-Changer
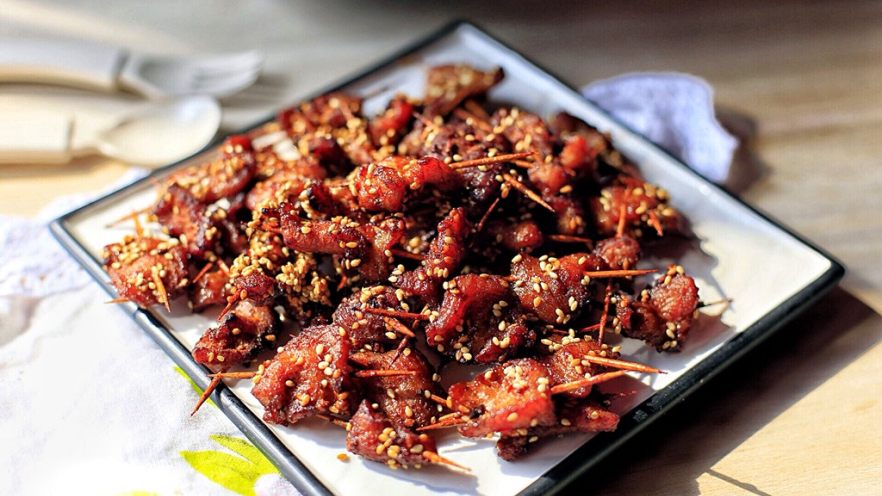
Let me tell you about my most-loved secret snack recipe – these crispy, tender toothpick meat bites! They’re basically the ultimate party food, game-day munchies, or just a late-night treat that’s impossible to stop eating. The best part? You don’t need a fancy kitchen! With simple ingredients and a few easy steps, you’ll have kids begging for seconds and adults raving about the “spicy-sweet magic” in every bite. These little savory bombs are coated in a marinade that’s equal parts umami, a hint of heat, and a sweet finish – perfect for anyone who says “no meat, no party.” Let’s get cooking!
Ingredients: What You’ll Need (No Fancy Stuff!)
First, gather your ingredients. I’ve kept this list practical – no obscure spices, just pantry staples you probably already have. Adjust measurements if you’re scaling up (or down!) for a crowd.
- Pork (or substitute: chicken, beef) – 350g (I swear by pork tenderloin or loin for tenderness, but feel free to use chicken thighs, beef strips, or even turkey!)
- Raw white sesame seeds – 20g (half for marinating, half for sprinkling on top)
- White granulated sugar – 2 tbsp (balances the spice, trust me)
- Garlic chili sauce – 2 tbsp (adds that spicy-sweet kick; if you’re not into heat, swap for regular sweet chili sauce)
- Oyster sauce – 1 tbsp (umami boost! If you’re vegetarian, use mushroom sauce instead)
- Ground cumin – 1 tbsp (that earthy, exotic aroma you love in street food)
- Vegetable seasoning (or MSG) – 1 tbsp (enhances saltiness; skip if you’re sensitive to MSG)
- Rice wine (or white wine) – 1 tbsp (tenderizes the meat and removes that raw smell)
- Sesame oil – 1 tbsp (adds a nutty depth; don’t use olive oil here, sesame is key)
- Light soy sauce (for color) – 1 tbsp (optional, but gives that rich brown hue)
- Egg – 1 large (we’ll use the white for binding; save the yolk for scrambled eggs later)
How to Make the Crispiest Toothpick Meat Ever
Now, let’s get to the fun part – cooking! Follow these steps, and you’ll be biting into crispy, tender perfection in no time. Pro tip: Don’t rush the marinating – it’s what makes the meat sing!

Step 1: Prep Your Ingredients – Gather everything above and measure it out. You’ll need a sharp knife, a big mixing bowl, a pot for soaking, a deep pan for frying, and plenty of toothpicks (skewers work too, but toothpicks are more kid-friendly!).

Step 2: Slice the Pork (or Other Meat) – Rinse the pork under cold water, then pat it dry with paper towels. Slice it into thin, long strips (about 3-4 inches long and ¼ inch thick). Thinner = quicker cooking = crispier outside! If using chicken, remove the skin and bone first.

Step 3: Soak to Remove “Raw” Taste – Put the pork strips in a pot, cover with warm water, and let them sit for 5 minutes. This washes away any blood or impurities, so the meat stays clean and tender. Drain and pat dry again.

Step 4: Mix the Marinade – In a large bowl, combine the 2 tbsp sugar, 2 tbsp garlic chili sauce, 1 tbsp oyster sauce, 1 tbsp cumin, 1 tbsp vegetable seasoning, 1 tbsp rice wine, and 1 tbsp sesame oil. Stir until everything’s smooth – no lumps allowed!

Step 5: Add the Sesame Seeds – Take half the sesame seeds (10g) and mix them into the marinade. Then add the drained pork strips and toss to coat. The sesame seeds help the marinade stick and add crunch later.

Step 6: Add the Egg White – Crack the egg and separate the white from the yolk (save the yolk for another recipe!). Pour the egg white into the marinade, then mix everything together. The egg white acts as a binder – your toothpick meat won’t fall apart when fried!

Step 7: Color & Marinate – Drizzle in the light soy sauce (if using) and toss. Let the pork marinate for 10 minutes. I like to stir it every 5 minutes to make sure every strip gets coated. The longer it sits, the more flavor it soaks up!

Step 8: Thread Pork on Toothpicks – Take a toothpick and slide it through the pork strip. For kids, use 1 toothpick per bite; for adults, maybe 2 if you want bigger pieces. Make sure the toothpick is secure but not poking out too much – safety first!

Step 9: Heat Oil for Frying – In a deep pan, pour enough oil to cover the toothpick meat. Heat it over medium-high until it reaches 70% hot (test with a drop of pork: it should sizzle and rise to the top quickly). If the oil is too hot, the outside burns before the inside cooks!

Step 10: First Fry – Golden & Crispy – Gently lower the toothpick meat into the oil. Fry for 3-4 minutes until they’re slightly golden. Use a slotted spoon to transfer them to a wire rack to drain oil. Don’t overcrowd the pan – fry in batches if needed!

Step 11: Second Fry – Extra Crispy – Now, heat a fresh pan with a little oil. Add the drained toothpick meat and stir-fry for 30 seconds. This is the secret to that “crunchy on the outside, chewy on the inside” texture. Trust me, worth the extra step!

Step 12: Garnish & Serve! – Sprinkle the remaining 10g of sesame seeds over the meat and stir gently. Now, dig in! These are best eaten warm, but they’re also delicious cold (leftovers? Yes, they’ll last 2-3 days in the fridge).

Pro Tip: Mix Up the Meat! – While pork is classic, try chicken thighs (bone-in for extra flavor), beef tenderloin strips (slice thin!), or even turkey! Just adjust cooking time if the meat is thicker – 5-7 minutes instead of 3-4 for beef.
Pro Tips for Toothpick Meat Success
Want to take your toothpick meat to the next level? Here are my go-to tricks:
- Crispiness Hack – Double-frying is non-negotiable! First fry until golden, drain, then re-fry for 30 seconds. No soggy bites here!
- Spice Control – Hate spicy? Use 1 tbsp sweet chili sauce instead of garlic chili. Love heat? Add a dash of chili flakes to the marinade!
- Meat Substitutes – For kids, chicken is easier to chew; for bold flavors, try beef. Pork is the juiciest – but experiment! I’ve even used tofu for a vegetarian twist (let me know if you try that!)
- Storage – Leftovers? Store in an airtight container. Reheat in the oven at 180°C for 5 minutes to get that fresh-out-the-fryer crisp.
- Make Ahead – Marinate the pork up to 24 hours ahead! Just keep it in the fridge. Thread the toothpicks before frying – saves time on game day!
Final Thoughts
There you have it – my secret toothpick meat recipe! These crispy, spicy-sweet bites are perfect for any occasion: game nights, birthdays, or even just a lazy Sunday snack. Kids will love how easy they are to eat, and adults will be impressed by the flavor. Tag me on Instagram @[YourName] if you make them – I’d love to see your twists! Now go grab your ingredients and enjoy the crunch!


")
")
![French Savory Tart [Magic Cake] – Sugar-Free, Layered Delight (Forced My Friend’s Recipe to Obsession!)](https://hearthsiderecipes.com/images/5214/5mit2exneu1.jpg "French Savory Tart [Magic Cake] – Sugar-Free, Layered Delight (Forced My Friend’s Recipe to Obsession!)")


 | Easy, Nutritious Recipe")
