


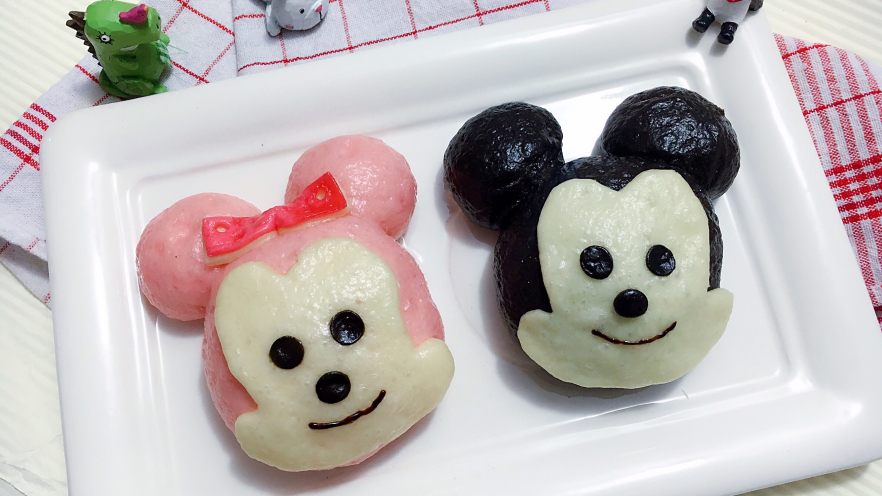
Oh my gosh, have you ever seen something so adorable you just had to make it? These Minnie and Mickey steamed buns are exactly that! 🐭🎀 They’re like tiny little pieces of Disney magic you can eat, and trust me—once you try making them, you’ll be hooked. I stumbled on this recipe months ago, and let me tell you, the first time I bit into one, I swear I felt like a kid again. No fancy equipment needed, just patience and a love for cute things. Let’s dive into how to make these picture-perfect treats for yourself!
Why These Buns Are a Must-Make
First off, let’s talk about why these buns are so special. They’re not just any steamed buns—they’re shaped like the most iconic Disney characters ever! Whether you’re throwing a Disney-themed party, making snacks for your kids, or just want to post something insanely cute on Instagram, these buns deliver. Plus, they’re surprisingly easy to customize. Want bigger bow details? Just adjust the dough sizes. Prefer Mickey’s ears over Minnie’s bow? Swap the pink dough for more black dough. The best part? They taste as good as they look—soft, slightly sweet, and packed with milk flavor. Let’s get started!
Ingredients: What You’ll Need
Before we start mixing, let’s gather all the supplies. Don’t worry, most ingredients are pantry staples!
Black Dough (For Mickey/Minnie’s Ears)
- 200g all-purpose flour (I use high-gluten flour for stretchier buns, but regular all-purpose works too!)
- 20g granulated sugar (the sweet stuff that feeds the yeast and makes the dough fluffy)
- 2g bamboo charcoal powder (this is what gives the black color—you can find it in Asian grocery stores or online)
- 8g unsweetened cocoa powder (adds depth to the black and a tiny chocolatey hint!)
- 150ml warm milk (keeps the dough soft and moist; aim for 35°C/95°F if you have a thermometer)
- 20g powdered milk (extra creaminess and milk flavor—total game-changer!)
- 2g active dry yeast (the magic that makes the dough rise; don’t use instant yeast here!)
Pink Dough (For Minnie’s Bow)
- 200g all-purpose flour (same as black dough)
- 20g granulated sugar
- 2-3 drops red velvet extract or red food coloring (use gel food coloring for vibrant pink; the more drops, the brighter the color!)
- 150ml warm milk
- 20g powdered milk
- 2g active dry yeast
White Dough (For the Faces)
- 100g all-purpose flour (we’ll use this for the white cheeks/eyes)
- 10g granulated sugar
- 80ml warm milk
- 10g powdered milk
- 1g active dry yeast
Extras (For Finishing Touches)
- A small bowl of water (for sticking dough together)
- Flour for dusting (to prevent sticking)
- A clean kitchen scale (optional but helpful for even dough sizes)
Step 1: Mix & Knead the Doughs
Let’s start by making each dough. The key here is to get the kneading right—this ensures the buns are soft and springy when steamed.
Prepping the Black Dough

1. In a large bowl, combine all black dough ingredients: flour, sugar, bamboo charcoal powder, cocoa powder, warm milk, powdered milk, and yeast.
2. Stir everything with a spoon until it forms a rough, shaggy dough (it’ll look like wet sand at first—don’t panic!).
3. Now, knead! If you have a stand mixer, use the dough hook on low speed for 5-7 minutes. If you’re doing it by hand, knead for 8-10 minutes. The goal is to make the dough smooth, stretchy, and slightly tacky (not sticky). You’ll know it’s ready when you can stretch a piece of dough thin enough to see light through it.
Pro Tip for Kneading:
If your dough is too sticky, dust your hands with a little flour. If it’s too dry, add 1-2 tablespoons of warm milk. I once accidentally over-kneaded mine and it turned out tough—so watch for that!
Repeat for Pink & White Doughs
Do the exact same process for the pink and white doughs:
- For pink dough: Mix all ingredients, knead until smooth (5-7 minutes by hand/stand mixer). The color should be bright and even—add more red food coloring if needed.
- For white dough: Mix the ingredients, knead for 5 minutes (smaller batch, so less kneading!). It should be smooth and a pale white.
Step 2: Fermentation – The Secret to Fluffy Buns
After kneading, the dough needs to rise. This is when it doubles in size and becomes light and airy—so crucial for soft, pillowy buns.
1. Shape each dough into a smooth ball. Dust the bowl with a little flour (or line it with plastic wrap if you’re using that).
2. Cover the bowls with a clean, damp cloth or plastic wrap (to keep moisture in).
3. Let them rise in a warm, draft-free spot. I put mine near my oven after preheating it for 10 seconds (then turn it off) or in a sunny window. The ideal temperature is 28-32°C (82-90°F).
4. Check after 1-2 hours: Press a finger gently into the dough. If the indent stays and the dough springs back slowly, it’s ready!
Warning: If your kitchen is cold, the dough might take longer. If it’s too hot, the dough will ferment too fast and collapse. Use your best judgment—you’ll get the hang of it!
Step 3: Shaping the Bases – Big Dough & Small Dough
Once the doughs are risen, it’s time to shape the “heads” and the “details.” Let’s break this down.
Dividing the Doughs
- Take the black dough and divide it into:
– 4 large portions (each 60g—these will be the main heads)
– 8 small portions (each 15g—these will be the ears)
- Do the exact same with the pink dough (4 large 60g + 8 small 15g).
- For the white dough: Roll it into a smooth ball, then divide into 4 equal parts (we’ll use these for the faces later).
Pro Tip for Even Sizes:
Use a kitchen scale to measure each dough portion. It’s easy to eyeball, but weighing ensures symmetry. If you don’t have a scale, make sure to roll each ball the same way (palms rolling in circles).
Rolling Out the Bases

1. Take one large black dough ball (60g) and roll it gently between your palms until it’s smooth and round. This is the “head” of your Mickey or Minnie.
2. Do this for all 4 large black doughs. Arrange them neatly on a floured surface (they’ll be next to each other for the next step).
3. Take the 8 small black dough balls (15g each) and roll them into tiny, smooth balls—these are the ears!
Step 4: Adding the Faces & Features
Now we’re getting to the cute stuff! This is where the magic happens—adding the eyes, nose, and bow.
White Dough for the Faces
1. Take the white dough (divided into 4 equal parts) and roll each into a thin circle (about 5mm thick). Use a rolling pin or your hands—just make sure it’s even!
2. Use a cookie cutter or a small glass to cut out circles (these will be the “faces”). If you don’t have a cutter, freehand it with a knife (like I did the first time—I promise it’s easier than it sounds!).
3. Gently place the white circles on top of the large black dough “heads.” They’ll stick if you dampen your finger with a little water.
Eyes & Nose with Black Dough
1. Take the black dough (the small 15g balls we made earlier). Roll them into tiny, thin circles (1cm diameter). These will be the eyes.
2. Use a toothpick or small knife to cut out tiny dots for the pupils (or just leave them as simple circles for a minimalist look).
3. Press the eyes onto the white face circles. Then, take a tiny piece of black dough (I used 0.5g) and roll it into a dot for the nose. Stick that in the center!
Pro Tip:
If you’re not confident with the knife, use a small round cookie cutter for the eyes (like a 1cm circle). For the nose, a toothpick dipped in water can help the dough stick.
Step 5: Making Minnie’s Bow (or Mickey’s Ears!)
Minnie’s bow is the star of the show, so let’s nail that.
Bow Materials
- Extra pink dough (we have leftover pink dough from earlier—perfect!)
- A little red food coloring (optional, if you want a deeper pink)
Step-by-Step Bow Tutorial
1. Take 15g of pink dough and add 1-2 drops of red food coloring. Knead until evenly mixed. This will be your deep pink “bow center.”
2. Roll the pink dough into a thin rectangle (about 10cm long, 2cm wide). Use a rolling pin for even thickness.
3. Cut the rectangle into 2 thin strips (about 5cm long, 1cm wide). These will be the bow’s loops.
4. Take a small portion of white dough (leftover from the face!) and roll it into a tiny ball. This is the “knot” in the center of the bow.
5. Place the two pink strips on top of the white knot, then fold them into a bow shape. Wet the ends with water to stick them together.
Pro Tip:
If you’re making Mickey instead of Minnie, skip the bow and use the black dough for extra ears! Just shape the black dough into small triangles instead of circles.
Step 6: Final Shaping & Steaming
Almost there! Let’s put everything together and cook those buns.
1. Stick the pink bow on top of the white face (center of the head). Use a tiny bit of water to make it stick—too much water makes the bun soggy, so just a drop!
2. Arrange all the finished buns on a bamboo steamer or a silicone mat-lined plate. Leave 2cm between each to allow space for rising during steaming.
3. Cover the steamer with a lid and let the buns “rest” for 15 minutes (this is called “proofing” again—they’ll puffed up a bit more).
4. After resting, steam on medium heat for 15 minutes. Then, turn off the heat and let them sit for 5 minutes before opening the lid (this prevents the buns from collapsing!).
Pro Tips for Perfect Buns
- Fermentation Check: If the dough doesn’t double, your kitchen is too cold. Try a warmer spot or cover the bowl with a blanket.
- Sticky Dough: If your dough sticks to your hands, dust them with flour before rolling. Also, make sure your work surface is floured!
- No Bow? No Problem: If you’re short on time, skip the bow and just make Mickey’s classic round ears.
- Storage: Leftover buns can be stored in the fridge for 3 days or frozen for a month. Reheat in the microwave for 10 seconds or steam for 5 minutes.
Final Bite: Why These Buns Are Worth It
These Minnie and Mickey buns are more than just food—they’re a hug in a bun. Whether you’re sharing them with friends, surprising your kids, or just treating yourself, they bring joy to every bite. I’ve made them for birthday parties, playdates, and even my own lazy Sunday mornings, and they always get rave reviews.
So grab your ingredients, roll up your sleeves, and let’s make some Disney magic! Tag me in your photos—I’d love to see your creations.
P.S. Don’t worry if they’re not perfect on the first try—practice makes progress, and soon you’ll be a pro at cute, edible crafts!

: No Bitterness, Kid-Approved Recipe")
 Recipe: A Fiery Family Favorite")


")
 Recipe: Super Flaky & Buttery")