




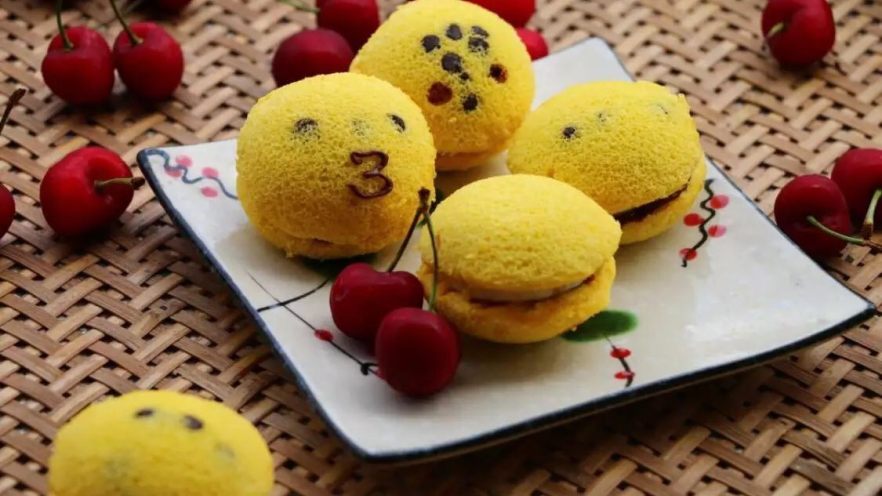

Easy Chocolate-Filled Mini Cakes Recipe | Quick & Delicious Homemade Dessert
Quick & Stress-Free Chocolate Mini Cakes
Hey there, sweet tooths! 🍰 If you’ve been hunting for a simple, no-fuss dessert that’s ready in under an hour, look no further. These Chocolate-Filled Mini Cakes are like tiny bites of heaven—moist, fluffy, and packed with rich chocolate flavor. Perfect for beginners, busy weeknights, or impressing guests with minimal effort. Let’s get baking!
Ingredients You’ll Need
Let’s keep this short and sweet—no fancy stuff here! These ingredients make about 6 mini cakes (one for each spot in the 12-link mold, but you can adjust as needed). Grab these from your pantry:
- Eggs: 2 (room temperature works best)
- All-purpose flour (low-gluten if you have it): 20g
- Milk: 20g (dairy or oat milk, whatever you love)
- Cooking oil: 20g (vegetable or canola oil)
- Sugar: 20g (adjust if you like less sweetness)
- Chocolate: Extra for filling (dark, milk, or white—your call!)
- Banana: ½ (ripe and soft for a fruity twist; swap with strawberries or kiwi if you want)
Step-by-Step Instructions to Bake Your Cakes
Let’s start with the fun part! Make sure your oven is preheated (we’ll get to that in a sec) and grab your mixing tools. No need for a professional kitchen—just a bowl, whisk, and spatula (or even a spoon works!).

Step 1: Heat Oil & Mix with Flour
Take 20g of cooking oil and heat it in a small pan over low heat. You’ll know it’s ready when you see tiny ripples on the surface (like gentle waves!). Since the oil is small, use a tiny container (ramekin, shot glass) to avoid spills—trust me, I’ve had oil boil over before… oops! 🔥 Once heated, sift the 20g flour directly into the oil. Stir quickly to mix into a smooth batter. This is your “dry base” for the cake!

Step 2: Cool the Batter
Let the oil-flour batter cool down to room temperature. This helps the eggs and milk mix better later. While it cools, prep the wet ingredients—we’ll need those eggs!

Step 3: Whisk Eggs & Milk
Crack 2 eggs into a bowl, add the 20g milk, and whisk gently until smooth. No electric mixer? No problem! A fork works just fine—just stir in one direction until everything blends. This is your “egg-milk wet base.”

Step 4: Combine Wet & Dry Mixtures
Pour the egg-milk mix into the cooled oil-flour batter. Stir carefully—just until no white streaks remain, but don’t overmix! Then, sprinkle in a handful of chocolate chips or chopped chocolate (optional, but why not?). If you’re not a chocolate fan, swap with nuts, dried berries, or shredded coconut—be creative!

Step 5: Whip Egg Whites to Stiff Peaks
Now, separate the egg whites (reserve the yolks for the batter, duh!). In a clean, dry bowl, add the 20g sugar and beat the egg whites with an electric mixer (or by hand if you’re strong!) until they form stiff, glossy peaks. It takes ~2-3 minutes with a mixer; by hand, it’s a bit longer, but keep going! When you lift the whisk, the tip should stand straight up—no drooping! 💪

Step 6: Gently Fold Egg Whites into Batter
Here’s the tricky part: Fold the egg whites into the batter with a spatula. Use gentle “cutting” motions—don’t stir in circles (that deflates the cake!). Just fold until the batter is smooth and all the white is mixed in. Think of it like folding a blanket over a sleeping cat: gentle and quick! This keeps the cake light and fluffy—no air bubbles left!

Step 7: Preheat Oven
Your batter is ready! Now, preheat the oven to 120°C (250°F). Why 120°C? Lower temp = even baking, so the outside doesn’t burn before the inside is done. Let the oven warm up while we prep the baking container.

Step 8: Transfer Batter to a Bag
To get the batter into the mold neatly, use a piping bag (or a ziplock bag with the corner cut off!). Squeeze the batter into the bag—leave space at the top so it doesn’t spill. If you don’t have a piping bag, use a spoon to scoop batter into the mold. Easy peasy!

Step 9: Fill Molds & Remove Bubbles
Fill the 12-Link Cupcake Mold (non-stick is best!) about ¾ full with batter. Tap the mold gently on the counter to release big air bubbles—this ensures even baking. Your mini cakes are about to take shape! 🧁

Step 10: Bake at 120°C for 20 Minutes
Pop the mold into the preheated oven and set the timer for 20 minutes. Keep an eye on them—if they start browning too much, lower the heat to 115°C. The cake is done when it springs back when you touch the top lightly.

Step 11: Cool by Inverting
When the timer dings, carefully take the mold out. Immediately invert it onto a cooling rack or plate—this stops the cake from collapsing and keeps its cute shape. Let it cool for 5-10 minutes before touching.

Step 12: Unmold the Cakes
Once cool, gently pop each cake out of the mold. If they stick, run a thin knife around the edge. The non-stick mold makes this super easy—no struggle! Look at those adorable little domes! 👀

Step 13: Add Chocolate Filling
Now, fill half the cakes with chocolate sauce! I melted dark chocolate in the microwave (30 seconds, stir halfway) for a smooth drizzle. If you’re lazy, use Nutella or jam—whatever you like! Be generous but don’t go overboard; we need the top half to close nicely.

Step 14: Assemble with Banana
Add a slice of banana (or your favorite fruit!) on top of the chocolate. Then, press the other half of the cake gently to close the sandwich. Drizzle extra chocolate on top if you’re feeling fancy! Strawberries, kiwi, or even whipped cream work too—get creative!

Step 15: Chill & Enjoy!
Pop the filled cakes into the fridge for 10-15 minutes to let the chocolate set. Trust me, this makes the filling thick and the cake even more moist. Take a bite and savor the chocolatey goodness! They’re perfect for breakfast, tea time, or late-night snacking—you can even pack them for a picnic! 🎉
Pro Tips for Perfect Mini Cakes
Here’s what I wish I knew before! These hacks make the cakes even better: 👇
- Oven Temp: 120°C is the magic number! Too hot = burnt outside, raw inside. Too low = takes forever. Stick to 120°C for 20 mins—no mistakes here!
- Mold Hack: The 12-Link Non-Stick Mold makes unmolding a breeze. If you don’t have one, grease a cupcake tin or use paper liners.
- Chocolate Swap: Peanut butter, caramel, or cream cheese frosting instead of chocolate? Go for it! Experiment with flavors!
- No Mixer? No Problem! Hand-whipping egg whites takes time, but keep whisking in one direction until peaks form. You’ll get there! 💪
- Storage: Keep leftovers in an airtight container in the fridge for up to 3 days. They stay fresh as a daisy!
So, what are you waiting for? Grab your ingredients, follow these steps, and enjoy your homemade chocolate-filled mini cakes! They’re easy, cute, and perfect for any occasion. Tag me if you make them—I’d love to see your creations! Happy baking! 🍰

![Homemade Cheesy Beef Burger Recipe: Better Than Fast Food! [Easy DIY Guide]](https://hearthsiderecipes.com/images/1713/pi0xfutbvri.jpg "Homemade Cheesy Beef Burger Recipe: Better Than Fast Food! [Easy DIY Guide]")
