
Why This Barbie Doll Cake Is Perfect for New Bakers (Like Me!)
Let’s be real—when I first decided to make a Barbie cake, I was terrified. I’d seen those Pinterest-perfect versions with smooth, flawless frosting and thought, “There’s no way I can pull that off.” But guess what? This recipe is a game-changer for anyone who’s still mastering the art of cake decorating (or, let’s be honest, still struggles with basic frosting). It uses an 8-inch chiffon cake base, which is forgiving and fluffy, and the decorating part? You can just grab your favorite piping tip and go wild—no need to stress about perfect smoothing. Trust me, I’ve tried it, and even my messy first attempt turned out cute enough to impress my niece (and her very judgmental 7-year-old friends).
What You’ll Need (No Fancy Tools Required!)
First things first: let’s gather your ingredients. The best part? Most of these are staples you probably already have in your pantry. No weird food coloring or specialty flours here—just simple stuff that works.
- 5 large eggs (room temperature is key—cold eggs won’t whip as well!)
- 40g water (or milk, if you prefer a creamier flavor)
- 40g vegetable oil (neutral-tasting, like canola or sunflower)
- 85g cake flour (low-gluten is best for that light chiffon texture)
- 80g granulated sugar (split between egg yolks and whites—wait, don’t skip that step!)
- 800g heavy cream (chilled, so it whips up stiff)
- A few drops of red food coloring (or any color you love—pink is classic for Barbie, but feel free to mix it up!)
Oh, and don’t forget your Barbie doll! Make sure to wrap her lower half in plastic wrap before sticking her into the cake—you don’t want cake crumbs in her dress (trust me, I learned that the hard way).
Step-by-Step Instructions (With Pictures to Save You!)
Let’s break this down into super simple steps. I’ve included pictures for each part because I know how confusing written instructions can be—especially when you’re covered in flour and panicking.
1. Prep All Your Ingredients First

This might sound obvious, but trust me—nothing’s worse than realizing you’re missing an egg halfway through. Lay out all your ingredients on the counter: eggs, water, oil, flour, sugar, cream, and food coloring. Get your Barbie mold (yes, you need a special mold for this—don’t try to carve a regular cake, it’ll be a disaster) and make sure it’s clean and dry.
2. Separate Egg Yolks and Whites (No Water or Oil Allowed!)

Take your 5 eggs and separate the yolks from the whites. The whites need to go into a completely clean, dry bowl—even a tiny bit of water or yolk will ruin your meringue. I like to use two small bowls: crack the egg into one, then transfer the yolk back and forth between the two shells to let the white drip into the bowl. Pro tip: If you accidentally get a yolk in the whites, fish it out with a piece of eggshell—it works like a charm!
3. Mix Egg Yolks, Water, and Oil

Put the egg yolks into a medium bowl, then add the 40g water and 40g oil. Stir them together with a whisk until they’re smooth and well combined. It should look pale yellow and creamy—no lumps here!
4. Whisk Until Smooth

Keep whisking the yolk mixture until it’s really smooth. You don’t want any streaks of oil or water—this step ensures your cake batter is even.
5. Sift in Cake Flour (Don’t Skip Sifting!)

Now, take your 85g cake flour and sift it into the yolk mixture. Sifting is non-negotiable here—it makes the cake light and fluffy instead of dense. Use a spatula to fold the flour into the yolk mixture until there are no lumps left. Be gentle—you don’t want to overmix, or your cake will be tough.
6. Whip Egg Whites with Sugar (Three Times!)

Now for the fun part: whipping the egg whites. Take your clean bowl of egg whites and use an electric mixer (hand mixer works too, but it’ll take longer) to whip them on medium speed until they’re foamy. Then, add the 80g sugar in three parts: first a third when it’s foamy, then another third when soft peaks form, then the last third when it’s starting to get stiff. Keep whipping until you have stiff peaks—this means when you lift the mixer, the peak stands straight up without bending over. If it flops, keep whipping a little longer!
7. Fold the Batter (Don’t Stir—Fold!)

Take about a third of the whipped egg whites and add them to the yolk-flour mixture. Use a spatula to fold them in—this means cutting through the middle, scraping the bottom, and folding over the top. Do this gently so you don’t deflate the egg whites (that’s where the fluff comes from!). Once that’s mixed, pour the entire yolk mixture back into the bowl of remaining egg whites and fold again until everything is combined. You should have a light, airy batter.
8. Pour into the Barbie Mold and Tap Out Bubbles

Pour the batter into your greased Barbie mold (I like to use a little oil or non-stick spray). Then, hold the mold a few inches above the counter and tap it gently a few times—this gets rid of any big air bubbles that would make holes in your cake.
9. Bake It (Oven Temp Is a Guideline, Not a Rule!)

Preheat your oven to 160°C (320°F) and put the mold on the lower rack. Bake for about 90 minutes—yes, that’s a long time, but chiffon cake needs slow baking to rise properly. Don’t open the oven door for the first 70 minutes, or your cake will sink! I set a timer and distract myself with a snack (or Netflix) during this time.
10. Cool and Unmold (Don’t Skip the Upside-Down Part!)

Once the cake is done (test it with a toothpick—if it comes out clean, it’s ready!), take it out of the oven and immediately flip it upside down. Chiffon cake needs to cool upside down to keep its shape—if you lay it flat, it’ll deflate. I usually balance the mold on a bottle or a wire rack so the cake doesn’t touch the counter. Let it cool completely (about 1-2 hours) before unmolding.
11. Whip the Cream and Add Color

While the cake is cooling, get your 800g chilled heavy cream. Pour it into a cold bowl (I even put my bowl in the fridge for 10 minutes first) and whip it on medium speed until it’s thick enough to hold its shape. Then, add a few drops of red food coloring (or whatever color you want) and mix until it’s evenly colored. I went with a soft pink for my niece’s cake—she loved it!
12. Frost and Decorate (No Smoothing Skills Needed!)

Now for the best part: decorating! First, take your cooled cake and place it on a plate. Stick your plastic-wrapped Barbie doll into the center (make sure she goes deep enough so she’s stable). Then, start frosting the cake. If you’re bad at smoothing (like me), don’t worry—there’s a trick! You can use a plastic scraper (the kind you can find on Amazon for a few dollars) to smooth the curved parts. But honestly? I just grabbed my favorite star piping tip and piped little stars all over the cake. It looked messy in a cute way, and no one noticed the uneven frosting. Win!
The Final Result (Spoiler: It’s Adorable!)

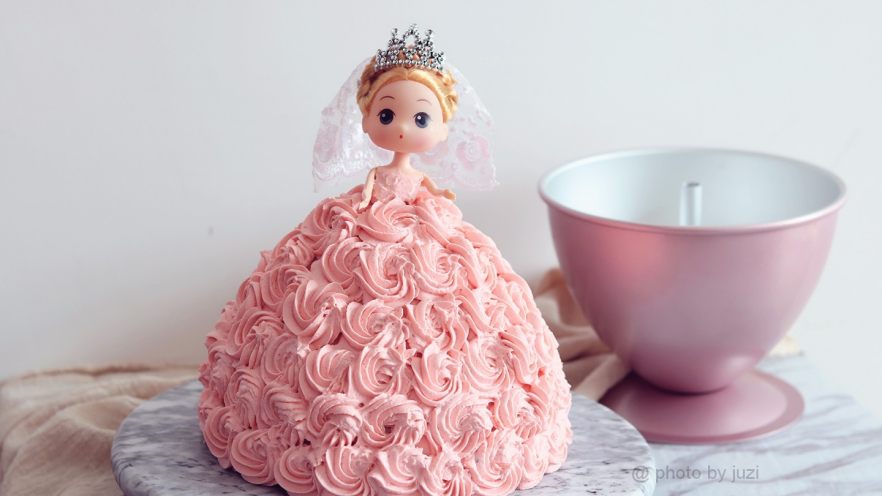
Here’s the finished cake! My niece’s eyes lit up when she saw it, and all her friends kept saying, “Did you really make that?” Even though it wasn’t perfect, it was full of love—and that’s what matters, right? The cake was fluffy, the frosting was sweet, and everyone had a great time eating it.

Another angle of the finished cake—see how the pink frosting looks like a pretty dress? I added a few extra stars on the bottom for fun, but you can decorate it however you want. Some people add sprinkles, edible glitter, or even little fondant flowers. The possibilities are endless!
Pro Tips to Make This Even Easier
- Oven temperature: The 160°C (320°F) is a guideline—every oven is different. If your cake is browning too fast, lower the temp by 10°C. If it’s not rising, check if your oven is preheated properly.
- Plastic wrap for Barbie: Don’t forget to wrap her lower half! I once skipped this and ended up with cake crumbs in her hair. Not cute.
- Piping tips: If you don’t have a piping bag, you can use a plastic zip-top bag—just cut a small hole in the corner and put the tip inside.
- Make ahead: You can bake the cake a day in advance and store it in an airtight container. Frost it the day of the party so the cream stays fresh.
Final Thoughts: You’ve Got This!
Making a Barbie doll cake might seem scary at first, but this recipe is designed for beginners. You don’t need fancy tools, perfect smoothing skills, or years of baking experience—just a little patience and a love for cute desserts. Whether you’re making it for a birthday, a sleepover, or just because, this cake will bring smiles to everyone’s faces. So grab your ingredients, turn on some music, and let’s bake—you’re going to nail it!


![Homemade Cheesy Beef Burger Recipe: Better Than Fast Food! [Easy DIY Guide]](https://hearthsiderecipes.com/images/1713/pi0xfutbvri.jpg "Homemade Cheesy Beef Burger Recipe: Better Than Fast Food! [Easy DIY Guide]")