




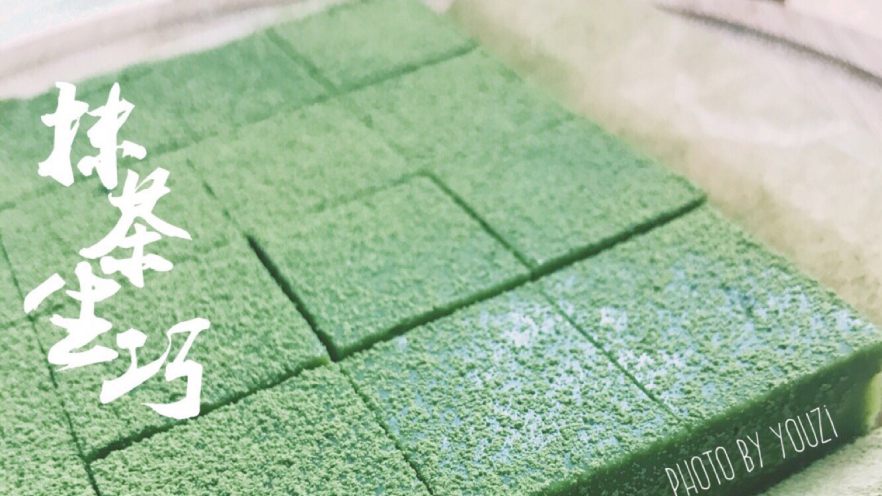

Why I Fell in Love with Making Matcha Nama Chocolate
Let me start by saying—I’m obsessed with matcha. Like, obsessed. But what’s even better than matcha lattes or matcha cookies? Matcha nama chocolate. If you’ve never had it, it’s this silky, melt-in-your-mouth treat that’s basically a hug for your taste buds. And guess what? I didn’t always nail it. Oh no, I went through so many “meh” batches before I got this recipe right.
Here’s the tea: I’ve got a crew of matcha-crazy besties. Every time we hang out, their first question is, “You got any matcha snacks?” So I took it as a challenge. I tested different ratios, burned a few chocolate batches (oops), and even cried a little when one batch turned into a grainy mess. But finally—finally!—I landed on this perfect recipe. It’s creamy, has just the right amount of matcha bitterness, and is so easy you won’t believe it.
Ingredients You’ll Need for Matcha Nama Chocolate
First things first: gather your stuff. No fancy gadgets here—just basic kitchen tools and ingredients you can grab at the grocery store. Let’s list ’em out:
- 80g white chocolate (use good quality—trust me, it makes a difference!)
- 30g unsalted butter (cut into small chunks, super important later)
- 50g cream cheese (softened a little, but not too melty)
- 40g heavy cream (the full-fat kind—no skimping on creaminess!)
- 5g high-quality matcha powder (avoid cheap stuff; it’ll taste grassy)
Pro tip: Don’t skip the good matcha. I tried a budget brand once, and the chocolate tasted like I’d sprinkled lawn clippings on it. Not cute.
Step-by-Step Guide to Making Perfect Matcha Nama Chocolate
Okay, let’s dive in! I’ve broken this down into super simple steps with pics to help you out. No stress—you’ve got this.
Step 1: Prep Your Ingredients (Don’t Skip This!)

First, weigh everything out. I know, I know—measuring cups are easier, but for chocolate recipes, scales are non-negotiable. A little extra cream or chocolate can mess up the texture. So grab your kitchen scale and get precise.
Step 2: Melt the White Chocolate

Pop your white chocolate into a stainless steel bowl. Then set that bowl over a pot of simmering water (make sure the bowl doesn’t touch the water—we’re doing a double boiler here). Stir it every now and then until it’s smooth.
Step 3: Get That Chocolate Silky Smooth

Keep stirring until there are zero lumps left. It should look like liquid silk. If you see any chunks, keep melting—don’t rush this part!
Step 4: Soften and Whip the Cream Cheese

Take your cream cheese and put it in another bowl. Use the leftover heat from the double boiler (turn off the stove first!) to soften it a little. Then grab a hand mixer (or a whisk if you’re feeling strong) and whip it until it’s super smooth—no lumps allowed.
Step 5: Mix Cream Cheese into Chocolate

Pour the whipped cream cheese into the melted white chocolate. Stir them together gently. At first, it might look a little weird—like the cheese is fighting the chocolate—but keep going!
Step 6: Don’t Panic About the Texture

As you stir, the mixture might turn a pale yellow, and you might see some water-oil separation. Relax! That’s totally normal. It’ll fix itself later, I promise.
Step 7: Heat the Heavy Cream

Now, take your heavy cream and heat it in a small pot until it just starts to boil (bubbles around the edges). Don’t let it boil like crazy—we just want it hot enough to melt everything together.
Step 8: Pour Cream into the Chocolate Mixture

Slowly pour the hot cream into the chocolate-cheese mix. Stir as you pour—this is where the magic happens!
Step 9: Stir Until It’s Liquidy

Keep stirring until the whole thing turns into a smooth, runny liquid. No more lumps, no more separation—just silky goodness.
Step 10: Add the Butter

Remember those small butter chunks I told you to cut? Toss them into the warm mixture. The residual heat will melt the butter—no need to reheat.
Step 11: Stir Until Butter Is Gone

Stir until the butter is completely melted and mixed in. If you didn’t cut the butter small, this part will take forever—so thank past you for listening!
Step 12: Sift in the Matcha Powder

Here’s the key to non-grassy matcha: sift it! Put your matcha powder through a fine-mesh sieve into the mixture. If you skip sifting, you’ll get little clumps of matcha that taste bitter. Trust me—sift.
Step 13: Mix in the Matcha

Stir the matcha into the chocolate until it’s evenly green. No streaks, no clumps—just that beautiful, vibrant matcha color.
Step 14: Optional (But Game-Changing) Blend

Want next-level creaminess? Grab a hand blender and give the mixture a quick blend. It’ll get so smooth you’ll want to eat it right from the bowl (I won’t tell).
Step 15: Blend Until Silky

Blend for 10-15 seconds—don’t overdo it! You just want to make it extra velvety.
Step 16: Check the Texture

After blending, the chocolate should be super smooth and glossy. If it’s still a little thick, don’t worry—it’ll set up in the fridge.
Step 17: Pour into a Mold

Line a small mold (or a square pan) with parchment paper. Pour the matcha chocolate mixture into it. Smooth the top with a spatula.
P.S. My mold is custom—spired by tofu molds! If you want one like mine, hit me up. But any regular mold or pan works too.
Step 18: Chill Overnight

Pop the mold into the fridge and let it chill for at least 8 hours (or overnight). Don’t try to cut it early—it’ll be too soft and messy.
Step 19: Cut and Dust with Matcha

The next day, take the chocolate out of the mold and cut it into small squares. Then sift a little extra matcha powder on top for that perfect finish.
My Top Tips for Matcha Nama Chocolate Success
I’ve made this recipe so many times, I’ve learned a few tricks to avoid disasters. Here are my must-dos:
- Use high-quality white chocolate: Cheap chocolate has more additives that mess up the texture.
- Don’t overheat the cream: Boiling it too hard can make the chocolate grainy.
- Sift the matcha: No clumps = better taste and texture.
- Chill overnight: Patience is key! Cutting it too early will ruin all your hard work.
Final Thoughts: Enjoy Your Homemade Matcha Nama Chocolate!
And there you have it—your very own matcha nama chocolate. Take a bite, and let that creamy, matcha-y goodness melt in your mouth. I promise your matcha-loving friends (and you!) will be obsessed.
Have you tried making matcha nama chocolate before? Did you have any mishaps? Drop a comment below—I’d love to hear your stories!
![Homemade Cheesy Beef Burger Recipe: Better Than Fast Food! [Easy DIY Guide]](https://hearthsiderecipes.com/images/1713/pi0xfutbvri.jpg "Homemade Cheesy Beef Burger Recipe: Better Than Fast Food! [Easy DIY Guide]")